09 Alternatives
Overview
This tutorial will show you how to calculate a route with up to 3 alternatives.
Base
As always you can use your results from the previous Tutorial08 as a base for our new project.
A route overview
First we will implement a new Activity showing the complete route and some metrics which will be shown right after the route calculation.
We call the activity RouteInfoActivity and the xml activity_route_info. The layout basically consists of a RelativeLayout with four buttons for the metrics inside and a MapView showing the current route trace. In the res folder of Tutorial09 you will find all graphics you need for the metric buttons.
<?xml version="1.0" encoding="utf-8"?>
<RelativeLayout xmlns:android="http://schemas.android.com/apk/res/android"
    xmlns:app="http://schemas.android.com/apk/res-auto"
    xmlns:tools="http://schemas.android.com/tools"
    android:id="@+id/activity_main"
    android:layout_width="match_parent"
    android:layout_height="match_parent"
    tools:context="com.ptvag.navigation.tutorial.RouteInfoActivity">

    <RelativeLayout
        android:id="@+id/infoMain"
        android:layout_width="match_parent"
        android:layout_height="100dp"
        android:background="@color/colorPrimaryDark"
        android:gravity="top">

        <Button
            android:id="@+id/distanceInfo"
            style="@style/Widget.AppCompat.Button.Borderless"
            android:layout_width="wrap_content"
            android:layout_height="wrap_content"
            android:drawableTop="@drawable/arw_destination_dist"
            android:gravity="center_horizontal|bottom"
            android:textAllCaps="false"
            android:text="2.3 km" />

        <Button
            android:id="@+id/timeInfo"
            style="@style/Widget.AppCompat.Button.Borderless"
            android:layout_width="wrap_content"
            android:layout_height="wrap_content"
            android:layout_toRightOf="@id/distanceInfo"
            android:drawableTop="@drawable/arw_destination"
            android:gravity="center_horizontal|bottom"
            android:textAllCaps="false"
            android:text="25 min" />

        <Button
            android:id="@+id/trafficInfo"
            style="@style/Widget.AppCompat.Button.Borderless"
            android:layout_width="wrap_content"
            android:layout_height="wrap_content"
            android:layout_toRightOf="@id/timeInfo"
            android:drawableTop="@drawable/icon_traffic_blocked"
            android:gravity="center_horizontal|bottom"
            android:textAllCaps="false"
            android:text="10 min" />

        <Button
            android:id="@+id/tollInfo"
            style="@style/Widget.AppCompat.Button.Borderless"
            android:layout_width="wrap_content"
            android:layout_height="wrap_content"
            android:layout_toRightOf="@id/trafficInfo"
            android:drawableTop="@drawable/icon_toll"
            android:gravity="center_horizontal|bottom"
            android:textAllCaps="false"
            android:text="500 m" />
    </RelativeLayout>

    <com.ptvag.navigation.tutorial.MapView
        android:id="@+id/map"
        android:layout_below="@id/infoMain"
        android:layout_width="match_parent"
        android:layout_height="match_parent"/>

    <android.support.design.widget.FloatingActionButton
        android:layout_width="wrap_content"
        android:layout_height="wrap_content"
        android:layout_margin="16dp"
        android:src="@android:drawable/ic_dialog_map"
        android:layout_alignParentBottom="true"
        android:layout_alignParentRight="true"
        android:onClick="onFloatingButtonClicked"/>

</RelativeLayout>
This code should look familiar to you. We just implement an Activity with a MapView inside. The new thing is that we call MapView.zoom2Route() in the onInitialize listener. Don't forget to register the RouteInfoActivity in the AndroidManifest.xml! We start the Activity when the route was successfully calculated in the MainActivity (instead of calling navigationLoop.startNavigation()). When you calculate a route now we should see our RouteInfoActivity with a centered route trace.
public class RouteInfoActivity extends DrawerActivity implements OnInitializeListener {
    private MapView mapView;

    @Override
    public void onCreate(Bundle savedInstanceState) {
        super.onCreate(savedInstanceState);
        setContentView(R.layout.activity_route_info);

        mapView = (MapView)findViewById(R.id.map);
        mapView.setOnInitializeListener(this);

        Button distanceInfo = (Button)findViewById(R.id.distanceInfo);
        Button timeInfo = (Button)findViewById(R.id.timeInfo);
        Button trafficInfo = (Button)findViewById(R.id.trafficInfo);
        Button tollInfo = (Button)findViewById(R.id.tollInfo);
    }

    @Override
    public void onResume() {
        super.onResume();
        mapView.resume();
    }

    @Override
    public void onPause() {
        super.onPause();
        mapView.finish();
    }

    @Override
    public void onInitialize() {
        mapView.zoom2Route();
        mapView.update();
    }

    @Override
    public void onFirstTimeDrawn() {

    }
}
<?xml version="1.0" encoding="utf-8"?>
<manifest xmlns:android="http://schemas.android.com/apk/res/android"
    package="com.ptvag.navigation.tutorial">
    ...

    <application
        ...
        <activity android:name=".SearchActivity"></activity>
        <activity android:name=".ResultListActivity"></activity>
        <activity android:name=".RouteInfoActivity"></activity>
        <activity android:name=".TrafficActivity"></activity>
    </application>
</manifest>
public class MainActivity extends DrawerActivity implements OnInitializeListener {
    ...

    void handleIntent(Intent intent) {
        ...
        Runnable calcRoute = new Runnable() {
            @Override
            public void run() {
                ...

                try {
                    Tour tour = new Tour(start);

                    tour.addStation(new WayPoint(destination));

                    CalculateTourResult result =
                            NavigationSDK.calculateTour(tour, calcRouteObserver);

                    if (result.getError() != SDKErrorCode.Ok) {
                        Log.v("Error", result.getError().toString());
                    } else {
                        Intent intent = new Intent(MainActivity.this, RouteInfoActivity.class);
                        startActivity(intent);
                    }
                } catch (CalculateTourException | NavigationException e) {
                    e.printStackTrace();
                }
            }
        };
        ...
    }
    ...
}
Now let us fill the metric buttons with some values. For this purpose we show from left to right the distance to destination, the estimated time of arrival, the delay caused by traffic and the covered distance on toll roads. All this information about the current route can be obtained by calling NavigationSDK.getRouteInformation(). The RouteInformation class can give you several infos like distance, duration, toll information and restrictions on your current route. To access the traffic delay we simply call NavigationSDK.getTrafficDelayOnRoute(). Like in Tutorial06 we format the distances with NavigationSDK.getLocalizedDistanceString.
public class RouteInfoActivity extends DrawerActivity implements OnInitializeListener {
    ...
    @Override
    public void onCreate(Bundle savedInstanceState) {
        super.onCreate(savedInstanceState);
        setContentView(R.layout.activity_route_info);

        mapView = (MapView)findViewById(R.id.map);
        mapView.setOnInitializeListener(this);

        Button distanceInfo = (Button)findViewById(R.id.distanceInfo);
        Button timeInfo = (Button)findViewById(R.id.timeInfo);
        Button trafficInfo = (Button)findViewById(R.id.trafficInfo);
        Button tollInfo = (Button)findViewById(R.id.tollInfo);

        RouteInformation info = NavigationSDK.getRouteInformation(0, 0);

        distanceInfo.setText(NavigationSDK.getLocalizedDistanceString(info.getLength(), false));

        tollInfo.setText(NavigationSDK.getLocalizedDistanceString(info.getTollInformation().getTollLength(), false));

        Calendar destCalendar = Calendar.getInstance();
        destCalendar.add(Calendar.SECOND, (int)info.getDuration());
        SimpleDateFormat formatter = new SimpleDateFormat("hh:mm");
        timeInfo.setText(formatter.format(destCalendar.getTime()));

        long trafficTime = NavigationSDK.getTrafficDelayOnRoute(true, 0);
        long hours = trafficTime / 3600;
        long minutes = (trafficTime % 3600) / 60;
        trafficInfo.setText("+ " + hours + " h " + minutes + " min");
    }
    ...
}
Finally we need a way to switch back to the MainActivity and start the navigation. So we just send a startDestination intent to the MainActivity when the floatin action button is clicked.
Attention
We start the activity with the flags Intent.FLAG_ACTIVITY_CLEAR_TOP and Intent.FLAG_ACTIVITY_SINGLE_TOP to reuse the current MainActivity and avoid a new instance of it!
public class RouteInfoActivity extends DrawerActivity implements OnInitializeListener {
    ...
    public void onFloatingButtonClicked(View view)
    {
        Intent intent = new Intent(this, MainActivity.class);
        intent.putExtra("startNavigation", "foo");
        intent.addFlags(Intent.FLAG_ACTIVITY_CLEAR_TOP | Intent.FLAG_ACTIVITY_SINGLE_TOP);

        startActivity(intent);
    }
}
Now we add code for handling the startNavigation intent in our MainActivity and call navigationLoop.startNavigation() to have a fully working navigation again.
public class MainActivity extends DrawerActivity implements OnInitializeListener {
    ...
    void handleIntent(Intent intent) {
        if (intent.hasExtra("startNavigation")) {
            navigationLoop.startNavigation();
            intent.removeExtra("startNavigation");
            return;
        }
        ...
    }
    ...
}
Enabling alternative routes
Enabling alternatives for the route calculation is as easy as setting the RouteCalculationType to RouteAlternative in the setDefaultRoutingOptions of the Application class.
public class Application extends android.app.Application {

    @Override
    public void onCreate() {
        super.onCreate();
        ...

        setDefaultRoutingOptions();
    }
    ...
    private void setDefaultRoutingOptions() {
        try
        {
            Result<RouteOptions> result = NavigationSDK.getRoutingOptions();
            RouteOptions options = result.getResult();
            options.setRouteCalculationType(RouteCalculationType.RouteAlternative);
            ...
        } ...
    }
    ...
}
Switching alternative routes
At last we want to have a mechanism to switch between all given alternatives. The following NavgationSDK methods are helpful for us:
getAlternativeRouteCount()receive the amount of alternatives (including the default currently <= 3)getAlternativeRouteActive()receive the active alternativesetAlternativeRouteActive(alt)set the active alternative (also highlights the active route trace)getRouteInformation(0, alt)obtain the RouteInformation for the alternativesgetTrafficDelayOnRoute(true, alt)obtain the delay caused by traffic on the selected alternative
To show all calculated alternatives we will modify our RouteInfoActivity to show up to three tabs containing the alternatives. As always the description of the UI needed for the tabbed display is beyond of the scope of this tutorial. But our earlier introduces helper module has two classes which assist us by accomplishing our goal.
TabsActivityan activity combining the drawer functionality with tabs and a ViewPagerViewPagerAdapteran adapter we can fill with fragments the TabsActivity will load in their tabs
So first we have to convert our RouteInfoActivity into a Fragment. We rename it to RouteInfoFragment and also rename the layout to fragment_route_info. After that we have to move our code from onCreate to onCreateView and inflate our layout ourself and operate on the resulting view. Thats all to get a working Fragment.
...
import android.support.v4.app.Fragment;
...

public class RouteInfoFragment extends Fragment implements OnInitializeListener {
    private MapView mapView;

    public RouteInfoFragment() {
    }


    @Override
    public View onCreateView(LayoutInflater inflater, ViewGroup container,
                                                Bundle savedInstanceState) {
        View view = inflater.inflate(R.layout.fragment_route_info, container, false);

        mapView = (MapView)view.findViewById(R.id.map);
        mapView.setOnInitializeListener(this);

        Button distanceInfo = (Button)view.findViewById(R.id.distanceInfo);
        Button timeInfo = (Button)view.findViewById(R.id.timeInfo);
        Button trafficInfo = (Button)view.findViewById(R.id.trafficInfo);
        Button tollInfo = (Button)view.findViewById(R.id.tollInfo);

        RouteInformation info = NavigationSDK.getRouteInformation(0, 0);

        distanceInfo.setText(
            NavigationSDK.getLocalizedDistanceString(info.getLength(), false)
        );

        tollInfo.setText(
            NavigationSDK.getLocalizedDistanceString(
                info.getTollInformation().getTollLength(), false
            )
        );

        Calendar destCalendar = Calendar.getInstance();
        destCalendar.add(Calendar.SECOND, (int)info.getDuration());
        SimpleDateFormat formatter = new SimpleDateFormat("hh:mm");
        timeInfo.setText(formatter.format(destCalendar.getTime()));

        long trafficTime = NavigationSDK.getTrafficDelayOnRoute(true, 0);
        long hours = trafficTime / 3600;
        long minutes = (trafficTime % 3600) / 60;
        trafficInfo.setText("+ " + hours + " h " + minutes + " min");

        return view;
    }

    @Override
    public void onResume() {
        super.onResume();
        mapView.resume();
    }

    @Override
    public void onPause() {
        super.onPause();
        mapView.finish();
    }

    @Override
    public void onInitialize() {
        mapView.zoom2Route();
        mapView.update();
    }

    @Override
    public void onFirstTimeDrawn() {

    }
}
Now we need a new RouteInfoActivity which holds our newly created fragment. To add a fragment view override setupViewPager and set it a ViewPageAdapter with one new RouteInfoFragment. Additionally we move the onFloatingButtonClicked from our Fragment to this Activity.
public class RouteInfoActivity extends TabsActivity {
    @Override
    protected void setupViewPager(ViewPager viewPager) {
        ViewPagerAdapter adapter = new ViewPagerAdapter(getSupportFragmentManager());
        adapter.addFragment(new RouteInfoFragment(), "title");

        viewPager.setAdapter(adapter);
    }

    @Override
    protected void onCreate(Bundle savedInstanceState) {
        super.onCreate(savedInstanceState);
        inflateNavigationMenu(R.menu.drawer_menu);
    }

    public void onFloatingButtonClicked(View view)
    {
        Intent intent = new Intent(this, MainActivity.class);
        intent.putExtra("startNavigation", "foo");
        intent.addFlags(Intent.FLAG_ACTIVITY_CLEAR_TOP | Intent.FLAG_ACTIVITY_SINGLE_TOP);

        startActivity(intent);
    }
}
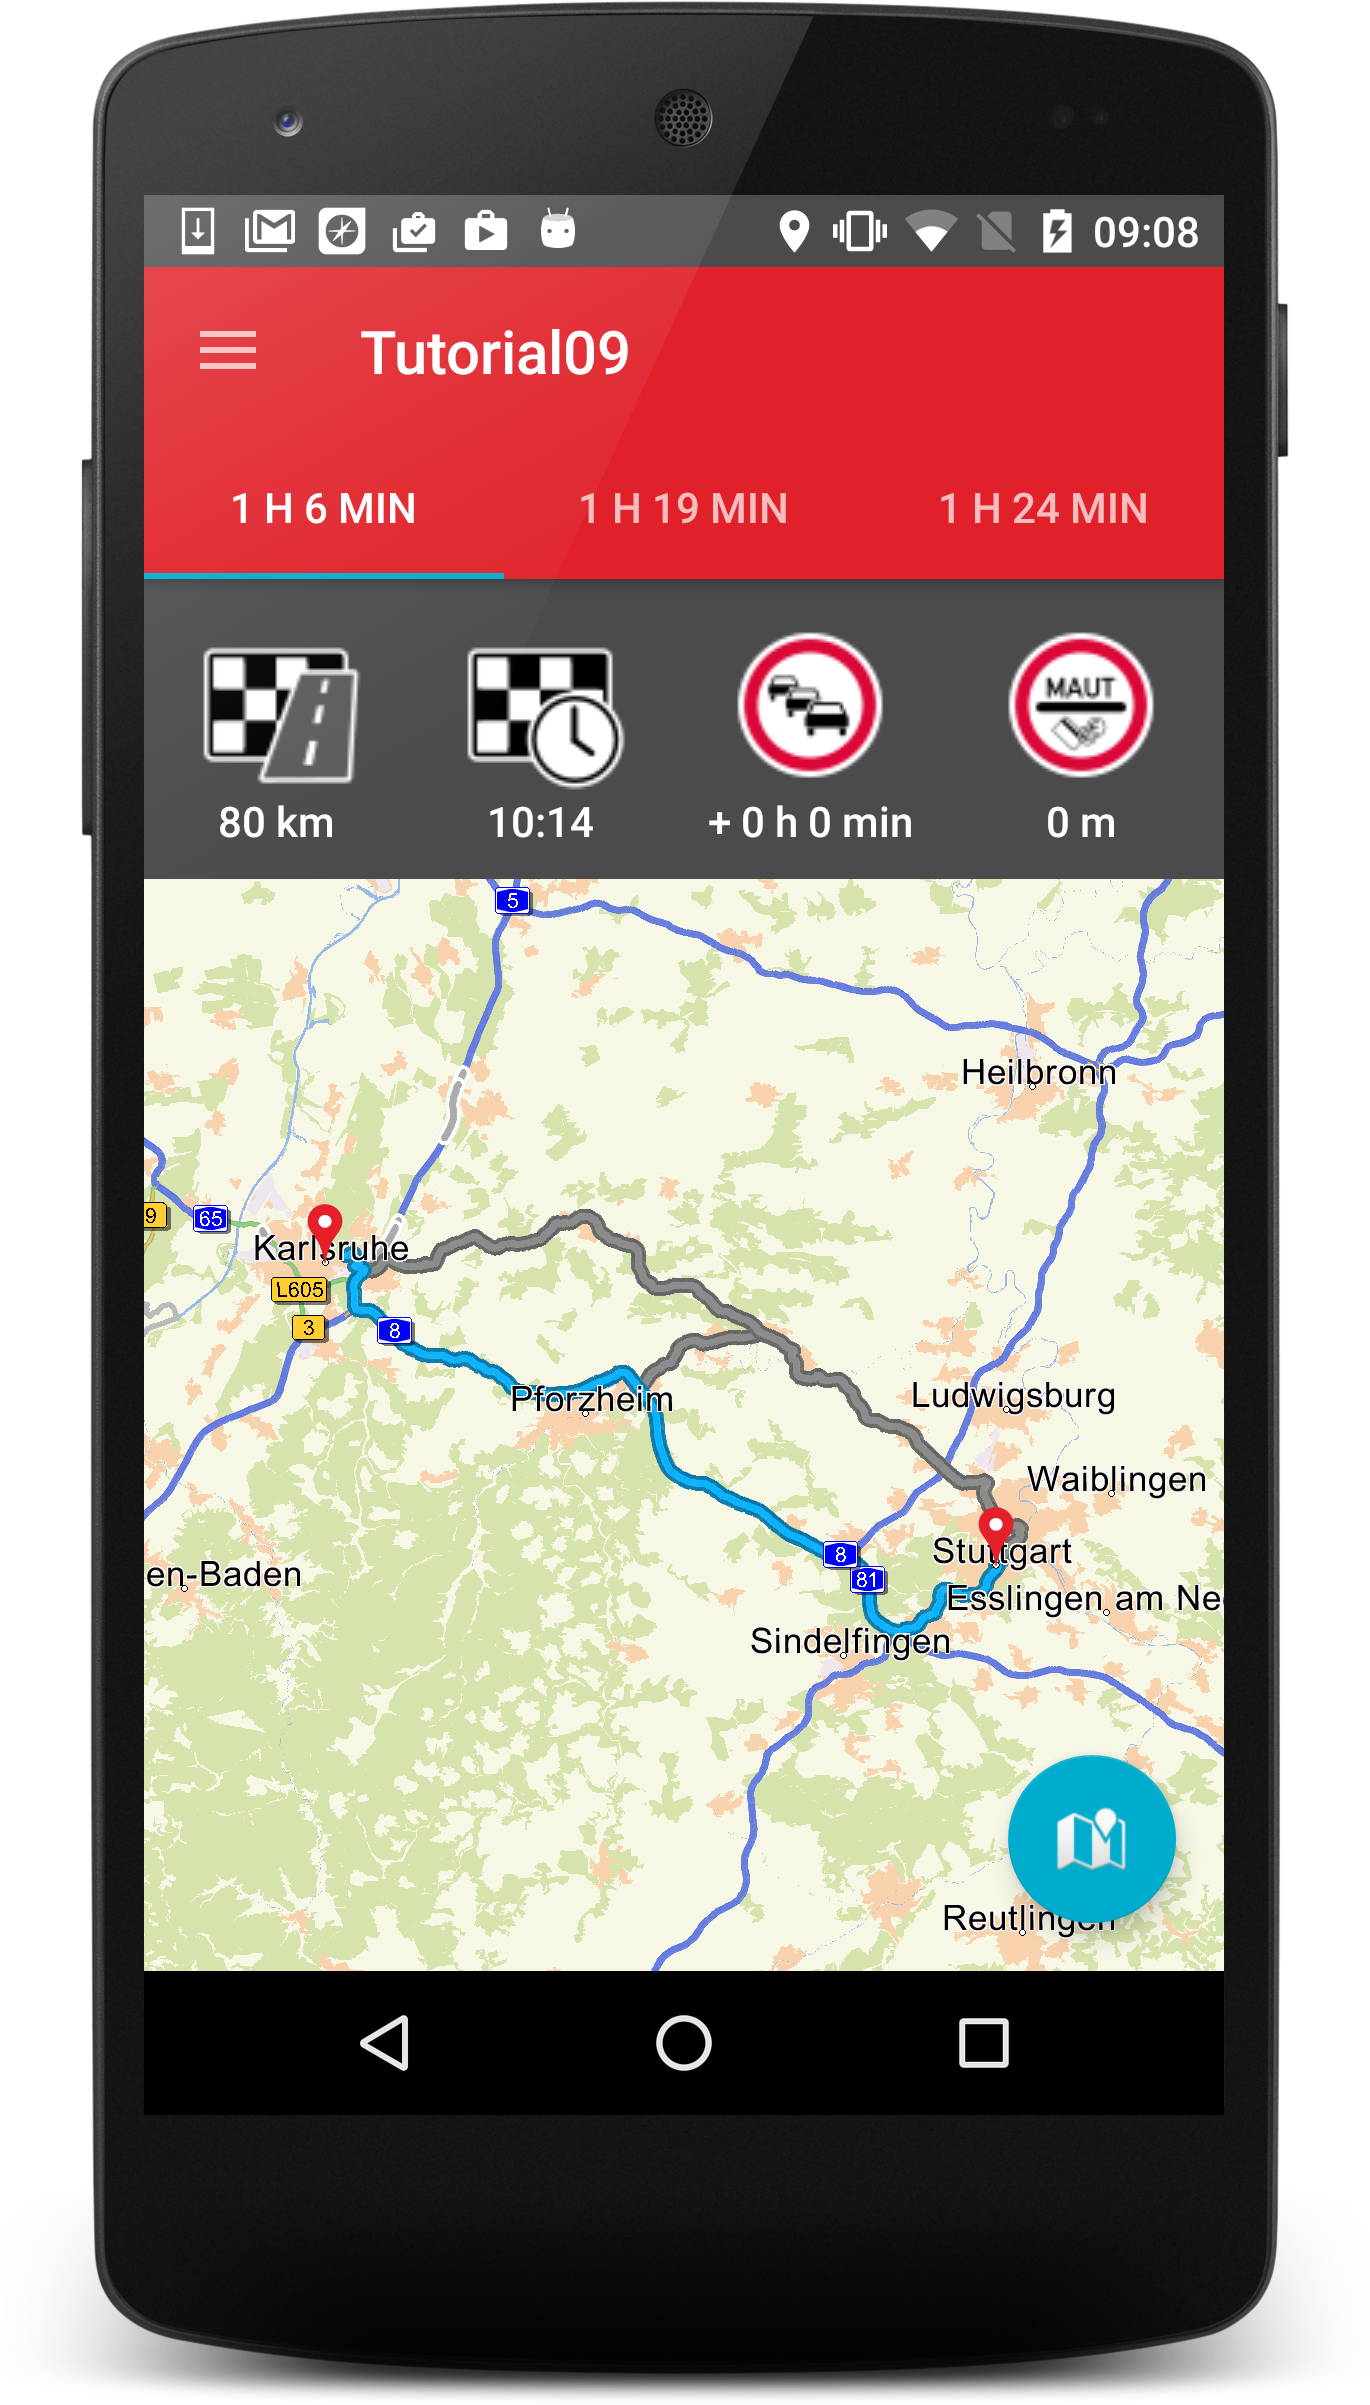
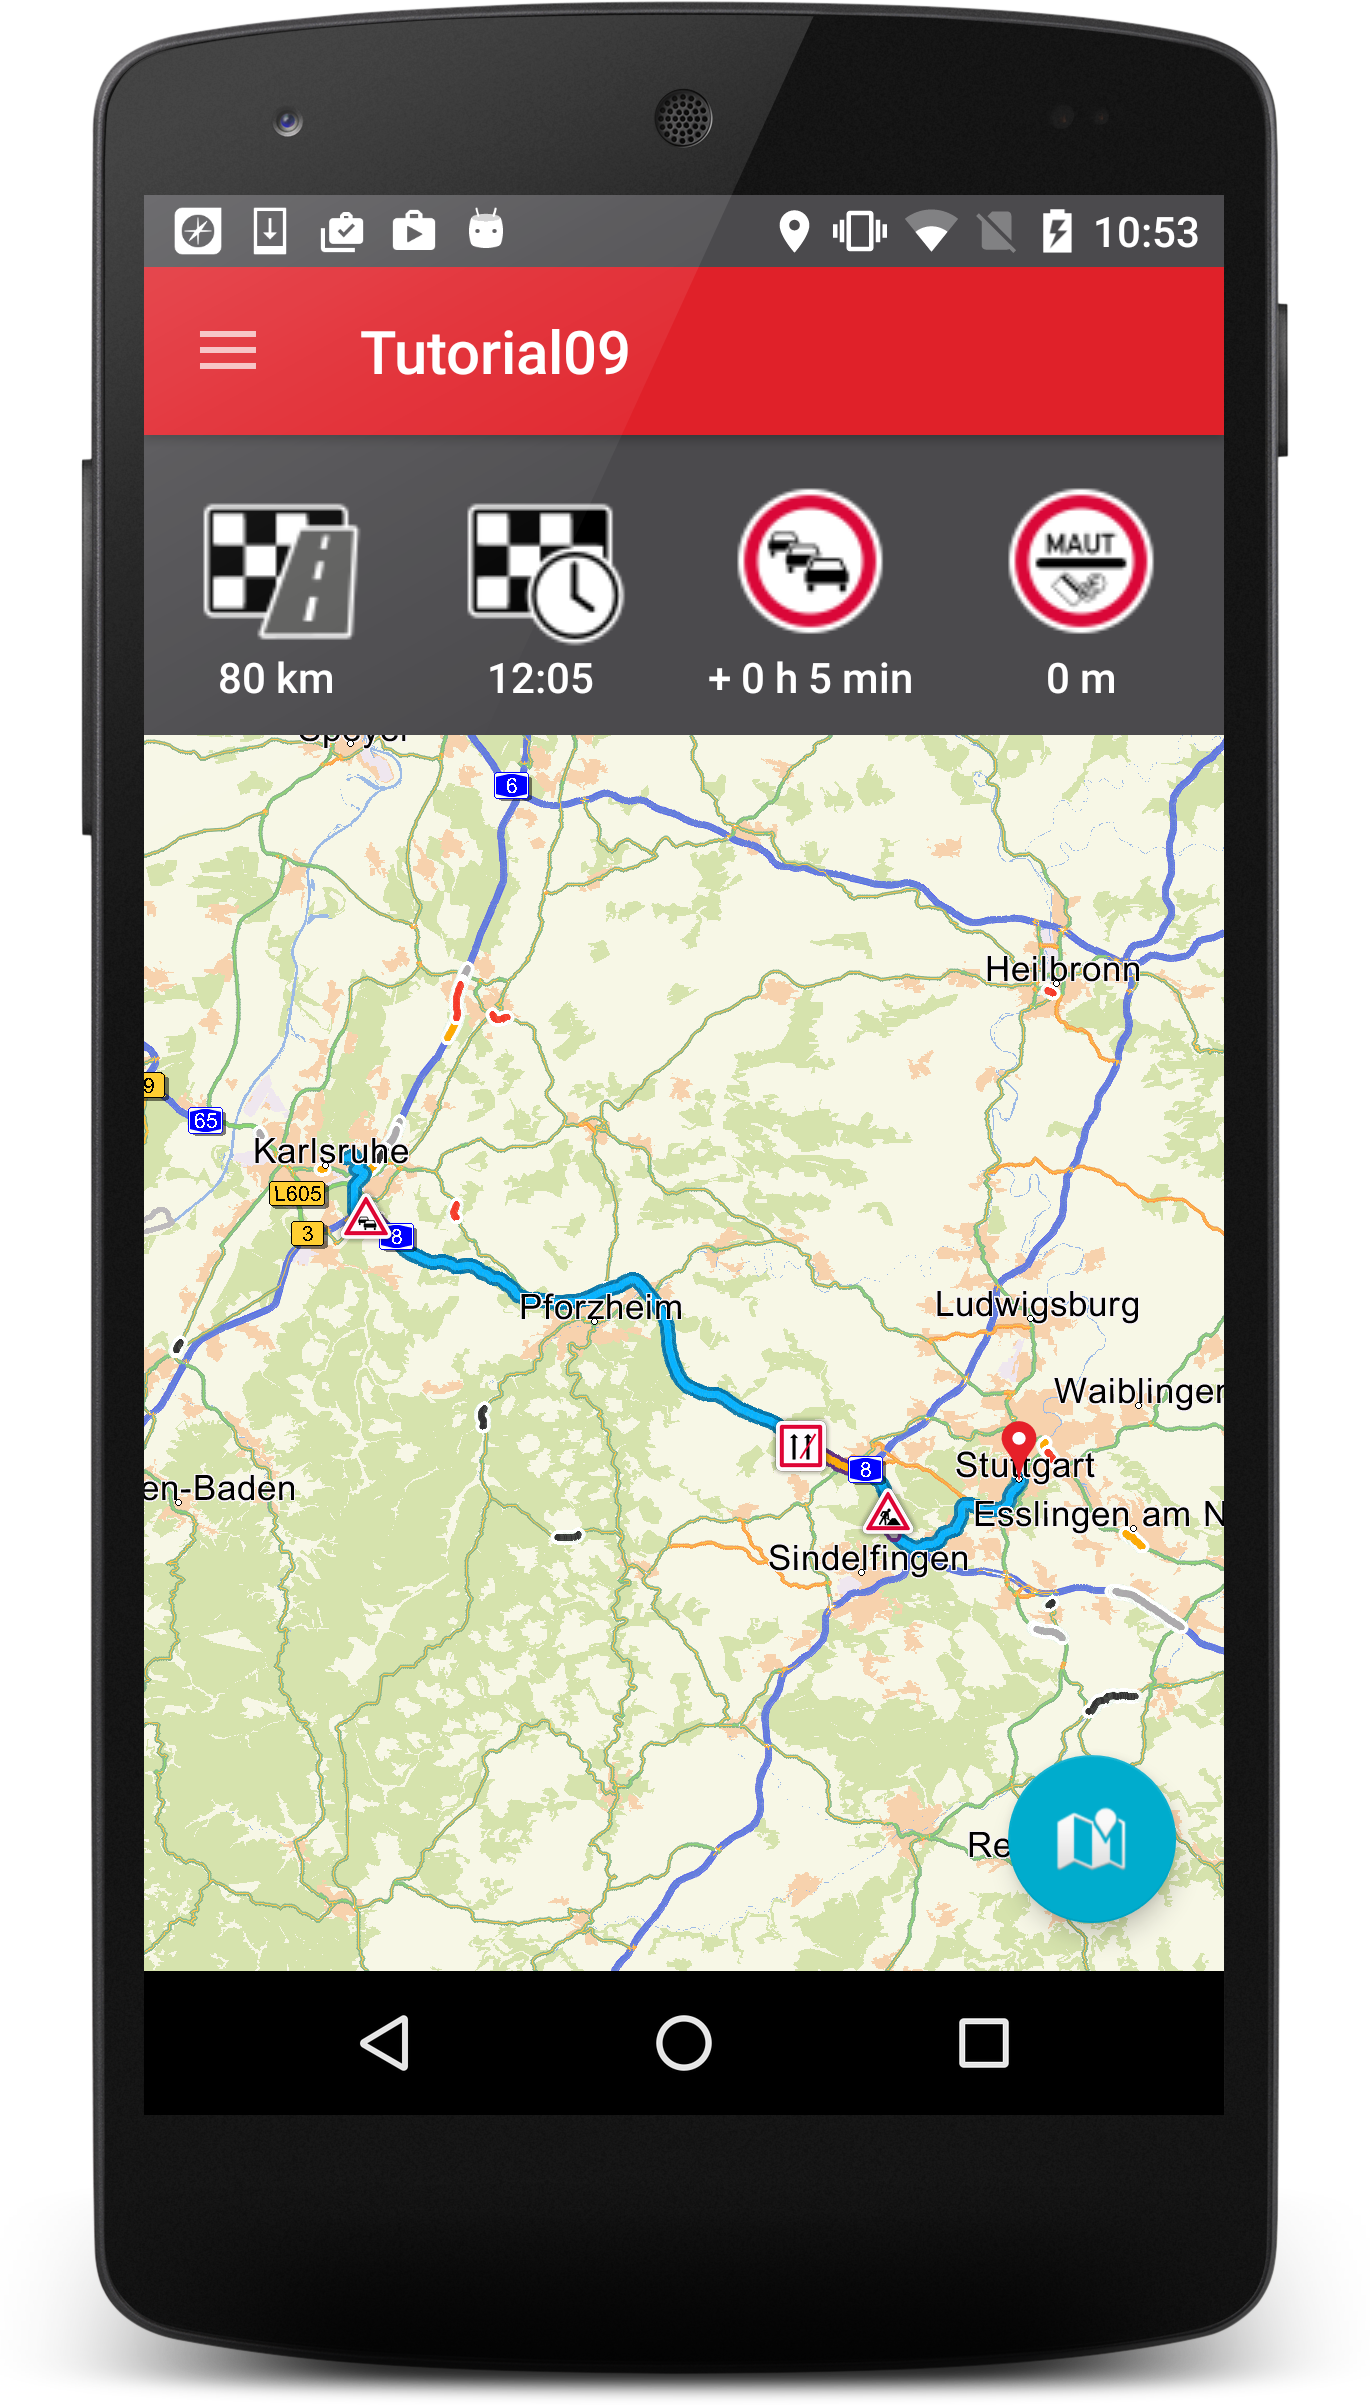
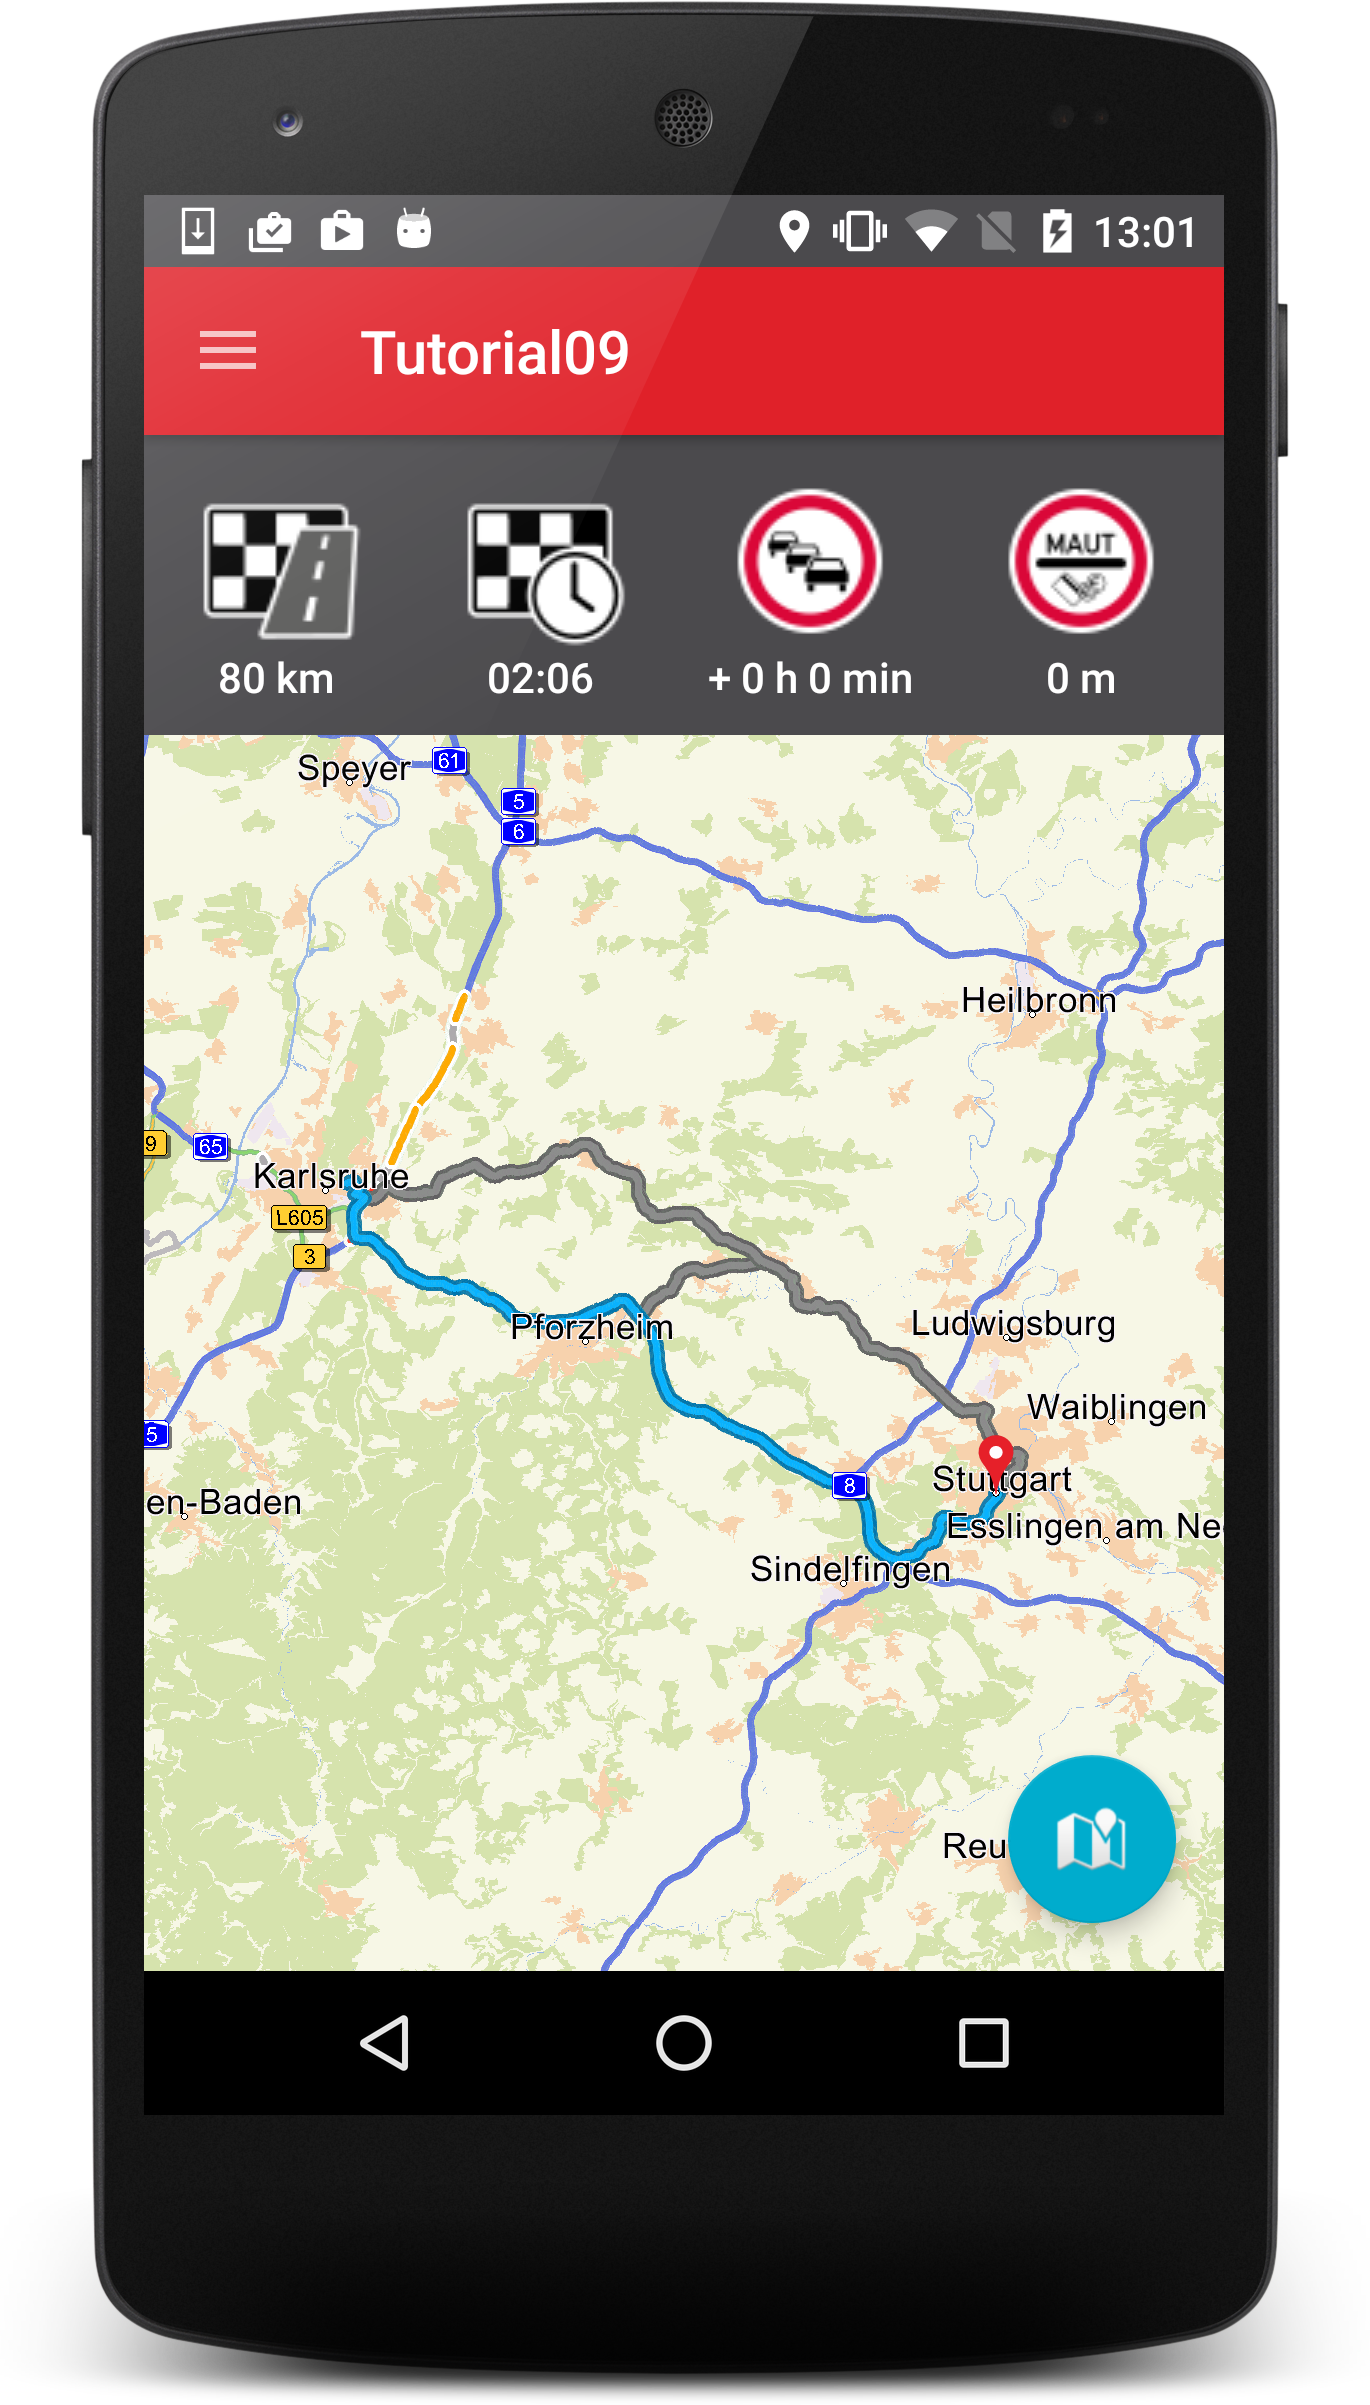
After this we should have a RouteInfoActivity with one tab and the same behaviour as before. So we can now alter our RouteInfoFragment to represent the alternatives. We introduce a setter for the index of the alternative in RouteInfoFragment and increase the amount of Fragments in RouteInfoActivity to the amount given by NavigationSDK.getAlternativeRouteCount(). Also we replace the title of the tabs with the total formatted duration of the alternative by calling NavigationSDK.getRouteInformation(0, alternative).getDuration().
public class RouteInfoFragment extends Fragment implements OnInitializeListener {
    ...
    private int alternative = 0;

    public RouteInfoFragment() {
    }

    public RouteInfoFragment setAlternative(int alternative) {
        this.alternative = alternative;

        return this;
    }
    ...
}
public class RouteInfoActivity extends TabsActivity {
    @Override
    protected void setupViewPager(ViewPager viewPager) {
        ViewPagerAdapter adapter = new ViewPagerAdapter(getSupportFragmentManager());

        int count = NavigationSDK.getAlternativeRouteCount();
        for (int i = 0; i < count; ++i) {
            long duration = NavigationSDK.getRouteInformation(0, i).getDuration();
            adapter.addFragment(new RouteInfoFragment().setAlternative(i), format(duration));
        }

        viewPager.setAdapter(adapter);
    }

    String format(long duration){
        long hours = duration / 3600;
        long minutes = (duration % 3600) / 60;

        return "" + hours + " h " + minutes + " min";
    }
    ...
}
The final thing to do is now to replace the routeInformation calls in RouteInfoFragment with their alternatives counterparts and activate the alternative of the fragment in the onInitialize listener by calling NavigationSDK.setAlternativeRouteActive(alternative).
public class RouteInfoFragment extends Fragment implements OnInitializeListener {
    ...
    @Override
    public View onCreateView(LayoutInflater inflater, ViewGroup container, Bundle savedInstanceState) {
        View view = inflater.inflate(R.layout.fragment_route_info, container, false);

        mapView = (MapView)view.findViewById(R.id.map);
        mapView.setOnInitializeListener(this);

        Button distanceInfo = (Button)view.findViewById(R.id.distanceInfo);
        Button timeInfo = (Button)view.findViewById(R.id.timeInfo);
        Button trafficInfo = (Button)view.findViewById(R.id.trafficInfo);
        Button tollInfo = (Button)view.findViewById(R.id.tollInfo);

        RouteInformation info = NavigationSDK.getRouteInformation(0, alternative);

        distanceInfo.setText(NavigationSDK.getLocalizedDistanceString(info.getLength(), false));

        tollInfo.setText(NavigationSDK.getLocalizedDistanceString(info.getTollInformation().getTollLength(), false));

        Calendar destCalendar = Calendar.getInstance();
        destCalendar.add(Calendar.SECOND, (int)info.getDuration());
        SimpleDateFormat formatter = new SimpleDateFormat("hh:mm");
        timeInfo.setText(formatter.format(destCalendar.getTime()));

        long trafficTime = NavigationSDK.getTrafficDelayOnRoute(true, alternative);
        long hours = trafficTime / 3600;
        long minutes = (trafficTime % 3600) / 60;
        trafficInfo.setText("+ " + hours + " h " + minutes + " min");

        return view;
    }
    ...
    @Override
    public void onInitialize() {
        NavigationSDK.setAlternativeRouteActive(alternative);
        mapView.zoom2Route();
        mapView.update();
    }
    ...
}
Voilà we should have our final result.
Attention
As soon as getGuidanceInformation is called for the first time the currently selected alternative will be the only selectable alternative. The SDK will remove the unwanted alternatives automatically.
Implications on navigation
If a navigation is started with an alternative route higher than 0, this has implications to navigation. Because any of these alternative routes are not the arithmetical optimal route, there is a risk, that reroutes will switch to the optimal one. Therefore a special mechanism is implemented: The chosen route will be stored during the whole navigation and its underlying segments get a small preference in reroutings. This should lead to a good trade-off finding reasonable reroutes, but also keeping the chosen alternative.