01 First project
Overview
The programming language used in the tutorials is Objective-C. For tutorial 10, which comprises all features, a Swift 4 version is included in the directory Tutorial10-Swift.
At the time of writing (December 2018) Xcode 10.1 is the latest version released by Apple. The latest iOS Version is 12.1. The deployment target of the NavigationSDK framework is set to iOS 9.3. The framework is delivered as a "fat framework", including architectures for x86_64 Simulators and ARM Devices (arm64 architecture).
This tutorial 01 will teach you the basics to create an iOS project with the NavigationSDK. You will learn how to add the NavigationSDK framework as a project dependency, how to initialize the SDK correctly and which additional data you need to use the SDK.
Note
If you just want to build and run the tutorial projects that are delivered with this SDK, you just have to copy the folders "navicoreFramework.framework" and "res" into the Tutorial folder of your choice. Open the .xcodeproj file in your Xcode IDE and build and run the application.
NavigationSDK files
docs(SDK documentation files)maps(prepackaged map data)res(necessary resources to run the tutorials, including the needed maps)sdk(NavigationSDK Framework "navicoreFramework.framework", including x86_64 code for running on the Simulator and ARM code for running on the device)tutorial(tutorial sources)license.key(license key for the SDK)
Attention
With your copy of the SDK you get a test license.key file. With this license.key you are able to test the SDK until a specified date. Please contact PTV if your test license.key has expired.
Create your first NavigationSDK project
To create your first NavigationSDK project, you have to create a new Xcode iOS Project. Use the simplest available application type "Single View". Use "Objective-C" as the language of choice. Set "Tutorial01" as the Project name to be in sync with this tutorial.
Add Framework and Resources
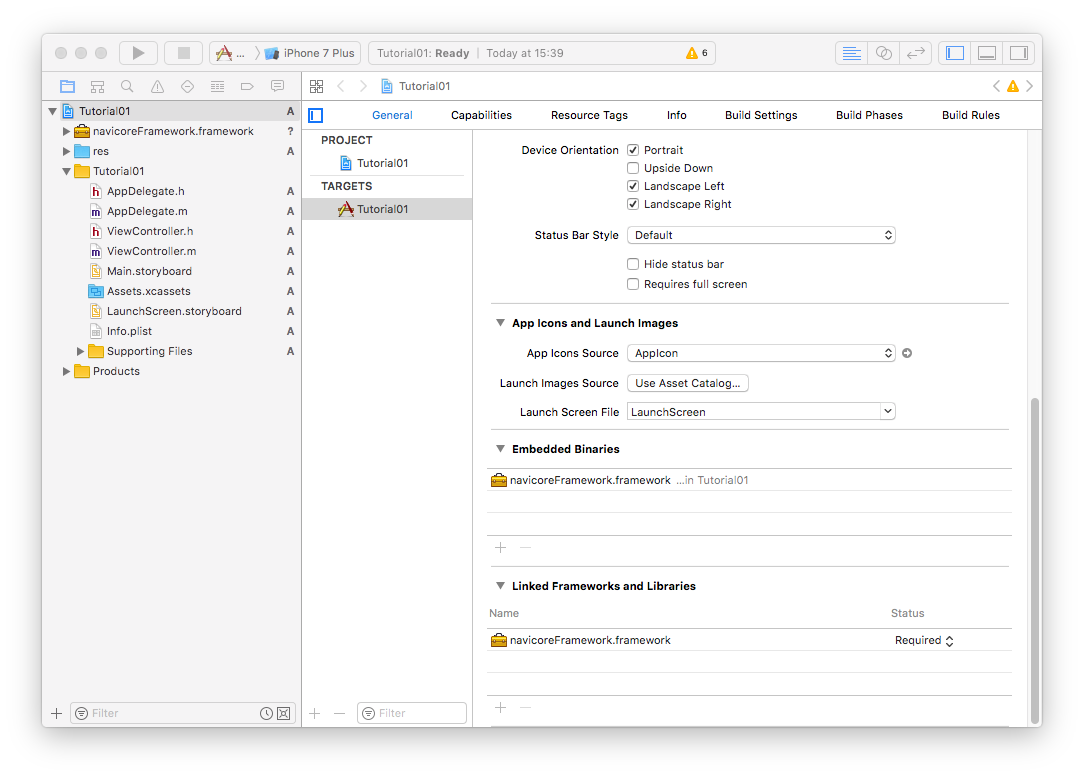
Now add the navicoreFramework to the project: Select the top file "Tutorial01" in the left Xcode pane and then select the tab "General" in the main pane. Open the Mac OS Finder, go to the "sdk" folder and drag the "navicoreFramework.framework" to the area "Embedded Binaries" in Xcode.
Open the Finder again and drag the folder "res" into the project. In the Xcode dialog choose "Copy items if needed" and "Create folder references". Verify that in the Project settings, tab "Build Phases", the "res" folder (and not the individual files) appears in the section "Copy Bundle Resources".
The project structure should look now like this:
Structure of the res folder
The folder "res" has the following three subdirectories:
maps(copy your map data here)
The maps directory is mandatory. All used maps must be copied to this folder. Copy only the files of the map folders, the maps directory does not accept subfolders. Deleting single files of a map will cause the SDK to not initialize, so be sure to always have complete maps consisting of many files with the same prefix.addr(copy your POI data here)
The addr directory contains the POI data and can be left empty if POIs are not used.-
data(copy the rendering data and yourlicense.keyhere)
This directory contains the subfoldersbmp,rendererandprofilesfor this tutorials.Generally, all files besides the
license.keyin the data directory are optional. The SDK will still work without the rendering data, but the map will look incomplete.In the top level, the
*.cmpfiles are used for all text renderings on the map. If you delete them, no street or town names will be rendered anymore. All other files in the top level directory of data can be removed, they are only used for the tutorials.In the
data\bmpdirectory you can find all icons that are directly rendered onto the map - like POI or restriction icons. If you don't need any of these icons, you can delete them. Please have in mind that a blue dot will be rendered for each POI as a fallback incase of POI data is present but icons are missing.In the
data\rendererdirectory reside the map design files. You can remove this directory if you don't want to change the map design.The
date\profilesdirectory contains files with predefined route options for various vehicles (see tutorial 5 for loading such files).
Note
Your SDK delivery contains a sample res folder which holds all necessary data for the complete tutorial and a map of Germany. If you want to have different maps, just replace the files inside the maps folder with your favored maps.
Initialize the NavigationSDK
First import the following header file of the SDK at the top of the AppDelegate.m file:
#import "navicoreFramework/NSDK_Navigation.h"
To initialize the NavigationSDK, we edit the didFinishLaunchingWithOptions: function in the AppDelegate.m file. The SDK initialize function needs three paths and a map name. The three paths are the maps, addr and data directories you just put in the application bundle by adding the res folder. The map name is the file name without the file extension (e.g. deu).
- (BOOL)application:(UIApplication *)application didFinishLaunchingWithOptions:(NSDictionary *)launchOptions {

    NSString *dir = [[NSBundle mainBundle] resourcePath];
    NSString* srcPath = [dir stringByAppendingPathComponent:@"res"];
    if (![[NSFileManager defaultManager] fileExistsAtPath:srcPath]){
        NSLog(@"res folder doesn't exist");
        return YES;
    }

    NSError * error;
    BOOL ret = [NSDK_Navigation initializeWithMapPath:[srcPath stringByAppendingString:@"/maps/"]
                                              mapName:@"deu"
                                             addrPath:[srcPath stringByAppendingString:@"/addr/"]
                                              appPath:[srcPath stringByAppendingString:@"/data/"] error: &error];

    NSLog(@"initializeWithMapPath returns:%d error:%@", ret, error);
    if (error) {
        _nsdkStartupError = error;
    }
    return YES;
}
If an error occurs, it is printed out and also stored in the property nsdkStartupError, which we' ll use in Tutorial 02 to display the cause of the error. The property is defined in the AppDelegate.h file:
#import <UIKit/UIKit.h>

@interface AppDelegate : UIResponder <UIApplicationDelegate>

@property (strong, nonatomic) UIWindow *window;

@property (strong, nonatomic) NSError *nsdkStartupError;

@end
That's it. You can now use the NavigationSDK. Run the app on your device or simulator and you should see the following log output in Xcode:
Successfully initialized NavigationSDK
API Version : 11.0 (NC 29000)
Build Date  : Dec  3 2018:16:38:00
OS          : ios
Compiler    : clang 10.0.0 (arm64)

2018-12-05 09:00:32.794775 Tutorial01[2410:2785306] initializeWithMapPath returns:1 error:(null)
Attention
If initialization returns NSError equal to code: -53, you either forgot to copy the license.key file to your data directory or your test license.key has expired.