09 Alternatives
Overview
This tutorial will show you how to calculate a route with two alternative route proposals.
Base
You can use your results from the previous Tutorial08 as a base for our new project.
Route overview
In this tutorial we implement a new UIViewController with name RouteInfoViewController showing the complete route and some metrics. The RouteInfoViewController will be displayed right after the route calculation.
Since we like to show our route with two alternative routes, we put three RouteInfoViewController into a UITabBarController. This enables the user to switch between the alternatives.
Enabling alternative routes
For enabling alternative routes in the SDK, you have to set the appropriate RouteCalculationType NSDK_ROUTE_ALTERNATIVE. You can do this in your AppDelegate:
@implementation AppDelegate

...

- (void) setRouteOptions {
    NSDK_RouteOptions * options = [NSDK_Navigation getRoutingOptions:nil];

    ...

    [options setRouteCalculationType:NSDK_ROUTE_ALTERNATIVE];
Handling alternative routes
In this tutorial we show a mechanism to switch between all given alternatives. The following SDK methods are helpful for us:
[NSDK_Navigation getAlternativeRouteCount:]- receive the amount of alternative routes (including the default, currently <= 3)[NSDK_Navigation getAlternativeRouteActive:]- receive the currently active alternative route[NSDK_Navigation setAlternativeRouteActive:error:]- set the active alternative route (also highlights the active route trace on the map)[NSDK_Navigation getRouteInformationWithAlternative:error:]- obtain the RouteInformation for the specified alternative route[NSDK_Navigation getTrafficDelayOnRouteWithCompleteRoute:alternativeRouteId:error:]- obtain the delay caused by traffic on the selected alternative route
Because there is a lot of boilerplate UI Code in this tutorial, we show and describe only excerpts of the code we use in the Tutorial09 XCode project. Therefore we recommend to copy these files to your project:
RouteInfoTabBarController.m, RouteInfoTabBarController.h
RouteInfoViewController.m, RouteInfoViewController.h
Furthermore it is recommended that you copy the complete "RouteInfoController" and "Route Info Tab Bar Controller" scene (including the three attached Navigation Controller) from the Tutorial09 XCode sample project storyboard to your storyboard.
Your storyboard should look like in the following picture:
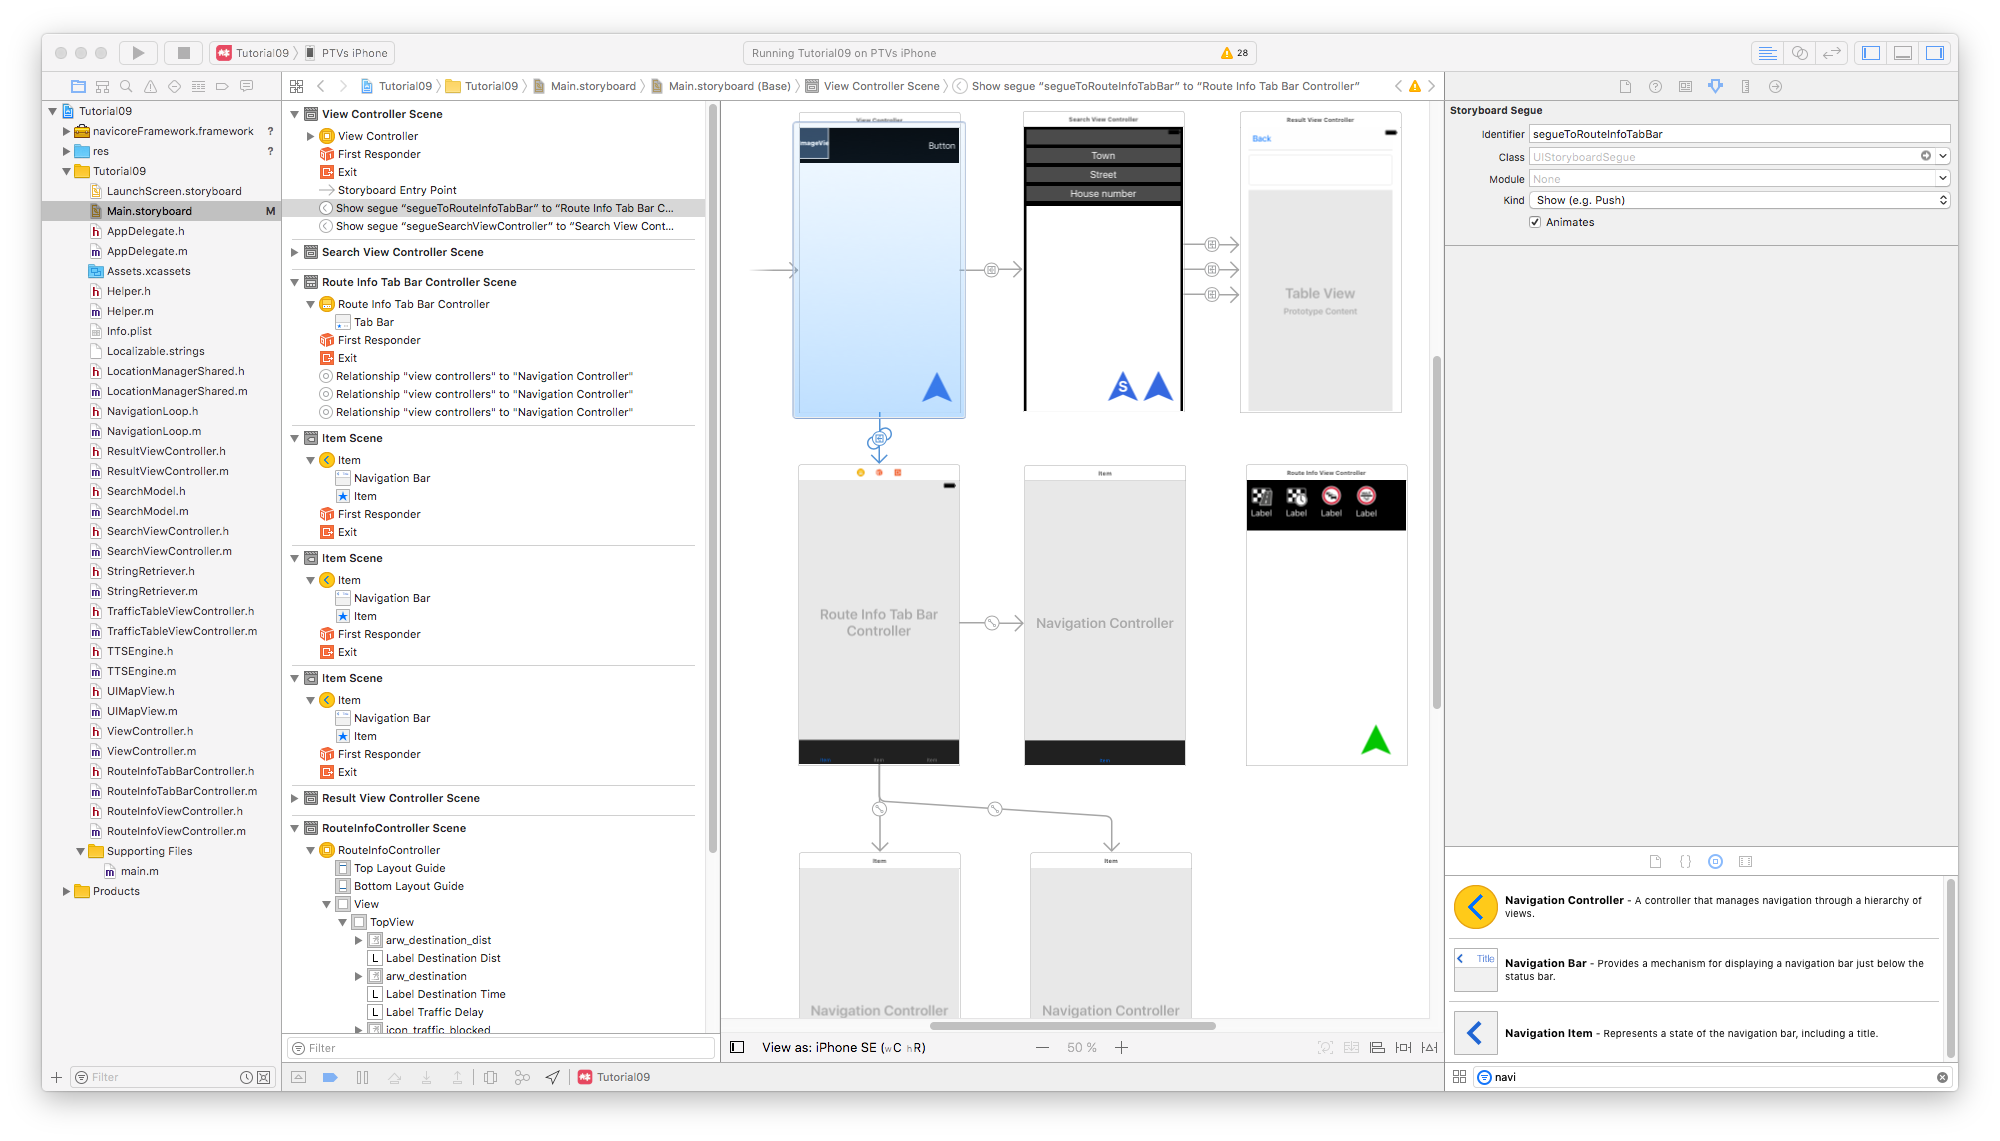
Set the "Custom class" of the "RouteInfoController" scene to "RouteInfoViewController" and of the "Route Info Tab Bar Controller" scene to "RouteInfoTabBarController"
Create a Segue with name segueToRouteInfoTabBar between the ViewController and the UITabBarController. In our [ViewController calcNavigation]method we no longer start the Navigation instantly, but show the UITabBarController with the alternative routes. The following code triggers the aforementioned segue.
@implementation ViewController
...
- (void) showRouteInfoController {
    [self performSegueWithIdentifier: @"segueToRouteInfoTabBar" sender: self];
}

- (void) calcNavigation {

    NSDK_JobQueue * jobQueue = [NSDK_JobQueue sharedInstance];
    [jobQueue pushWithBlock:^{

        NSDK_WayPoint * start = [Helper getCurrentWayPointWithFallbackKarlsruhe];
        NSDK_WayPoint *  end = [[NSDK_WayPoint alloc] initWithX:[_destination  getX] y:[_destination getY]];

        NSError * err = NULL;
        NSDK_Tour * tour = [[NSDK_Tour alloc] initWithWayPoint:start];
        [tour addStation:end error:nil];

        [NSDK_Navigation calculateTour: tour observer:self error:&err];
        if (err) {
            NSLog(@"ViewController calculateTour NSError returns:%@", err);
        } else {
            //call 'searchTrafficInformation' here, because in the RouteInfoController we want to get the traffic delay
            NSDK_Position * startPosition = [[NSDK_Position alloc] initWithX:[start getX] y:[start getY]];
            [NSDK_Navigation searchTrafficInformationWithPosition:startPosition observer:nil error:&err];
            if (err) {
                NSLog(@"ViewController searchTrafficInformationWithPosition NSError returns:%@", err);
            }

            dispatch_async(dispatch_get_main_queue(), ^{
                [self showRouteInfoController];
            });
        }
    }];
}
As you can see in the code above, we added a call to [NSDK_Navigation searchTrafficInformationWithPosition:]. That's because we have successfully calculated a route a few lines before and the SDK is so smart to fetch the traffic situation for the calculated route.
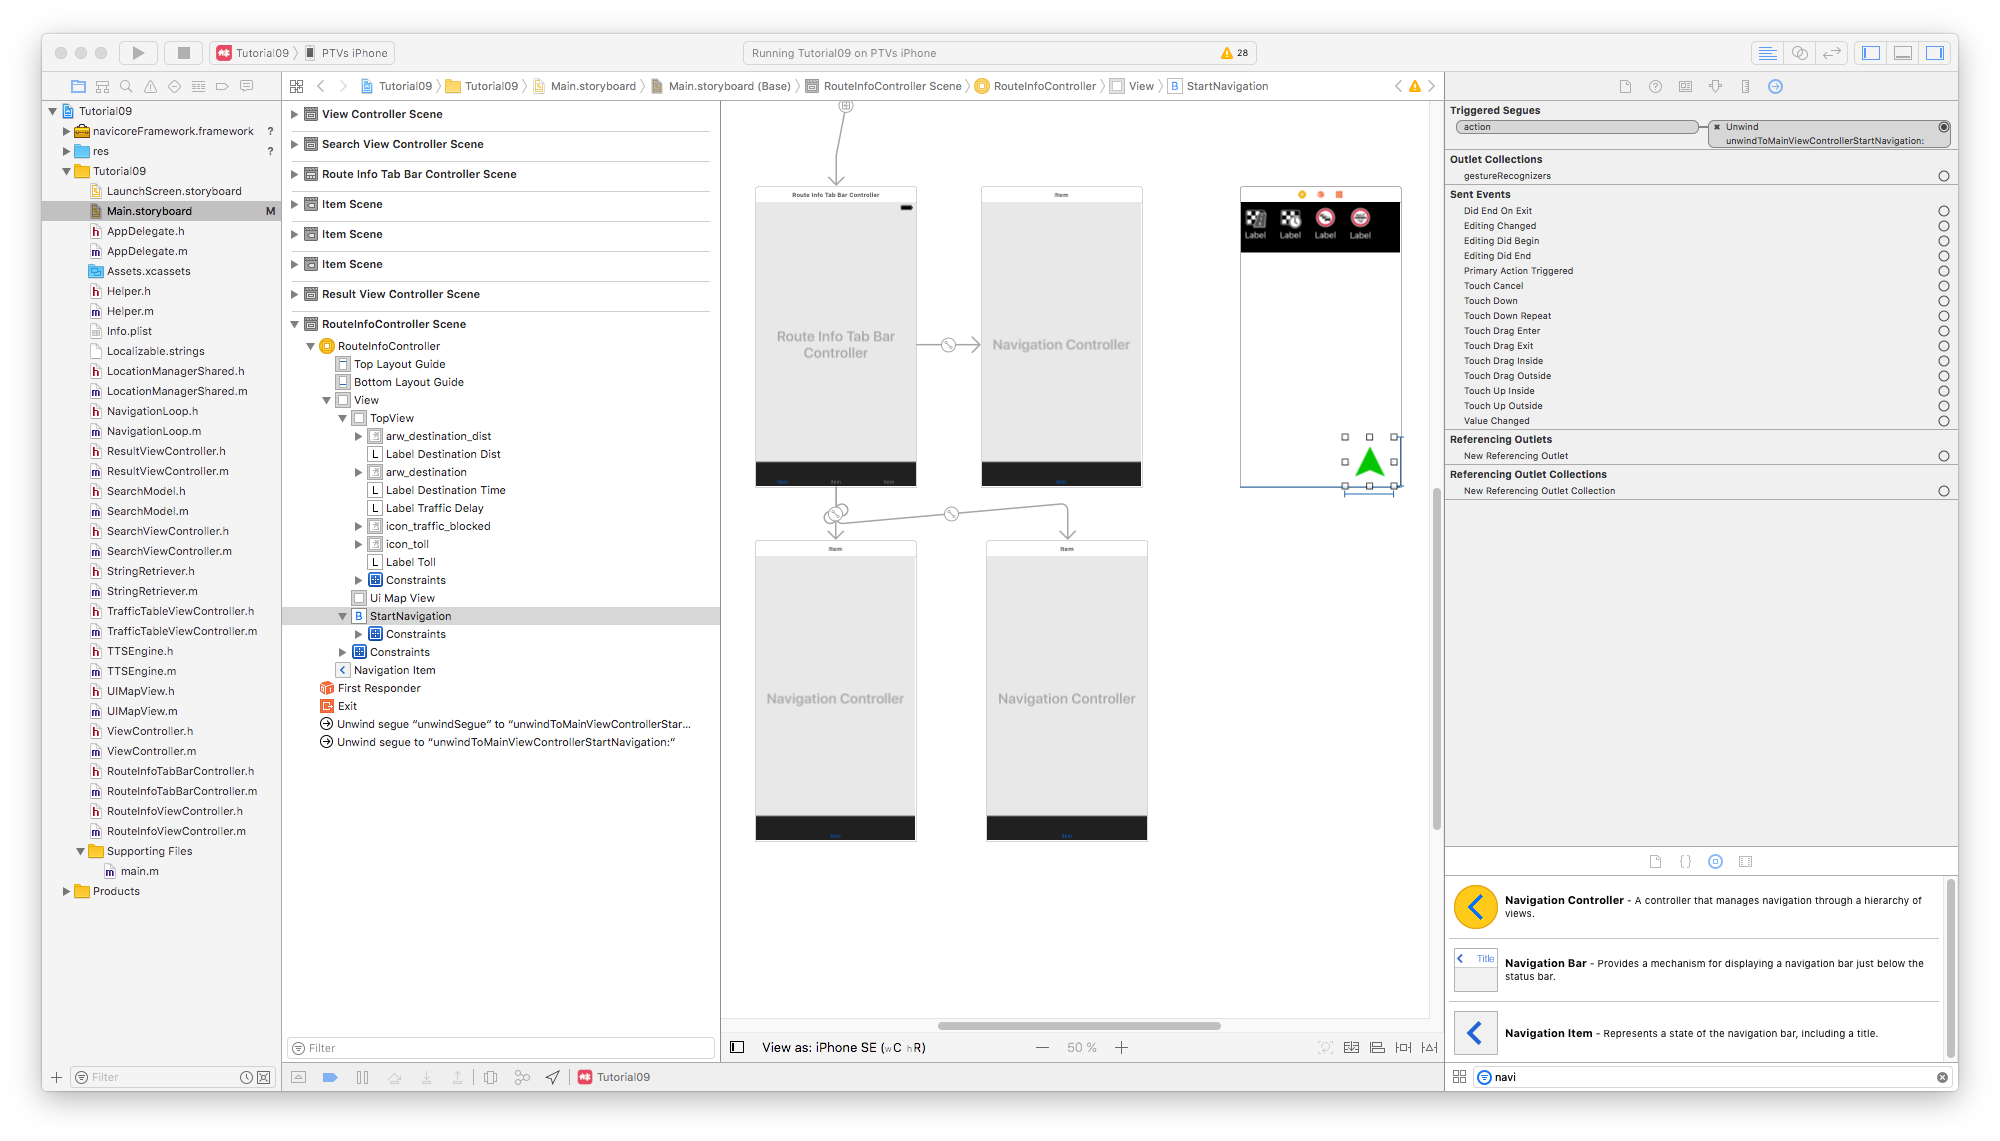
Create a new IBAction method for actually starting the navigation:
@implementation ViewController
...
- (IBAction)unwindToMainViewControllerStartNavigation:(UIStoryboardSegue*)sender {
    if (_gpsSimulationIsActive) {
        [[LocationManagerShared sharedManager] startGPSSimulation];
    }
    [_navigationLoop startNavigation];
}
In the RouteInfoViewController scene in the storyboard we have connected a button (the button with the green arrow) with this method (again through the "Exit" Icon in Interface Builder).
We have to revise our unwindToMainViewController and unwindToMainViewControllerSimulation methods a bit. That's because the iOS runtime often runs in View hierarchy issues when we switch to another UIViewController (or call a segue) within these methods. Therefore we just set a flag that the navigation calculation should be started (and after the calculation is finished, the segue to the RouteInfoViewController should be triggered) - and actually check the flag and do the work in our viewDidAppear method.
@interface ViewController ()
...
@property BOOL shallCalcNavigation;
@end

@implementation ViewController
...
- (void)viewDidAppear:(BOOL)animated {
    [super viewDidAppear:animated];

    ...

    if (_shallCalcNavigation && _destination != nil) {
        _shallCalcNavigation = NO;
        [self initProgressView];
        [self calcNavigation];
    }
}


- (IBAction)unwindToMainViewControllerSimulation:(UIStoryboardSegue*)sender {
    _gpsSimulationIsActive = YES;
    _shallCalcNavigation = YES;
}


- (IBAction)unwindToMainViewController:(UIStoryboardSegue*)sender {

    if (_gpsSimulationIsActive) {
        [[LocationManagerShared sharedManager]  stopGPSSimulation];
    }
    _gpsSimulationIsActive = NO;
    _shallCalcNavigation = YES;
}
Attention
Don't call [NSDK_Navigation getGuidanceInformation] before the user has chosen the alternative route. If you do nevertheless, the SDK will discard the alternative routes!
We stop our NavigationLoop when we leave our ViewController. We can stop the loop whenever a Segue will be performed:
@implementation ViewController

...

- (void)prepareForSegue:(UIStoryboardSegue *)segue sender:(id)sender {
    [_navigationLoop stopNavigation];
}
Now connect the UILabels and the UIMapView of the RouteInfoViewController scene to the corresponding IBOutlets in the header file. So Ctrl-Drag to the appropriate property.
#import <UIKit/UIKit.h>
#import "navicoreFramework/NSDK_Navigation.h"
#import "UIMapView.h"


@interface RouteInfoViewController : UIViewController

@property NSInteger routeAlternativeId;

@property (weak, nonatomic) IBOutlet UIMapView *uiMapView;
@property (weak, nonatomic) IBOutlet UILabel *labelDestinationDist;
@property (weak, nonatomic) IBOutlet UILabel *labelDestinationTime;
@property (weak, nonatomic) IBOutlet UILabel *labelTrafficDelay;
@property (weak, nonatomic) IBOutlet UILabel *labelToll;

@end
In RouteInfoViewController we show from left to right
- The distance to destination
- The estimated time of arrival
- The delay caused by traffic
- The covered distance on toll roads
All this information about the current route can be obtained by calling [NSDK_Navigation getRouteInformation:]. The [NSDK_RouteInformation] class can give you several infos like distance, duration, toll information and restrictions on your current route. To access the traffic delay, we simply call [NSDK_Navigation getTrafficDelayOnRouteWithCompleteRoute:alternativeRouteId:error:]
. Like in Tutorial06 we format the distances with [NSDK_RouteInformation getLocalizedDistanceString:quantify:error:].
@implementation RouteInfoViewController

- (void) viewWillAppear:(BOOL)animated {
    [super viewWillAppear:animated];
    NSLog(@"RouteInfoViewController routeAlternativeId:%ld viewWillAppear called", (long)_routeAlternativeId);
    [NSDK_Navigation setAlternativeRouteActive:(int)_routeAlternativeId error:nil];
    [self setLabelText];
}

- (void) setLabelText {
    NSError * error;
    NSDK_RouteInformation * routeInformation = [NSDK_Navigation getRouteInformationWithAlternative:_routeAlternativeId error:&error];

    //Distance
    NSString * distanceString = [NSDK_Navigation getLocalizedDistanceString:[routeInformation getLength] quantify:NO error:&error];
    _labelDestinationDist.text = distanceString;

    //Arrival time
    NSDate * date = [NSDate dateWithTimeIntervalSinceNow:[routeInformation getDuration]];
    NSDateFormatter *formatter = [[NSDateFormatter alloc] init];
    [formatter setDateFormat:@"HH:mm"];
    NSLog(@"RouteInfoViewController RouteInformation arrival date:%@", [formatter stringFromDate:date]);
    _labelDestinationTime.text = [formatter stringFromDate:date];

    //traffic delay
    int trafficTime = [NSDK_Navigation getTrafficDelayOnRouteWithCompleteRoute:YES alternativeRouteId:_routeAlternativeId error:&error];
    int hours = trafficTime / 3600;
    //remaining seconds
    trafficTime = trafficTime - hours * 3600;
    int minutes = trafficTime / 60;
    NSString *trafficDelay = [NSString stringWithFormat:@"+%dh %dmin", hours, minutes];
    _labelTrafficDelay.text = trafficDelay;
    NSLog(@"RouteInfoViewController TrafficDelay hours:%d minutes:%d", hours, minutes);

    //toll length
    int tollLength = [[routeInformation getTollInformation] getTotalLengthTruckToll];
    _labelToll.text = [NSDK_Navigation getLocalizedDistanceString:tollLength quantify:NO error:&error];
}

...
setLabelText method from the viewWillAppear method, not from the viewDidLoad method. That's because we want to respect the freshest traffic delay information whenever the user switches between the different alternative routes within the UITabBarController. The viewDidLoad method is called only once by the runtime, no matter how often the user switches the view within the UITabBarController.
Furthermore we set the active route in the SDK with the call to [NSDK_Navigation setAlternativeRouteActive:error:].
And last, here is the essential code for instantiating and initializing the RouteInfoViewControllers within the RouteInfoTabBarController:
@implementation RouteInfoTabBarController
...

- (void)viewDidLoad {
    [super viewDidLoad];

    int routeCount = [NSDK_Navigation getAlternativeRouteCount:nil];

    NSMutableArray *tabbarViewControllers = [NSMutableArray arrayWithArray: [self viewControllers]];
    if (routeCount < 3) {
        [tabbarViewControllers removeObjectAtIndex:2];
    }
    if (routeCount < 2) {
        [tabbarViewControllers removeObjectAtIndex:1];
    }

    [self setViewControllers: tabbarViewControllers ];

    [self setRouteIdOnController:0];
    [self setRouteIdOnController:1];
    [self setRouteIdOnController:2];
}


- (void) setRouteIdOnController:(int) idx {

    if (idx >= [[self viewControllers] count]) {
        return;
    }

    NSError * error;
    NSDK_RouteInformation * routeInformation = [NSDK_Navigation getRouteInformationWithAlternative:idx error:&error];

    int seconds = [routeInformation getDuration];
    int hour = seconds / 3600;
    int mins = (seconds % 3600) / 60;
    NSString * str = [NSString stringWithFormat:@"%dH %dMIN", hour, mins];

    UITabBarItem * item = [self.tabBar.items objectAtIndex:idx];
    [item setTitle:NSLocalizedString(str, @"comment")];
    [item setTitlePositionAdjustment:UIOffsetMake(0, -10)];
    [item setTitleTextAttributes:[NSDictionary dictionaryWithObjectsAndKeys:
                                            [UIFont boldSystemFontOfSize:16], UITextAttributeFont, nil]
                                  forState:UIControlStateNormal];

    //add RouteInfoViewController to NavigationController
    RouteInfoViewController * routeInfoViewController = [self.storyboard instantiateViewControllerWithIdentifier:@"routeInfoControllerId"];
    UINavigationController * navigationController = (UINavigationController*)[[self viewControllers] objectAtIndex:idx];
    [navigationController addChildViewController:routeInfoViewController];

    routeInfoViewController.routeAlternativeId = idx;
}
When the SDK delivers less than three routes, we have to check the actual number of routes and remove the superfluous Controller from the UITabBarController. Remember that we initially defined 3 child controllers (UINavigationController) for the UITabBarController.
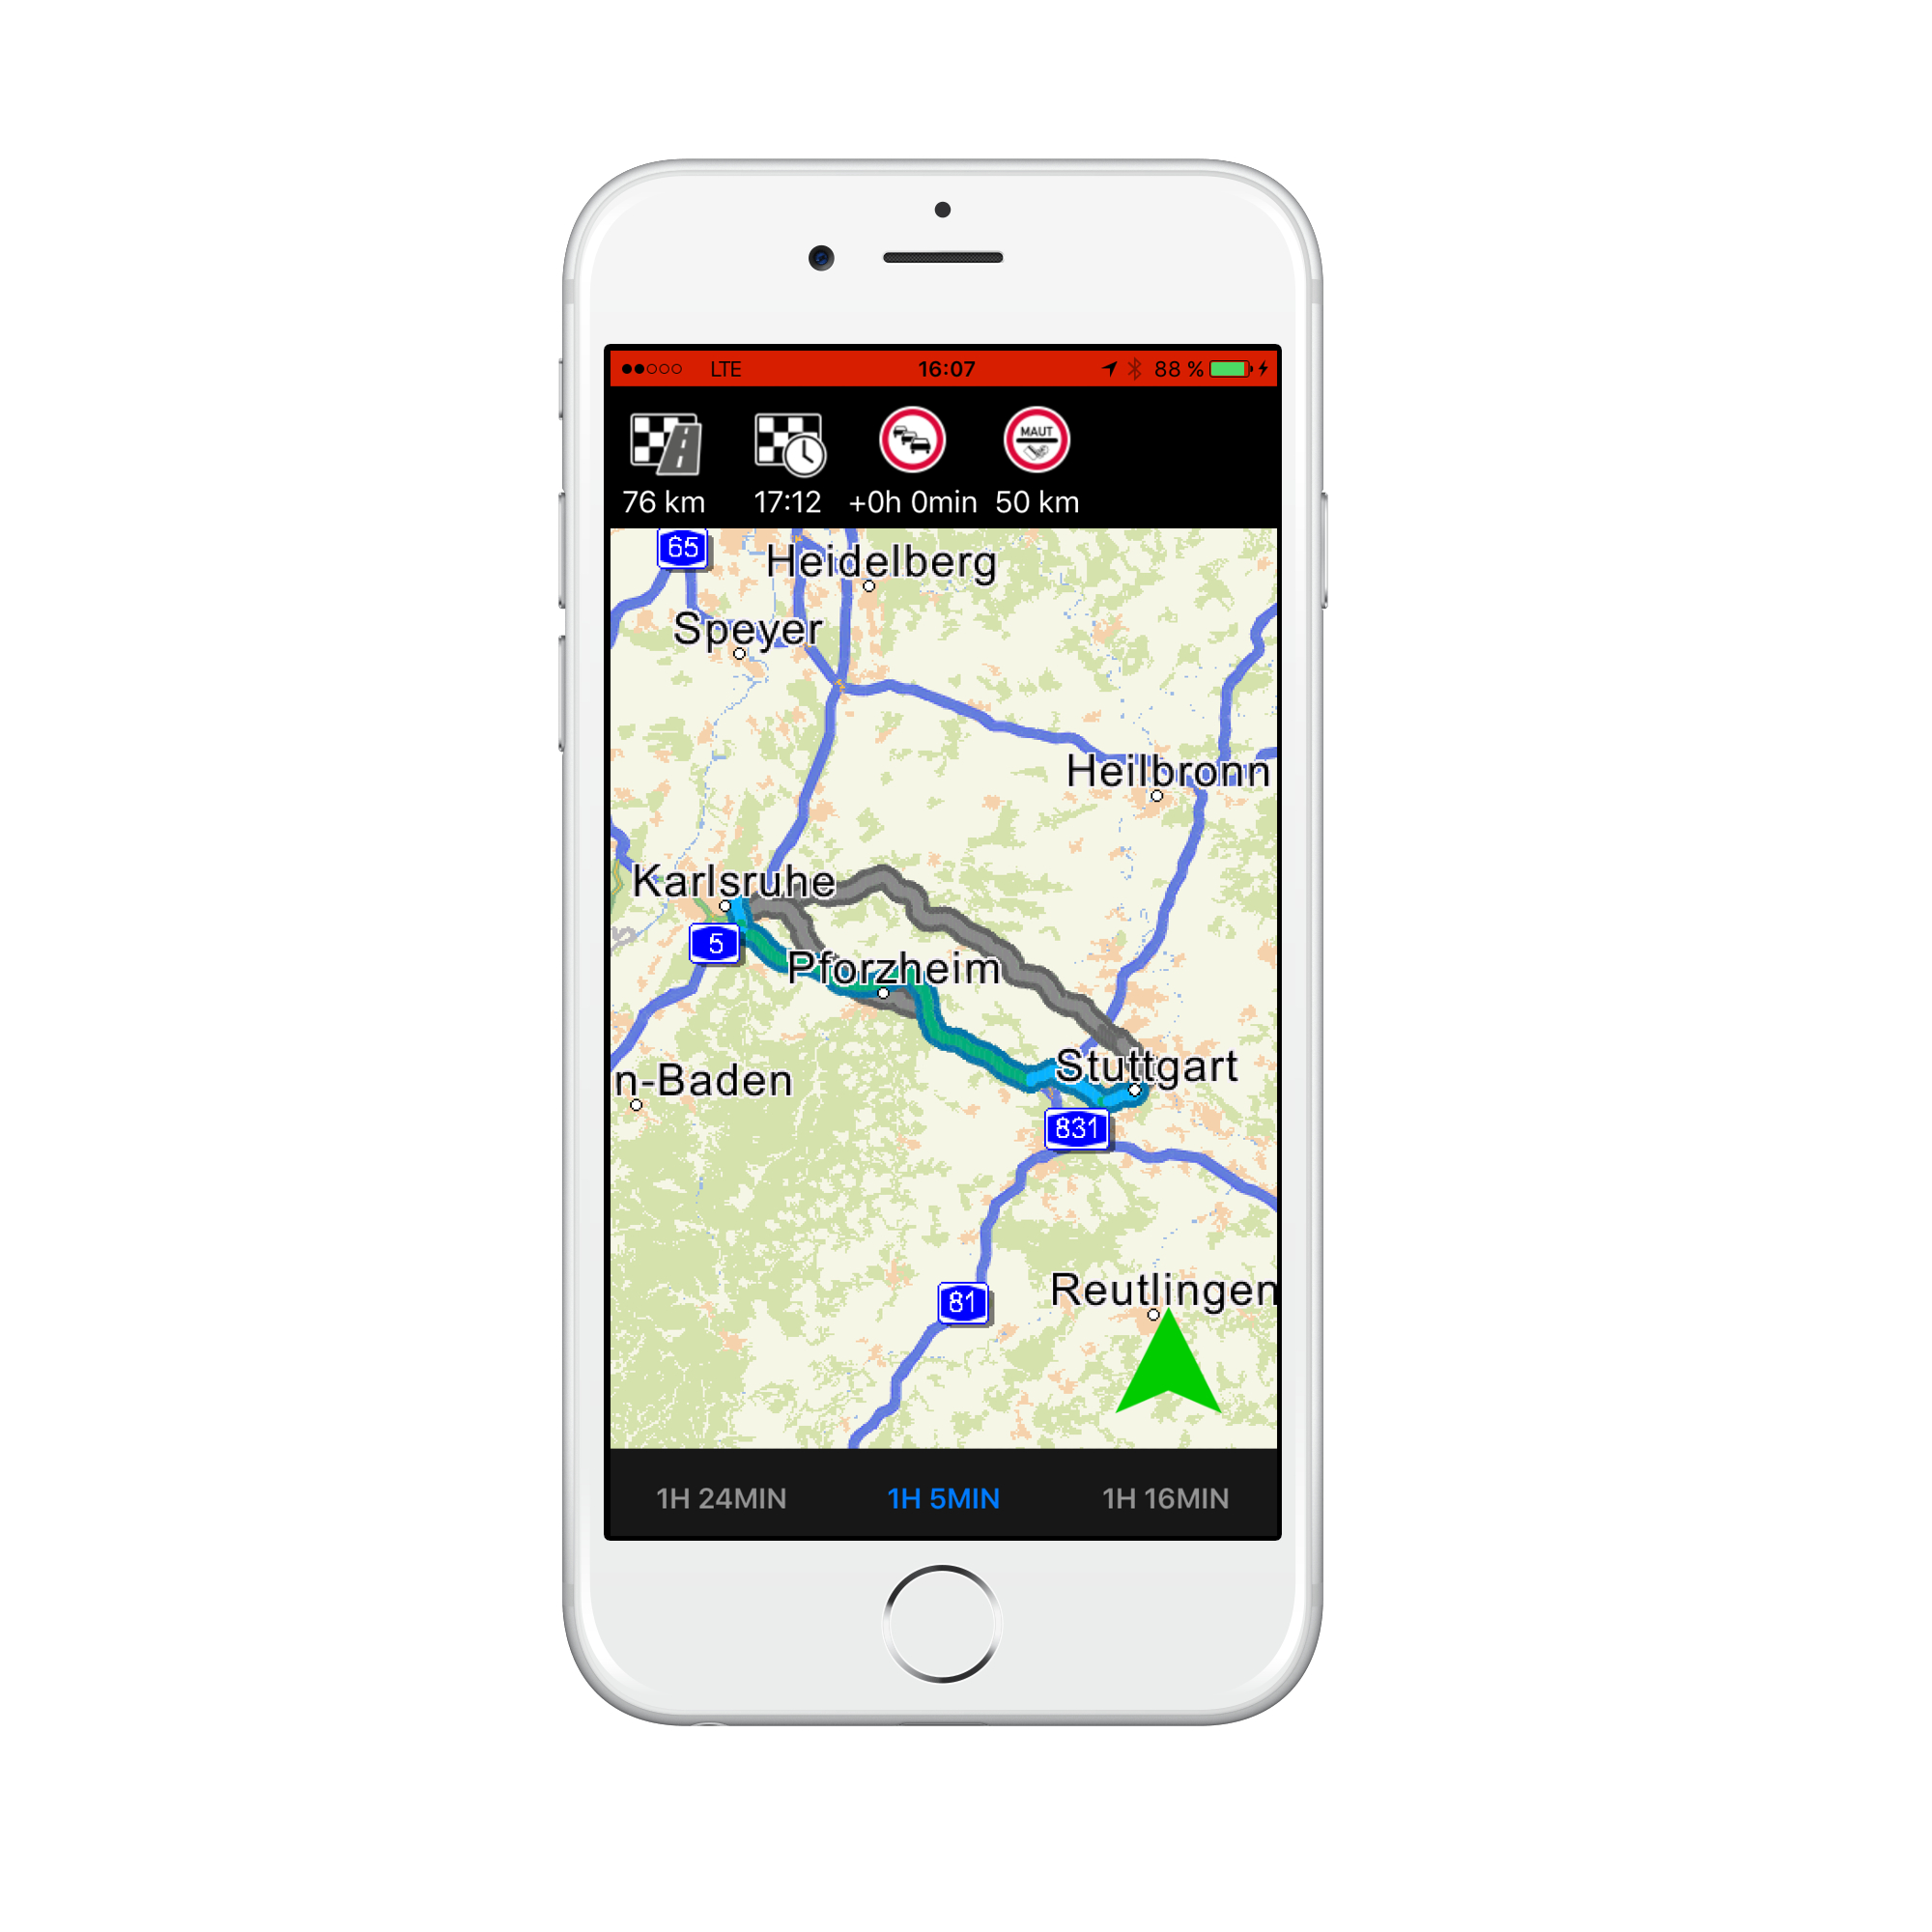
This is our final result:
Implications on navigation
Starting a navigation with an alternative route (i.e. bigger than 0) has implications to navigation. Because each of the alternative routes is not the arithmetical optimal route, there is a risk that rerouting will switch back to the optimal route. Therefore a special mechanism is implemented: The chosen route will be stored during the whole navigation. Its underlying segments get a small preference while rerouting. This should lead to a good trade-off finding reasonable reroutes, but also most likely keeps the chosen alternative route.