05 Route calculation
Overview
In this tutorial you will learn how to calculate a route from A to B and how to influence the routing by setting your vehicle parameters.
Base
You can use your results from Tutorial04 as a base for our new project.
Retrieving the destination
In the last tutorial we added a simple activity to search for addresses. To start a navigation to a search result, we first add a FloatingActionButton as a start button.
<android.support.design.widget.CoordinatorLayout>

    ...

    <android.support.design.widget.FloatingActionButton
        android:layout_width="wrap_content"
        android:layout_height="wrap_content"
        android:layout_gravity="bottom|right"
        android:layout_margin="16dp"
        app:layout_anchor="@id/search"
        android:src="@android:drawable/ic_dialog_map"
        app:layout_anchorGravity="bottom|right|end"
        android:onClick="onFloatingButtonClicked"/>
</android.support.design.widget.CoordinatorLayout>
In onFloatingButtonClicked we then check which of the three search results are set. The best result will be sent to our MainActivity for the route calculation by bundling it to the MainActivity intent.
Attention
We start the activity with the flags Intent.FLAG_ACTIVITY_CLEAR_TOP and Intent.FLAG_ACTIVITY_SINGLE_TOP to reuse the current MainActivity and avoid instantiating a new one!
public void onFloatingButtonClicked(View view)
{
    Intent intent = new Intent(this, MainActivity.class);
    if (mCurrentHNRResult != null) {
        intent.putExtra("destination", mCurrentHNRResult.getPosition());
    } else if (mCurrentStreetResult != null) {
        intent.putExtra("destination", mCurrentStreetResult.getPosition());
    } else if (mCurrentTownResult != null) {
        intent.putExtra("destination", mCurrentTownResult.getPosition());
    }

    intent.addFlags(Intent.FLAG_ACTIVITY_CLEAR_TOP | Intent.FLAG_ACTIVITY_SINGLE_TOP);
    startActivity(intent);
}
Now we only need to override the onNewIntent method of the MainActivity to retrieve the route calculation intent and extract the destination from the intent bundle.
@Override
protected void onNewIntent(Intent intent) {
    super.onNewIntent(intent);

    if (!intent.hasExtra("destination"))
        return;

    final Position destination = intent.getParcelableExtra("destination");
}
Calculating a route
Every long lasting operation should be performed in a background thread to avoid stalling the GUI thread and therefore the user interactions. So we put long lasting operations in a seperate thread. The NavigationSDK helps you with a simple worker thread (the SDKJobQueue) where you can queue your long lasting NavigationSDK operations.
Hint
You can easily use your own asynchronous mechanism. But be aware that most of the NavigationSDK functions are currently mutual exclusive and cannot be called concurrently. So try to call only one NavigationSDK method at a time to avoid locks in your application.
So we create a Runnable with all the route calculation operations and push it via SDKJobQueue.getInstance().push() to the SDKJobQueue. To calculate a route from our current position to our given destination, we create a Tour with the current position in the constructor as the start. The destination is added via addStation. Then we call calculateTour.
@Override
protected void onNewIntent(Intent intent) {
    super.onNewIntent(intent);

    if (!intent.hasExtra("destination"))
        return;

    final Position destination = intent.getParcelableExtra("destination");

    Runnable calcRoute = new Runnable() {
        @Override
        public void run() {
            WayPoint start;
            try {
                // set current position as starting point
                start = new WayPoint(GPSManager.getInstance().getCurrentPosition());
            } catch (NavigationException e) {
                // if it fails use Karlsruhe
                start = new WayPoint(934177, 6268747);
            }

            try {
                Tour tour = new Tour(start);

                tour.addStation(new WayPoint(destination));

                CalculateTourResult result =
                        NavigationSDK.calculateTour(tour, null);

                if (result.getError() != SDKErrorCode.Ok) {
                    Toast.makeText(MainActivity.this, "route calculation failed", Toast.LENGTH_LONG).show();
                }
            } catch (CalculateTourException | NavigationException e) {
                e.printStackTrace();
            }
        }
    };

    // don't forget to remove the extra to avoid handling it twice
    intent.removeExtra("destination");

    SDKJobQueue.getInstance().push(calcRoute);
}
The result for an example route from Karlsruhe to Stuttgart:

Attention
Try to avoid calling other NavigationSDK methods on another thread while the route calculation is running. For example drawing the map on the GUI thread while calculating the route will lock the GUI thread because most NavigationSDK methods are protected by the same mutex and cannot be called in a concurrent way.
To avoid calling other NavigationSDK methods on another thread while the route calculation is running, we push our NavigationLoop and our GPSManager.getInstance().pushLocation() call also to the SDKJobQueue. So we are sure that all recurring NavigationSDK methods are called on the same thread.
public class MainActivity extends AppCompatActivity {
    ...
    private LocationListener locationListener = new LocationListener() {
        @Override
        public void onLocationChanged(final Location location) {
            SDKJobQueue.getInstance().push(new Runnable() {
                @Override
                public void run() {
                    GPSManager.getInstance().pushLocation(location);
                }
            });
        }
        ...
    };
    ...
    TimerTask navigationLoopTrigger = new TimerTask(){
        @Override
        public void run() {
            SDKJobQueue.getInstance().push(navigationLoop);
        }
    };
    ...
}
Retrieving progress information
Users should be notified about the progress of every long lasting operation. Therefore most of the long lasting operations in the NavigationSDK can be called with an Observer to monitor their progress. To monitor the route calculation progress, we implement an Observer as a member of the MainActivity and call calculateTour with it.
Observer calcRouteObserver = new Observer() {
    @Override
    public void onProgress(final int current, final int total, int job) {
    }

    @Override
    public void onFinished(final int error, int index) {
    }
};
CalculateTourResult result = NavigationSDK.calculateTour(tour, calcRouteObserver);
Attention
The onProgress and onFinished callbacks will be called from the thread in which the route calculation was started from. So in our example from the SDKJobQueue thread.
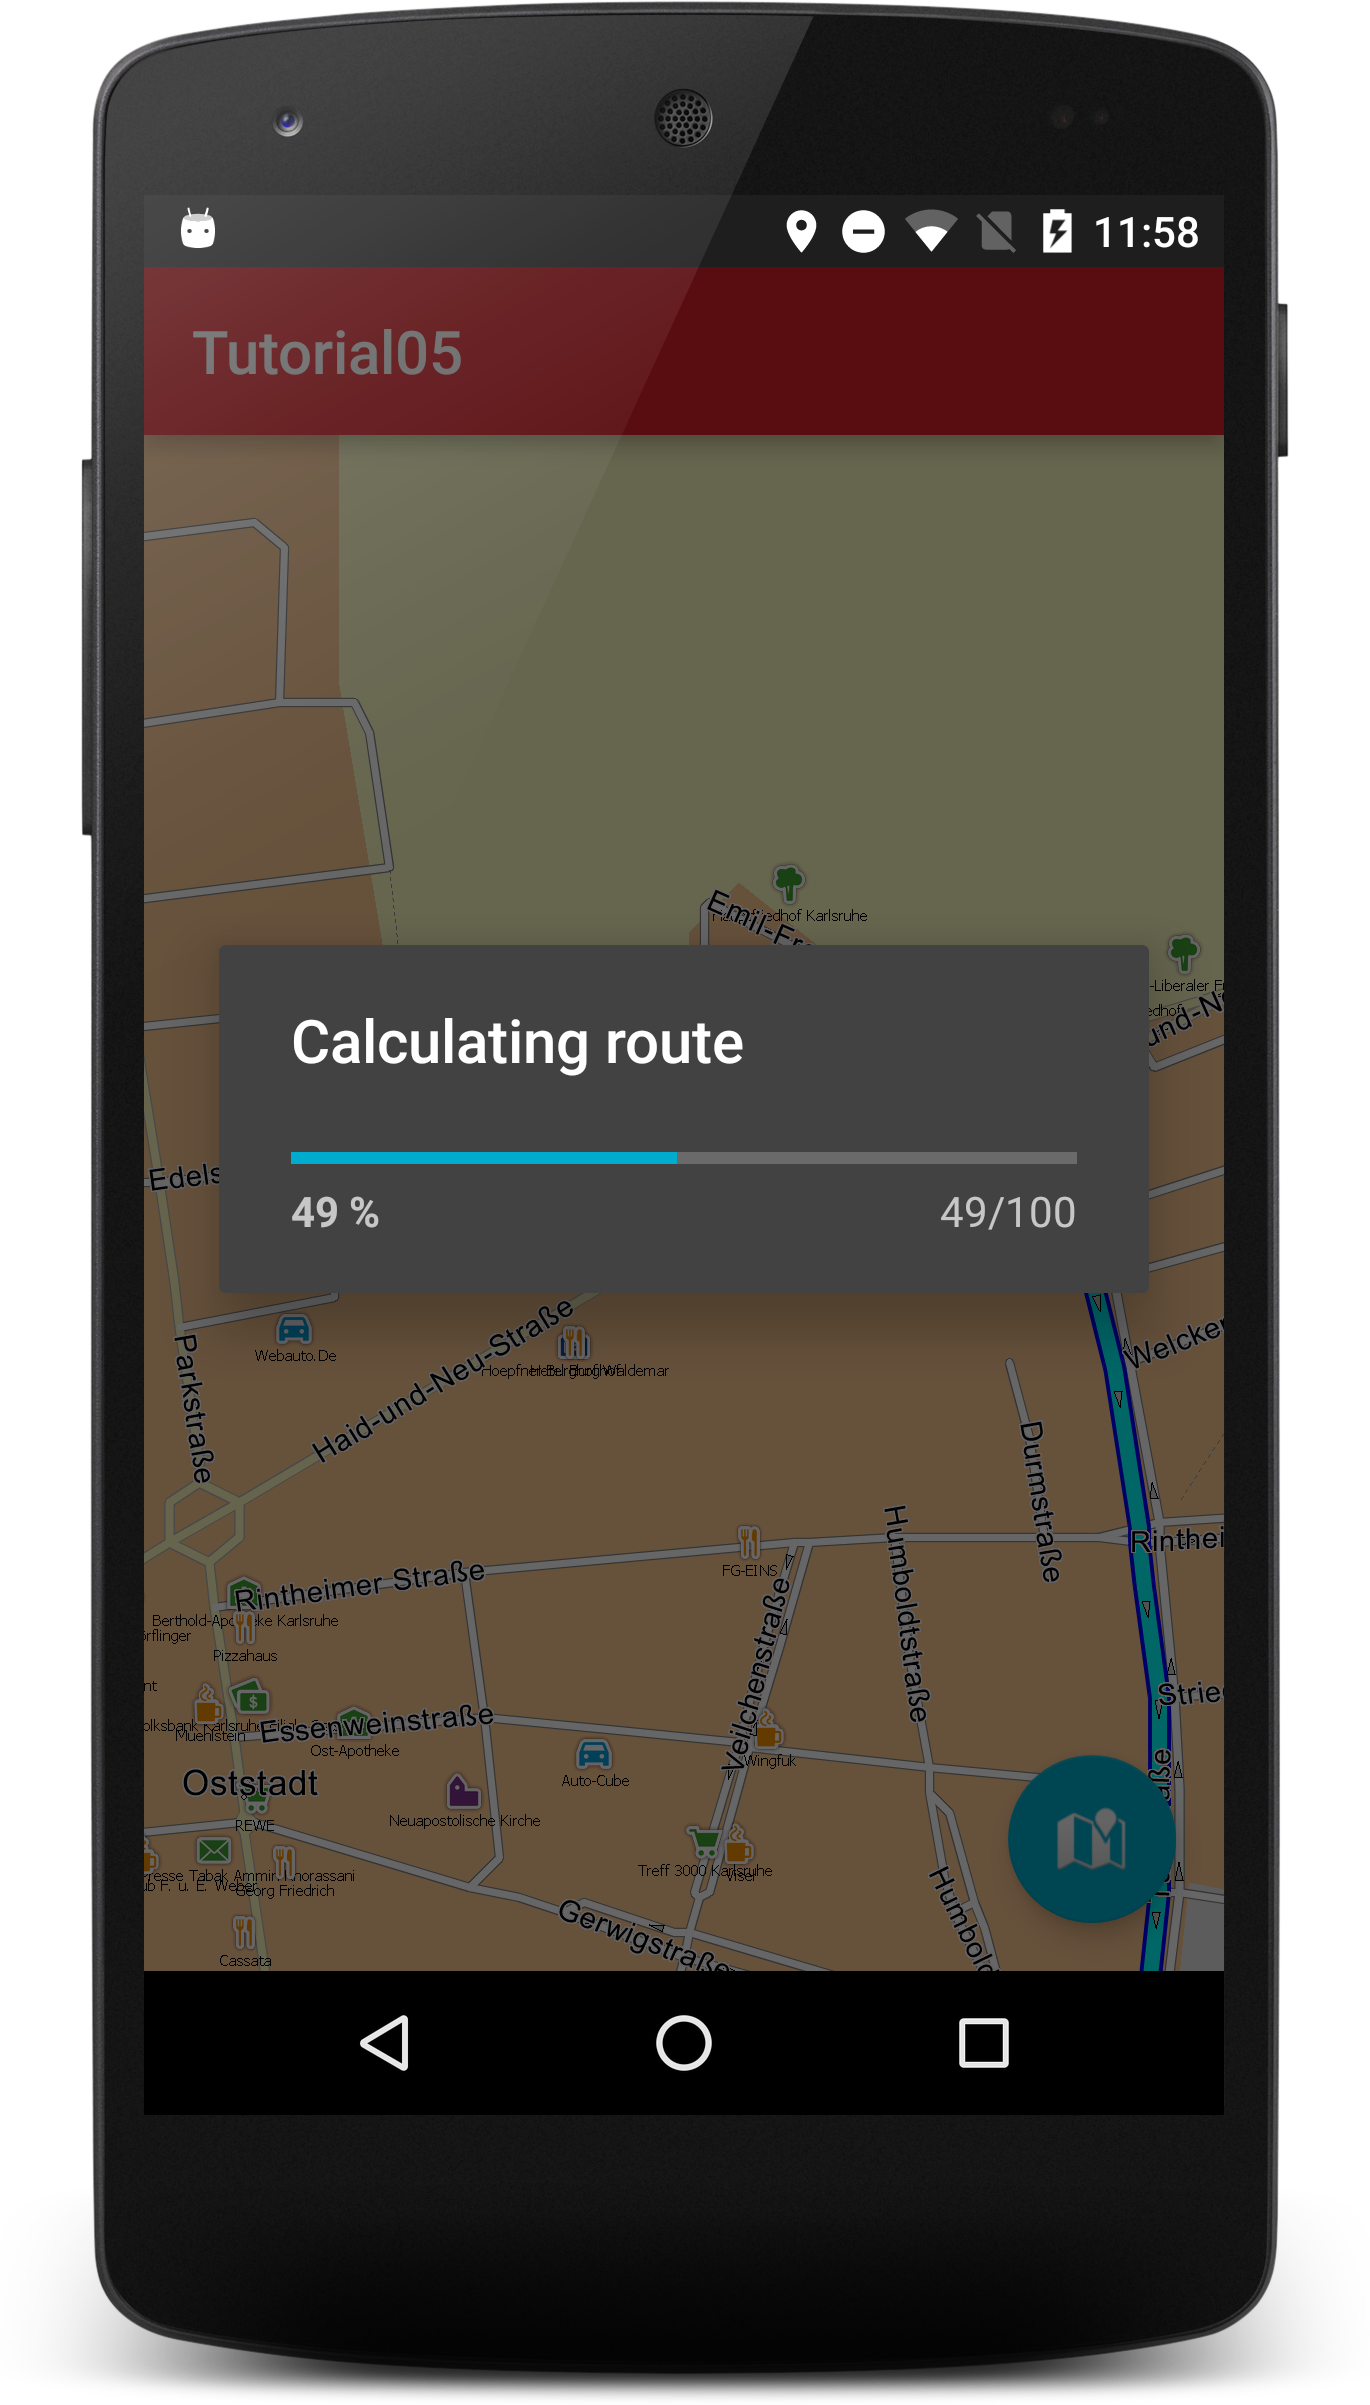
We create a ProgressDialog right before pushing the calcRoute Runnable to the SDKJobQueue.
showRouteCalculationProgressDialog();
SDKJobQueue.getInstance().push(calcRoute);
private void showRouteCalculationProgressDialog() {
    progressDialog = new ProgressDialog(MainActivity.this);
    progressDialog.setTitle(R.string.route_calc_progress_title);
    progressDialog.setProgressStyle(ProgressDialog.STYLE_HORIZONTAL);
    progressDialog.setProgress(0);
    progressDialog.setMax(100);
    progressDialog.setCancelable(false);

    progressDialog.show();
}
...
Handler handler = new Handler();
ProgressDialog progressDialog;

private final Observer calcRouteObserver = new Observer() {
    @Override
    public void onProgress(final int current, final int total, int job) {
        handler.post(new Runnable() {
            @Override
            public void run() {
                if (progressDialog != null) {
                    progressDialog.setMax(total);
                    progressDialog.setProgress(current);
                }
            }
        });
    }

    @Override
    public void onFinished(final int error, int index) {
        super.onFinished(error, index);
        handler.post(new Runnable() {
            @Override
            public void run() {
                if (progressDialog != null) {
                    progressDialog.dismiss();
                    progressDialog = null;
                }
            }
        });
    }
};
...
Currently the intent is handled while the MainActivity is initializing, so it is possible that the MainActivity tries to draw itself for the first time while the route calculation is running. This yields in a lock of the GUI thread for the time of the route calculation and most probably leads to a black screen. To avoid this, we delay the route calculation to the point after the MapView is fully drawn for the first time. For this we implement OnInitializeListener in the MainActivity and set it with setOnInitializeListener on the MapView. We can move the intent handling code to an own function called handleIntent and call it in onFirstTimeDrawn. In onNewIntent we just set the current intent via setIntent(intent).
public class MainActivity extends AppCompatActivity implements OnInitializeListener {
    ...

    @Override
    protected void onCreate(Bundle savedInstanceState) {
        super.onCreate(savedInstanceState);
        setContentView(R.layout.activity_main);

        mapView = (MapView)findViewById(R.id.map);
        mapView.setOnInitializeListener(this);

        ...
    }

    @Override
    protected void onNewIntent(Intent intent) {
        super.onNewIntent(intent);
        setIntent(intent);
    }

    ...

    void handleIntent(Intent intent) {
        if (!intent.hasExtra("destination"))
            return;

        final Position destination = intent.getParcelableExtra("destination");

        Runnable calcRoute = new Runnable() {
            @Override
            public void run() {
                WayPoint start;
                try {
                    // set current position as starting point
                    start = new WayPoint(GPSManager.getInstance().getCurrentPosition());
                } catch (NavigationException e) {
                    // if it fails use Karlsruhe
                    start = new WayPoint(934177, 6268747);
                }

                try {
                    Tour tour = new Tour(start);

                    tour.addStation(new WayPoint(destination));

                    CalculateTourResult result =
                            NavigationSDK.calculateTour(tour, null);

                    if (result.getError() != SDKErrorCode.Ok) {
                        Toast.makeText(MainActivity.this, "route calculation failed", Toast.LENGTH_LONG).show();
                    }
                } catch (CalculateTourException | NavigationException e) {
                    e.printStackTrace();
                }
            }
        };

        // don't forget to remove the extra to avoid handling it twice
        intent.removeExtra("destination");

        showRouteCalculationProgressDialog();
        SDKJobQueue.getInstance().push(calcRoute);
    }

    @Override
    public void onInitialize() {
    }

    @Override
    public void onFirstTimeDrawn() {
        handleIntent(getIntent());
    }
}
RoutingOptions
Loading a vehicle profile
To avoid setting the routing options manually and to get a quick way to set them for a particular vehicle, we use so called profiles. Profiles describe certain standard vehicles like trucks, cars, transporters and so on. In these profiles (which are text files) the values for the relevant routing and lorry options are preset (some of the options are not in the profiles file, but will be adapted internally to the used vehicle). We highly recommend to use the profile loading mechanism which the SDK provides, instead of setting the options manually, especially the speed tables.
Loading a profile is done by calling the method NavigationSDK.loadVehicleProfile(). The function takes as parameter the full path to the profile file to load.
We deliver a set of profiles in a directory called 'profiles' under the data directory of the tutorial app data.
public class Application extends android.app.Application {

    ...

    @Override
    public void onCreate() {
        super.onCreate();

        ...

        File profilePath = new File(getDataPath(), "profiles");
        NavigationSDK.loadVehicleProfile(new File(profilePath, "truck75.dat"));
    }
Manually setting the routing options
Setting the routing options manually is also possible but only recommended for experts.
The NavigationSDK brings several methods to influence the result of the route calculation. For example you can avoid toll roads, decide what kind of vehicle you are driving or if you want a routing optimized for short way or time. To get you started, we set a bunch of options in the Application in a new method setDefaultRoutingOptions. By calling NavigationSDK.getRoutingOptions() we retrieve the default RouteOptions, which we can alter to our needs afterwards. The example is only a starting point to play with. Feel free to alter it to your custom wishes.
private void setDefaultRoutingOptions() {
    try
    {
        Result<RouteOptions> result = NavigationSDK.getRoutingOptions();
        RouteOptions options = result.getResult();

        boolean avoidToll = false;

        if (avoidToll) {
            options.setTollFactor(90);
            options.setTruckTollFactor(90);
            options.setUseTollLayer(true);
            options.setUseTruckTollLayer(true);
        } else {
            options.setUseTollLayer(false);
            options.setUseTruckTollLayer(false);
        }

        options.setTimeFactor(80);

        Result<LorryOptions> lorryResult = NavigationSDK.getLorryOptions();
        LorryOptions lorry = lorryResult.getResult();

        int vehicle = 0;

        if (vehicle == 0) {
            options.setLorry(true);
            lorry.setWeight((short)75);
            lorry.setHeight((short)37);
        } else if (vehicle == 1) {
            options.setLorry(true);
        } else {
            options = null;
        }

        options.setRoutingVehicle(RoutingVehicleType.USER);

        short[] speedTableRouteList = {82,75,74,66,60,45,56,51,48,38,35,23,30,30,15};
        short[] speedTableCalc = {84,76,74,66,60,40,50,38,26,22,11,5,5,5,2};

        options.setSpeedTable_RouteList(speedTableRouteList);
        options.setSpeedTable_Calc(speedTableCalc);

        NavigationSDK.setRoutingOptions(options);
        NavigationSDK.setLorryOptions(lorry);
    }
    catch (NavigationException e)
    {
        Log.e("Tutorial", e.getMessage());
    }
}
Avoid GUI interaction while route calculation
To avoid any possible GUI interaction we need a way to deactivate the NavigationLoop while calculating a route.
class NavigationLoop implements Runnable {
    ...

    AtomicBoolean stopped = new AtomicBoolean(false);

    public void start() {
        stopped.set(false);
    }

    public void stop() {
        stopped.set(true);
    }

    @Override
    public void run() {
        if (stopped.get())
            return;

        ...
    }

    ...
}
We stop the NavigationLoop before pushing the calcRoute Runnable to the SDKJobQueue. And restart it in onFinished of our calcRouteObserver.
private final Observer calcRouteObserver = new Observer() {
    ...

        @Override
        public void onFinished(final int error, int index) {
        super.onFinished(error, index);
        handler.post(new Runnable() {
            @Override
            public void run() {
                ...
                    navigationLoop.start();
            }
        });
    }
};
private void handleIntent(Intent intent) {
    ...
    navigationLoop.stop();
    showRouteCalculationProgressDialog();
    SDKJobQueue.getInstance().push(calcRoute);
}