06 Navigating a route
Overview
In this tutorial you will learn how to implement route navigation and how to interpret the maneuvers given by the NavigationSDK. We also show you an easy way to simulate a navigation along the current route for testing.
Base
Use Tutorial05 as a starting point for this project.
Prerequisites
Please add/replace the following files from the Tutorial06 folder to your project directory:
- NaviInfo.cpp
- NaviInfo.h
- NextManeuverControlWidget.cpp
- NextManeuverControlWidget.h
- nextmaneuvercontrolwidget.ui
- InfoControlWidget.cpp
- InfoControlWidget.h
- infocontrolwidget.ui
- NavigationLoop.cpp
- NavigationLoop.h
- mainwindow.ui
Note
When replacing an .ui file, the build system sometimes doesn't recognize the file has change. As a workaround simply modify the file (for example add and remove a space) and save it so that its time stamp changes.
Add the new files to the CMakeLists.txt file:
set(Tutorial_RES
    ...
    nextmaneuvercontrolwidget.ui
    infocontrolwidget.ui
)

set(Tutorial_SRCS
    ...
    NextManeuverControlWidget.cpp
    InfoControlWidget.cpp
    NaviInfo.cpp
)

set(Tutorial_HEADER
    ...
    NextManeuverControlWidget.h
    InfoControlWidget.h
    NaviInfo.h
)
Also, copy the resources below from the Tutorial06/res directory to your projects /res folder:
- arw_fwd.png
- arw_fwd_left.png
- arw_fwd_right.png
- arw_left.png
- arw_right.png
- arw_uturn_left.png
- arw_uturn_right.png
Add the resource files to the main.qrc file:
main.qrc:
<RCC>
  <qresource>
    <file>res/ccp.png</file>
    <file>res/arw_fwd.png</file>
    <file>res/arw_fwd_left.png</file>
    <file>res/arw_fwd_right.png</file>
    <file>res/arw_left.png</file>
    <file>res/arw_right.png</file>
    <file>res/arw_uturn_left.png</file>
    <file>res/arw_uturn_right.png</file>
  </qresource>
</RCC>
Call cmake ../ in the build directory or build the ALL_BUILD project of the solution to update it.
Also, always trigger a rebuild after copying to ensure that replaced files will be rebuilt.
Getting guidance information
To get maneuvers for our current guidance, we have to call SDK_GetGuidanceInformation() in our NavigationLoop. We only have to call it when we are navigating a route. So we add an inNavigation flag to our NavigationLoop to determine the status of our app. We use a std::atomic<bool> to guarantee thread safe access to it. We added the methods startNavigation(), stopNavigation() and navigationActive() to set the flag and to get the status. We also have to subclass the NavigationLoop additionally from QObject, because we like to send the progress and guidance info via the signal slot mechanism later:
NavigationLoop.h:
...
#include "NaviInfo.h"

class NavigationLoop : public QObject, public QRunnable
{
    Q_OBJECT
public:
    NavigationLoop(MapWidget * mapWidget);
    ~NavigationLoop();
    void run();

    static SDK_INT4 SDK_API progressCallback(SDK_INT4 current, SDK_INT4 total, SDK_INT4 job);

    void startNavigation();
    void stopNavigation();
    bool navigationActive();

private:
    MapWidget * mMap;
    std::atomic<bool> inNavigation;
    NaviInfo mNaviInfo;

signals:
    void progress(int);
    void newGuidanceInfo(NaviInfo info);
};
In the MainWindow::onCalcRouteFinished() we call mNavigationLoop->startNavigation() if the route calculation succeeded:
Add the following to MainWindow::onCalcRouteFinished():
MainWindow.cpp:
void MainWindow::onCalcRouteFinished(int error)
{
    ..
    if ((SDK_ERROR)error == SDK_ERROR_Ok)
    {
        ..
        mNavigationLoop->startNavigation();
    }
}
Now we can get the guidance information in the navigation loop. Because SDK_GetGuidanceInformation() is a potentially long running operation, we would usually call it in a QRunnable and push it to our SDKJobQueue. But since we are already in a QRunnable - which is called in the SDKJobQueue - there is no need for this. If we have no route, it makes no sense to get guidance information. So we check this and return early from the loop. At the end, we check the DestinationReached flag of the returned SDK_NavigationInformation result to see if we have to stop the navigation.
NavigationLoop.cpp:
...
void NavigationLoop::run()
{
    ...

    if (rc == SDK_ERROR_Ok || rc == SDK_ERROR_SamePosition)
    {
        ...

        if (navigationActive())
        {
            SDK_ERROR rc = SDK_GetGuidanceInformation(&gps, &navInfo, 0, progressCallback);
            if (rc == SDK_ERROR_Ok)
            {
                mNaviInfo.setNaviInfo(navInfo);
                ...
                emit newGuidanceInfo(mNaviInfo);
            }
        }
        ...

        if (navInfo.DestinationReached == SDK_TRUE)
        {
            stopNavigation();
        }
    }
}
...
Rerouting
So what happens if we deviate from the given route? Do we have to check and calculate a new route? No we don't have to, SDK_GetGuidanceInformation() will take care of that. If we deviate only a few meters from our current route, the call of the function will automatically pull us back to our current route. If we deviate further from our current route it will calculate a complete new route to our destination.
Because of this, we can call SDK_GetGuidanceInformation() with a callback as parameter to get progress information in this case. To send this progress information to our MainWindow, we created a signal progress(), which we connect to our MainWindow::onProgress() slot (which we have already implemented for the route calculation).
NavigationLoop.h:
...
signals:
    void progress(int);
    ...
NavigationLoop.cpp:
SDK_INT4 SDK_API NavigationLoop::progressCallback(SDK_INT4 current, SDK_INT4 total, SDK_INT4 job)
{
    emit pThis->progress(current);
    return 1;
}
Add the following to the MainWindow class:
MainWindow.cpp:
MainWindow::MainWindow(QMainWindow * parent) : QMainWindow(parent)
{
    ...
    connect(mNavigationLoop, SIGNAL(progress(int)), this, SLOT(onProgress(int)));
}
Maneuver building
To inform the MainWindow about new guidance information, we emit the signal newGuidanceInfo() in our NavigationLoop. Qt can only send structures with the signal/slot connections over threads that are previously registered to Qt. Therefore, we have to wrap the SDK_NavigationInformation struct in a new class, so that Qt can send it over. This class has to be subclassed from QObject and must have a copy constructor. Q_DECLARE_METATYPE(NaviInfo) declares this class for Qt.
Finally, we also have to register the class to make it visible to Qt:
Add the following to the MainWindow class:
MainWindow.cpp:
...
#include "NaviInfo.h"

MainWindow::MainWindow(QMainWindow * parent) : QMainWindow(parent)
{
    qRegisterMetaType<NaviInfo>();
    ...
}
The NaviInfo class itself looks like this:
NaviInfo.h:
#pragma once

#include "../navigationsdk/SDKInterface.h"
#include <QObject>

class NaviInfo
{

public:
    NaviInfo();
    NaviInfo(const SDK_NavigationInformation& info);
    ~NaviInfo();

    void getNaviInfo(SDK_NavigationInformation& info);
    void setNaviInfo(const SDK_NavigationInformation& info);

private:
    SDK_NavigationInformation mNaviInfo;
};

Q_DECLARE_METATYPE(NaviInfo);
NaviInfo.cpp:
#include "../navigationsdk/SDKInterface.h"
#include "NaviInfo.h"

NaviInfo::NaviInfo()
{

}

NaviInfo::NaviInfo(const SDK_NavigationInformation& info)
{
    mNaviInfo = info;
}

NaviInfo::~NaviInfo()
{

}

void NaviInfo::getNaviInfo(SDK_NavigationInformation& info)
{
    info = mNaviInfo;
}

void NaviInfo::setNaviInfo(const SDK_NavigationInformation& info)
{
    mNaviInfo = info;
}
As you can see, the class simply wraps a SDK_NavigationInformation struct so we can use it with the signal/slot mechanism.
To show the guidance information on the MainWindow, we created a small widget which shows the distance, the street name and an icon representation of the next maneuver called NextManeuverControlWidget. We also created a control called InfoControlWidget to show the arrival time, the distance to the next station and the time to the next station. The NextManeuverControlWidget will be shown on top of our map, the InfoControlWidget at the bottom.
Open the nextmaneuvercontrolwidget.ui and the infocontrolwidget.ui in the Qt designer:
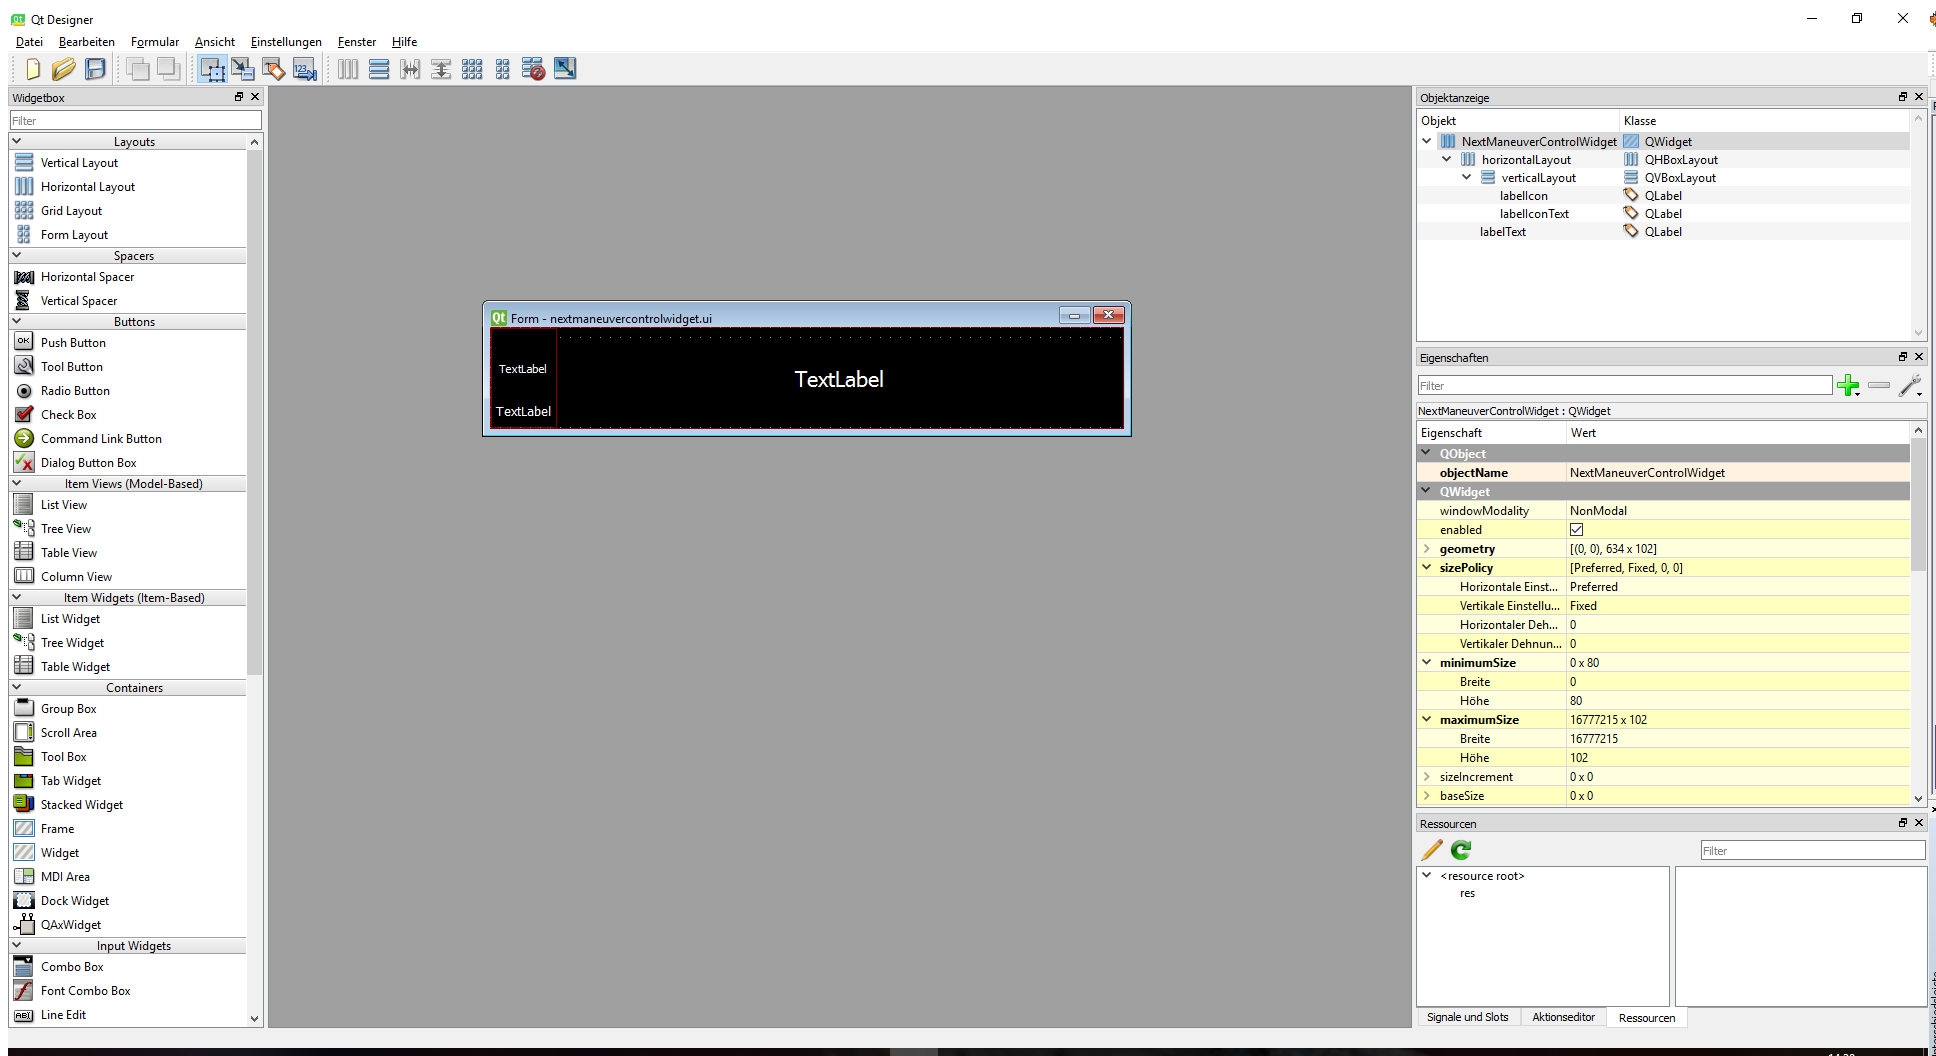
The next maneuver control widget has three labels, two on the left side and one one the right. The upper left one will show a direction arrow, the lower one the distance to the next maneuver. The right label shows the street name.
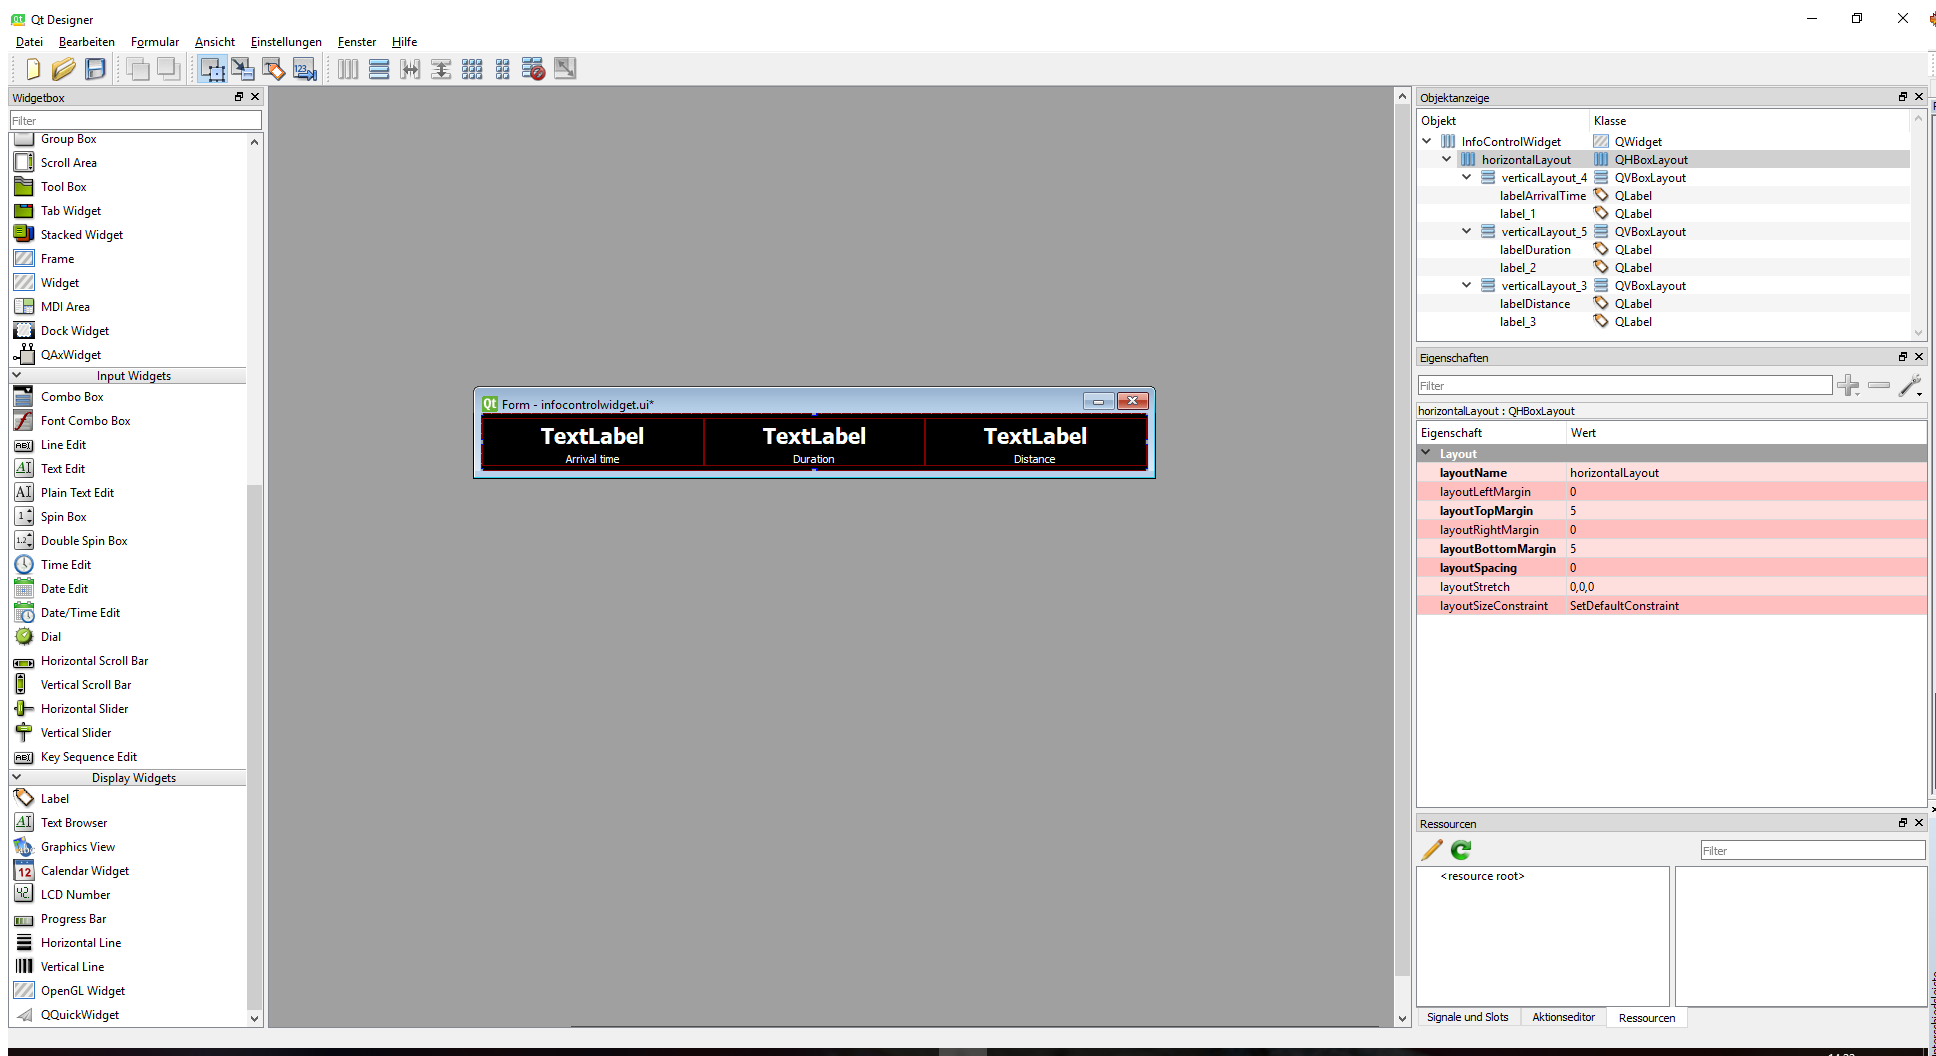
The info control widget has three labels to show the arrival time, the driving time and the distance to the next station.
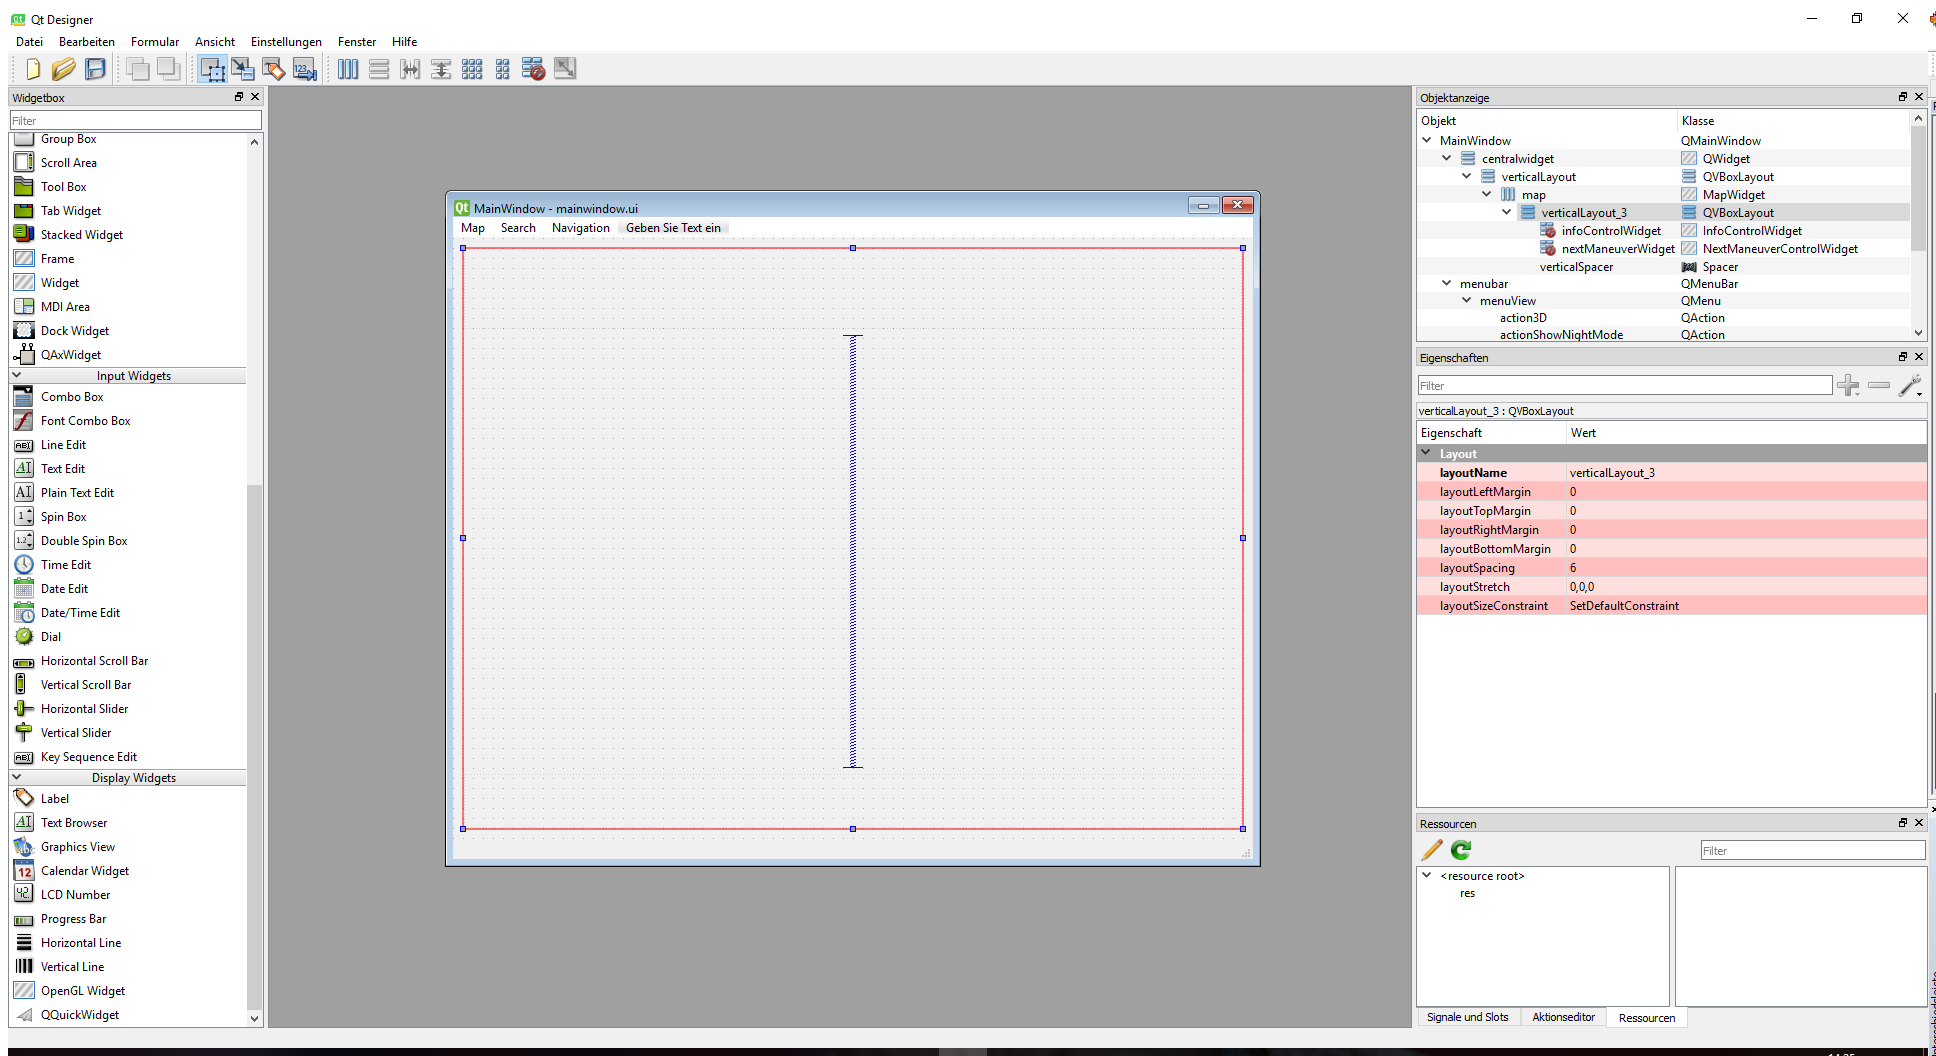
We added the widgets to our mainwindow.ui, so that the next maneuver control is placed above the map in the upper part of the window and the info control is in the lower part:
To manage the content and visibility of the two widgets, we implemented two classes, the NextManeuverControlWidget class and the InfoControlWidget class.
Both classes are based on a QWidget.
NextManeuverControlWidget.cpp:
...
NextManeuverControlWidget::NextManeuverControlWidget(QWidget *parent)
    : QWidget(parent)
{
    ui.setupUi(this);

    mArrowForward.load(":/res/arw_fwd.png");
    mArrowForwardLeft.load(":/res/arw_fwd_left.png");
    mArrowForwardRight.load(":/res/arw_fwd_right.png");
    mArrowLeft.load(":/res/arw_left.png");
    mArrowRight.load(":/res/arw_right.png");
    mArrowUTurnLeft.load(":/res/arw_uturn_left.png");
    mArrowUTurnRight.load(":/res/arw_uturn_right.png");

    ui.labelIcon->setPixmap(mArrowForward);
    ui.labelIconText->setText("500m");
    ui.labelText->setText("Streetname");
}

void NextManeuverControlWidget::update(const SDK_NavigationInformation& navInfo)
{
    ...
}
In the constructor, we load the bitmaps of the direction arrows. The update function will change the arrow and texts in the widget dependent on the SDK_NavigationInformation struct it receives. We will show details of this function later.
InfoControlWidget.cpp:
...
InfoControlWidget::InfoControlWidget(QWidget *parent)
    : QWidget(parent)
{
    ui.setupUi(this);
}

...

void InfoControlWidget::update(const SDK_NavigationInformation& info)
{
    if (!isVisible())
        setVisible(true);


    // labelDistance shows the distance to the next station
    SDK_WCHAR_T *distanceText = NULL;
    SDK_ERROR rc = SDK_GetLocalizedDistanceString(info.DistToNextStation, SDK_FALSE, &distanceText, SDK_FALSE, L"", L'.', SDK_FALSE);
    ui.labelDistance->setText(QString::fromWCharArray(distanceText));

    // labelArrivalTime shows the arrival time
    QDateTime date = QDateTime::currentDateTime();
    date = date.addSecs(info.TimeToNextStation);
    QString format = "hh:mm";
    QString t = date.toString(format);
    ui.labelArrivalTime->setText(t);

    // labelDuration shows the driving time
    int hours = (info.TimeToNextStation / 60 / 60) % 24;
    int minutes = (info.TimeToNextStation / 60) % 60;

    QString  duration;
    duration.sprintf("%02d:%02d", hours, minutes);
    ui.labelDuration->setText(duration);
}
In the update() method, we fill the labels with the distance, the arrival time and the duration.
The DistToNextStation value is in [m], so we format it with SDK_GetLocalizedDistanceString() to get a string with a localized and meaningful unit.
We also format the arrival time and the duration.
The NextManeuverControlWidget and the InfoControlWidget will be updated in the MainWindow in the slot onGuidanceInfo(). This slot is connected to the NavigationLoop signal NavigationLoop::newGuidanceInfo() and will receive the current navigation information.
Add/Change the following in the MainWindow class:
MainWindow.h:
...
#include "NaviInfo.h"
...
protected slots:
    ...
    void onGuidanceInfo(NaviInfo info);
    ...
MainWindow.cpp:
MainWindow::MainWindow(QMainWindow * parent) : QMainWindow(parent)
{
    ...
    ui.nextManeuverWidget->setVisible(false);
    ui.infoControlWidget->setVisible(false);
    connect(mNavigationLoop, SIGNAL(newGuidanceInfo(NaviInfo)), this, SLOT(onGuidanceInfo(NaviInfo)));
}

void MainWindow::onGuidanceInfo(NaviInfo navInfo)
{
    SDK_NavigationInformation info;
    navInfo.getNaviInfo(info);

    if (info.DestinationReached)
    {
        ui.nextManeuverWidget->setVisible(false);
        ui.infoControlWidget->setVisible(false);
    }
    else
    {
        ui.nextManeuverWidget->update(info);
        ui.infoControlWidget->update(info);
    }
}
We initially set the widgets to invisible, because we do not have any guidance information on startup.
When new guidance information is available, we call ui.nextManeuverWidget->update(info) and ui.infoControlWidget->update(info) with the current navigation information.
The struct SDK_NavigationInformation has the following members:
| Type | Name | Description |
|---|---|---|
| SDK_HDRINFO | size | Size of the structure - for controlling |
| SDK_HDRINFO | version | Version of the structure - for controlling. Use SDK_NavigationInformationVERSION |
| SDK_Position | Pos | Current position [Mercator] |
| SDK_Position | PosOnRoute | Current position on route [Mercator] |
| SDK_Position | CorrectedPosOnRoute | Current position on route [Mercator] (+forecast, but that's not implemented) |
| SDK_INT4 | Course | Current course [0..360[, head east, counter-clockwise |
| SDK_INT4 | CourseOnRoute | Current course on route [0..360[, 0 heading east, counterclockwise |
| SDK_INT4 | SpeedLimitCar | Speed limit on the current segment for cars [km/h] |
| SDK_INT4 | SpeedLimitTruck | Speed limit on the current segment for trucks [km/h] |
| SDK_BOOL | SpeedLimitCarIsImplicit | Flag whether the speed limit for cars is implicit or explicit. |
| SDK_BOOL | SpeedLimitTruckIsImplicit | Flag whether the speed limit for trucks is implicit or explicit. |
| SDK_INT4 | NextSpeedLimitCar | Value of next different speedlimit for cars ahead on the route from the current position, if the speedlimit doesn't change until reaching the target, the value will be set to -1 |
| SDK_INT4 | NextSpeedLimitTruck | Value of next different speedlimit for trucks ahead on the route from the current position, if the speedlimit doesn't change until reaching the target, the value will be set to -1 |
| SDK_UINT4 | DistToNextSpeedLimitCar | Distance to the next different speedlimit for cars on the route. |
| SDK_UINT4 | DistToNextSpeedLimitTruck | Distance to the next different speedlimit for trucks on the route. |
| SDK_INT4 | RoadTypeOfNextSpeedLimitCar | Road type of the segment where the next speedlimit for cars changes |
| SDK_INT4 | RoadTypeOfNextSpeedLimitTruck | Road type of the segment where the next speedlimit for trucks changes |
| SDK_INT4 | RoadType | Road type of the current segment [0..14] |
| SDK_INT4 | Category | Road category of the current segment [0..4] |
| SDK_INT2 | CountryCode | The country code attached to the current segment. 0 when no cc is attached |
| SDK_BOOL | SegmentBorderPassed | Has a segment border been passed since the last position? |
| SDK_BOOL | ManeuverPointPassed | Has a maneuver point been passed since the last position? |
| SDK_BOOL | NextCrossingInTown | Is the next crossing inside a town area? |
| SDK_BOOL | NoTownUntilNextManeuver | Only Non-City-Roads until next crossing? |
| SDK_UINT4 | DistToNextManeuver | Distance [m] to next maneuver |
| SDK_UINT4 | TimeToNextManeuver | Time [s] to next maneuver |
| SDK_UINT4 | RouteLengthToNextManeuver | Distance [m] from previous maneuver to next maneuver |
| SDK_UINT4 | DistToDestination | Distance [m] to destination |
| SDK_UINT4 | TimeToDestination | Time [s] to destination without delays caused by traffic on the route |
| SDK_UINT4 | CrowFlightDistToDestination | Crow flight distance [m] from last matched position on the route to destination |
| SDK_UINT4 | DistToNextStation | Distance [m] to next station |
| SDK_UINT4 | TimeToNextStation | Time [s] to next station |
| SDK_INT2 | VoiceOutputManeuverHint | 0 if no voice output of the next maneuver is suggested. > 0 if voice output is suggested. Value is the amount of suggestions including this up to next maneuver. May be set for a finite period of time, see generatemaneuverhints for details |
| SDK_BOOL | AnnounceNextManeuver | True, if the next maneuver is closer than 600m in urban and closer than 3000m in rural areas |
| SDK_BOOL | AnnounceAtOnceForNextManeuver | True, if the next and second next maneuver are nearby crossings and the time between the two will not exceed a certain period |
| SDK_BOOL | AnnounceSecondNextManeuver | True if the maneuver is a composite maneuver |
| SDK_WCHAR_T | CurrentStreetName[128] | Name of the current street |
| SDK_ManeuverDescription | NextManeuver | Description of the next maneuver |
| SDK_ManeuverDescription | SecondNextManeuver | Description of the second next maneuver |
| SDK_CrossingView | NextManeuverCrossingView | Information for drawing the crossing view for the next maneuver |
| SDK_CrossingView | SecondNextManeuverCrossingView | Information for drawing the crossing view for the second next maneuver |
| SDK_INT4 | RoundedDistToNextManeuver | Distance to the next maneuver [unit]. The unit is given by the current set metric |
| SDK_INT4 | RoundedDistFromNextToSecondNextManeuver | Distance from the next to the second next maneuver [unit]. The unit is given by the current set metric |
| SDK_BOOL | InTunnel | Are we in a tunnel? |
| SDK_BOOL | OnBridge | Not yet implemented |
| SDK_BOOL | WrongRoad | Are we on the wrong road? Early indicator that the user has left the road |
| SDK_BOOL | OffRoad | Set to SDK_TRUE when driving offroad |
| SDK_BOOL | MissRouting | Are we in a missrouting case? System will try to calculate a new route next time, if it wasn't done just now |
| SDK_BOOL | DestinationReached | Destination reached? Set to SDK_TRUE while near the destination. User should stop navigation/calling SDK_GetGuidanceInformation then! |
| SDK_BOOL | ClosedArea | Indicates if the vehicle is on a "forbidden" road |
| SDK_INT4 | reserved0 | Reserved for future applications |
| SDK_INT4 | ReRouteStatus | Did the ReRoute status change? (see ReRoutingModes) |
| SDK_UINT4 | RouteTraceHnd | Reserved for future applications |
| SDK_INT4 | GuidanceKind | Guidance mode. See GuidanceKinds |
| SDK_INT4 | NextGuidanceKind | Next Guidance mode. See GuidanceKinds |
| SDK_INT2 | CrowFlightDirection | Direction to target [0..360] 0=N, 90=E |
| SDK_UINT4 | CrowFlightGPSDistToDestination | Crow flight distance [m] from current GPS position on route to destination |
| SDK_TruckWarnings | TruckWarningsCurrentSegment | Truck warnings on current segment |
| SDK_TruckWarnings | TruckWarningsNextSegment | Truck warnings on next segment |
| SDK_INT4 | TrafficDelayOnRoute | Current traffic delay on the complete route |
| SDK_INT4 | TrafficDelayOnRouteForCurrentPosition | Current traffic delay on the route from the current position |
| SDK_BOOL | TrafficBlockingEventsOnRoute | Any blocking traffic events exist on route. |
| SDK_BOOL | TrafficBlockingEventsOnRouteForCurrentPosition | Any blocking traffic events exist on route for or after current position. |
As you can see, there is a lot of information we get. For our control, we only use the DistToNextManeuver for the distance label and the NextManeuver for determining the arrow and for setting the street name.
To update the label with the correct maneuver arrow, we have to interpret the NextManeuver field, which is of type SDK_ManeuverDescription.
The struct SDK_ManeuverDescription has the following members:
| Type | Name | Description |
|---|---|---|
| SDK_HDRINFO | size | Size of the structure - for controlling |
| SDK_HDRINFO | version | Version of the structure - for controlling. Use SDK_ManeuverDescriptionVERSION |
| SDK_Position | Pos | Coordinates of the maneuver |
| SDK_INT4 | DrivingDirection | [0..360], 0 is East |
| SDK_INT4 | RoadType | Road type of road after maneuver [0..14] |
| SDK_INT4 | Category | Road category of road after maneuver [0..4] |
| SDK_INT4 | CountryID | Country id. Maybe 0 for some roads due to internal limitations |
| SDK_INT4 | DistFromStart | Distance from start [m] |
| SDK_INT4 | TimeFromStart | Time from start [s] |
| SDK_INT4 | TunnelMode | Usually set to 0. 1 indicates a maneuver inside a tunnel. 2 indicates a maneuver immediately after leaving a tunnel |
| SDK_BOOL | RoundaboutManeuver | Is this a maneuver related to a roundabout? |
| SDK_BOOL | TBaseCrossing | Is this a maneuver at a T-like crossing (i.e. two streets leaving the current street, one about 90 degrees left, one about 90 degrees right) |
| SDK_INT2 | ManeuverType | A value of type NavigationManeuverTypes |
| SDK_INT2 | TurnOrient | A value of type NavigationManeuverDirections |
| SDK_INT2 | TurnWeight | A value of type NavigationManeuverWeights |
| SDK_INT2 | ExitNr | Exit number in a roundabout. It counts only for valid/legal exits and counting is in driving direction (i.a. counter-clockwise if driving on RHS (most parts of europe, USA, etc.) and clockwise if driving on LHS (GB, AUS, RSA, etc.) |
| SDK_INT4 | GuidanceKind | Kind of current guidance as of next menoeuvre. See GuidanceKinds |
| SDK_INT4 | NextGuidanceKind | Kind of next guidance as after next maneuver. See GuidanceKinds |
| SDK_BOOL | Border | Is maneuver a border crossing |
| SDK_BOOL | EnterFerry | Is maneuver entering a ferry |
| SDK_BOOL | LeaveFerry | Is maneuver leaving a ferry |
| SDK_BOOL | HasSignPostInfo | Signpost info is available |
| SDK_UINT1 | JunctionType | The type of junction this maneuver description belongs to. Possible values are:
|
| SDK_WCHAR_T | StreetName[128] | Street name of segment after passing the maneuver |
| SDK_SignPostInfo | SignPostInfo | Signpost information, only set, if HasSignPostInfo is SDK_TRUE |
| SDK_INT4 | DelayOnRoute | The traffic delay on the route |
We implement a simple (but not complete) example how to map these informations into a maneuver arrow in NextManeuverControlWidget::update().
void NextManeuverControlWidget::update(const SDK_NavigationInformation& navInfo)
{
    ...
    SDK_ManeuverDescription nextManeuver = navInfo.NextManeuver;
    SDK_CrossingView crossingView = navInfo.NextManeuverCrossingView;
    bool drivingRHS = crossingView.DrivingRHS;
    ...
First, we retrieve the next maneuver information and the crossing info. The next maneuver field provides information about the direction of the next maneuver and the type of it. The crossing info is used to retrieve info about the driving side. We need this info to paint the correct arrow for turn around maneuvers.
    ...
    SDK_WCHAR_T *distanceText = NULL;
    SDK_ERROR rc = SDK_GetLocalizedDistanceString(navInfo.DistToNextManeuver, SDK_TRUE, &distanceText, SDK_TRUE, L"now", L'.', SDK_FALSE);
    ui.labelIconText->setText(QString::fromWCharArray(distanceText));
    ui.labelText->setText(QString::fromWCharArray(nextManeuver.StreetName));
    ...
To get a formatted distance string with the correct unit, we call SDK_GetLocalizedDistanceString(). Next we determine the arrow for the maneuver:
    ...
    switch (nextManeuver.ManeuverType)
    {
        case SDK_eMT_Error:
        case SDK_eMT_Further:
            ui.labelIcon->setPixmap(mArrowForward);
            return;

        case SDK_eMT_Keep:
        case SDK_eMT_Enter:
        case SDK_eMT_Change:
        case SDK_eMT_Turn:
        {
            switch (nextManeuver.TurnOrient)
            {
                case SDK_eTO_Left:
                {
                    switch (nextManeuver.TurnWeight)
                    {
                    case SDK_eTW_Weak:
                        ui.labelIcon->setPixmap(mArrowForwardLeft);
                        return;
                    case SDK_eTW_Error:
                    case SDK_eTW_Strong:
                    case SDK_eTW_Normal:
                        ui.labelIcon->setPixmap(mArrowLeft);
                        return;
                    }
                }
                case SDK_eTO_Right:
                {
                    switch (nextManeuver.TurnWeight)
                    {
                    case SDK_eTW_Weak:
                        ui.labelIcon->setPixmap(mArrowForwardRight);
                        return;
                    case SDK_eTW_Error:
                    case SDK_eTW_Strong:
                    case SDK_eTW_Normal:
                        ui.labelIcon->setPixmap(mArrowRight);
                        return;
                    }
                }
                case SDK_eTO_Back:
                {
                    if (drivingRHS)
                        ui.labelIcon->setPixmap(mArrowUTurnLeft);
                    else
                        ui.labelIcon->setPixmap(mArrowUTurnRight);
                    return;
                }
                default:
                    ui.labelIcon->setPixmap(mArrowForward);
                    return;
            }
        }

        case SDK_eMT_UTurn:
            if (drivingRHS)
                ui.labelIcon->setPixmap(mArrowUTurnLeft);
            else
                ui.labelIcon->setPixmap(mArrowUTurnRight);
            break;

        case SDK_eMT_Exit:
        case SDK_eMT_EnterRoundabout:
        case SDK_eMT_StayRoundabout:
        case SDK_eMT_ExitRoundabout:
        case SDK_eMT_DestinationReached:
        case SDK_eMT_EnterRoad:
        case SDK_eMT_LeaveRoad:
        case SDK_eMT_StopOver:
        default:
            ui.labelIcon->setPixmap(mArrowForward);
            return;
    }
}
MainWindow.cpp:
void MainWindow::onCalcRouteFinished(int error)
{
    ...

    if ((SDK_ERROR)error == SDK_ERROR_Ok)
    {
        ...
    }
    else
    {
        ui.nextManeuverWidget->setVisible(false);
    }
}

void MainWindow::actionSearchAddressTriggered(bool triggered)
{
    ...

    if (retVal == QDialog::Accepted && rc == SDK_ERROR_Ok)
    {
        ui.map->denyUpdates();
        ui.nextManeuverWidget->setVisible(false);
        ...
    }
}
We hide the controls if a route calculation returned an error, when we go into tracking mode or when a new address was searched.
Simulate driving
For easy testing, the NavigationSDK brings its own simulation mechanism. To use it, we simply generate a simulation file by calling SDK_CreateGPSSimulation() after a route calculation. We then close our current GPSDevice by calling GPSManager::getInstance()->closeGPS() and reopen a simulated GPSDevice with GPSManager::getInstance()->openGPS() passing the name of the created simulation file.
Attention
Don't push locations to the SDK by calling GPSManager::getInstance()->positionUpdated()! Only get the current position with GPSManager::getInstance()->getCurrentPosition(). The simulation will step to the next position with each call to getCurrentPosition().
To start and stop a simulation, we added a new menu entry to our MainWindow with the action actionToggleSimulation. When triggered, the slot actionSimulationToggled() will be called. We also add a new atomic bool flag for getting the current simulation status.
Add the following to the MainWindow class:
MainWindow.h:
...
#include <atomic>

class MainWindow : public QMainWindow
{
    ...
protected slots:
    void actionSimulationToggled(bool toggled);
private:
    ...
    std::atomic<bool> mIsSimulation;
    ...
}
MainWindow.cpp:
MainWindow::MainWindow(QMainWindow * parent) : QMainWindow(parent)
{
    ..
    mIsSimulation.store(false);
    connect(ui.actionToggleSimulation, SIGNAL(toggled(bool)), this, SLOT(actionSimulationToggled(bool)));
}

void MainWindow::actionSimulationToggled(bool checked)
{
    if (!checked)
    {
        mIsSimulation.store(false);
        GPSManager::getInstance()->closeGPS();
        GPSManager::getInstance()->openGPS(0);
    }
    else
    {
        mIsSimulation.store(true);
        QString simFileName = Constants::getDataPath();
        simFileName += "simulation.dat";
        SDK_ERROR rc = SDK_CreateGPSSimulation(simFileName.toStdWString().c_str());
        mGPSManager.closeGPS();
        mGPSManager.openGPS(simFileName.toStdWString().c_str());
        ui.map->setScale(250);
    }
}
In the constructor, we set the mIsSimulation flag initially to false and connect the menu action actionToggleSimulation to the slot actionSimulationToggled().
If the simulation was toggled by clicking the menu entry, we either stop or start the simulation. Stopping is easy, we close the GPS device and reopen it with the simulation file name set to 0. Starting the simulation is done by calling
SDK_ERROR rc = SDK_CreateGPSSimulation(simFileName.toStdWString().c_str());
As mentioned above, we have to avoid pushing GPS data to the SDK by calling GPSManager::getInstance()->positionUpdated(gpsData) if we are in a simulation, so we check the flag mIsSimulation before pushing the GPS data.
Add/Change the following in the MainWindow class:
MainWindow.cpp:
void MainWindow::onPositionUpdated(QGeoPositionInfo info)
{
    ...
    if(!mIsSimulation.load())
        GPSManager::getInstance()->positionUpdated(gpsData);
}
...
void MainWindow::onCalcRouteFinished(int error)
{
    ...

    if ((SDK_ERROR)error == SDK_ERROR_Ok)
    {
        ...
        ui.actionToggleSimulation->setEnabled(true);
    }
    else
    {
        ui.actionToggleSimulation->setEnabled(false);
        ...
    }
}
The menu entry for starting a simulation should only be active if the route calculation was successful, so we set the action to enabled or disabled according to the error returned from the route calculation.
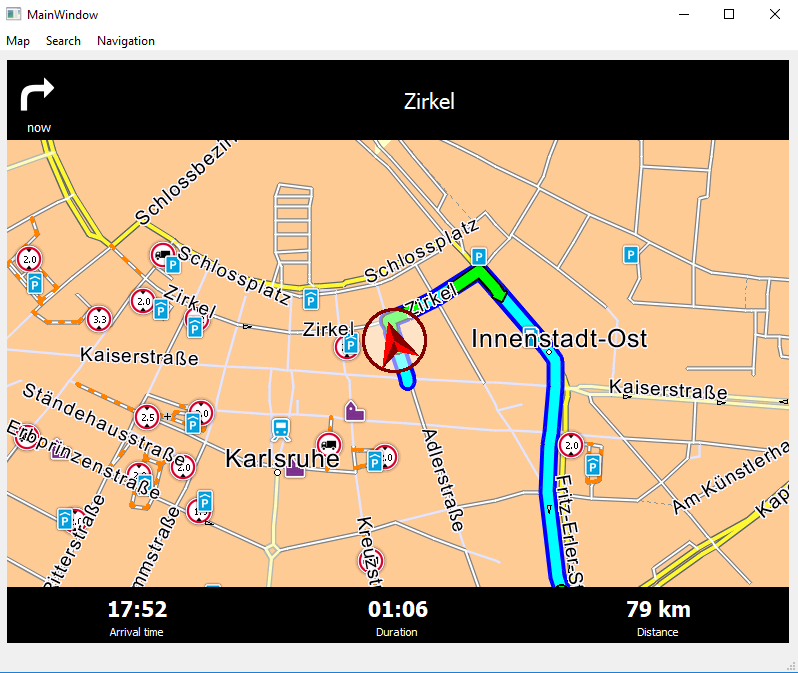
Now we have the possibility to navigate:
Auto zooming
The SDK offers the possibility to auto zoom the map depending on the current driving situation. If a maneuver is ahead, it will be zoomed in to show the street situation at the maneuver in detail. If no maneuver is ahead, a proper zoom level will be calculated dependent on the driving speed and the segment speed the car is on. On motorways the auto zoom will zoom out a lot more than on urban streets for a better overview. The margins for the scalings and the speed intervals with the correspondent scales can be set by the functions SDK_SetAutoZoomSpeedScales() and SDK_SetAutoZoomScaleMargins(). The scaling and speed values are all preset internally to meaningful values, so you only have to change them if you are not satisfied with the default values.
Zooming is done by calling SDK_DoAutoZoom(). We call this function in our MapWidget class, so we have to add the following code:
MapWidget.h:
class MapWidget : public QWidget
{
    Q_OBJECT

public:
    ...
    void DoAutoZoom(const SDK_NavigationInformation * navInfo, const SDK_GPSData * gps);
...
}
MapWidget.cpp:
...
void MapWidget::DoAutoZoom(const SDK_NavigationInformation * navInfo, const SDK_GPSData * gps)
{
    SDK_DoAutoZoom(mMapId, navInfo, gps, true);
}
SDK_DoAutoZoom() will calculate a proper scale value for the current driving situation. If the parameter navInfo is 0, it will calculate values suitable for tracking mode, if an SDK_NavigationInformation struct is given, it will calculate a scale for navigation (for instance by considering the maneuver information additionally). The third parameter is for using the smoothing functionality of the zoom. The calculated scale values of the different zooming situations may vary a lot. For instance, if you drive onto a motorway, the scale for the maneuver will be very low to show details of the street situation. After the maneuver, the scale for driving on the motorway is much higher. You usually don't need many details when driving on a motorway, so the standard behaviour is to zoom out for a better overview. To avoid a jump in the zoom level, the auto zoom will ramp up or down the actual scale value by a given step size until it reaches the calculated zoom value for the situation. Therefore, you have to call SDK_DoAutoZoom() in the NavigationLoop to constantly change the scale value. If you immediately want to switch to the calculated zoom value without smoothing (maybe because you are switching from manual to auto zoom), you can set the third parameter to false. This will result in an immediate switch to the zoom value.
To switch the auto zoom on and off, we added a menu entry in the main window, which we now connect to a slot in our NavigationLoop (the action is already defined in the mainwindow.ui, you don't have to add this):
Add/Change the following in the MainWindow class:
MainWindow.cpp:
MainWindow::MainWindow(QMainWindow * parent) : QMainWindow(parent)
{
    ...
    connect(ui.actionAutoZoom, SIGNAL(toggled(bool)), mNavigationLoop, SLOT(actionAutoZoomToggled(bool)));
}
We connect the actionAutoZoom to the slot actionAutoZoomToggled() in the NavigationLoop. Now we have to add this function to the NavigationLoop:
NavigationLoop.h:
class NavigationLoop : public QObject, public QRunnable
{
    ...
private:
    bool mDoAutoZoom;
    ...

protected slots:
    void actionAutoZoomToggled(bool);
}
NavigationLoop.cpp:
NavigationLoop::NavigationLoop(MapWidget * map) : QObject(), QRunnable()
{
    ...
    mDoAutoZoom = false;
}

...

void NavigationLoop::run()
{
    ...
    if (navigationActive())
    {
        SDK_ERROR rc = SDK_GetGuidanceInformation(&gps, &navInfo, 0, progressCallback);
        if (rc == SDK_ERROR_Ok)
        {
            ...
            if(mDoAutoZoom)
                mMap->DoAutoZoom(&navInfo, &gps);
        }
    }
    else
    {
        if (gps.fix > 0)
        {
            ...
            if(mDoAutoZoom)
                mMap->DoAutoZoom(0, &gps);
        }
        else
            ...
    }
    ...

}
...
void NavigationLoop::actionAutoZoomToggled(bool checked)
{
    mDoAutoZoom = checked;
}
The auto zooming is done by calling the previously implemented function DoAutoZoom(0, &gps) of our MapWidget. We call this in the NavigationLoop every time we get new guidance or new gps information. The SDK function will calculate a proper scale value and sets it automatically.
Tunnel extrapolation
When driving through a tunnel, we normally have no valid GPS position. Our navigation software therefore stops at the tunnel entry and will go on when leaving the tunnel. Most of the time, this behaviour is not wanted, we want to drive through the tunnel as in normal navigation and we also want updated navigation information in the tunnel.
To circumvent this situation, the SDK offers the method SDK_CheckIfTunnel(). It has to be called right after getting navigation information by calling SDK_GetGuidanceInformation() and will check if we entered or leaved a tunnel. The parameter 'pIsTunnel' will be set accordingly. Now, we know if we are in a tunnel or not, but we still haven't a valid GPS signal and the navigation will not continue in the tunnel.
SDK_CheckIfTunnel() also has a solution for this problem. It not only checks if we enter a tunnel, it also starts a position extrapolator, which emulates a GPS signal in the tunnel. We can get this extrapolated position by reading out the values extraPolatedPos, extraPolatedVelocity and extraPolatedCourse in our SDK_GPSData struct. Disabling the extrapolator is also done by SDK_CheckIfTunnel. If we receive more than 5 continuous valid gps data sets, the extrapolator will be deactivated automatically.
To enable the extrapolating, we have to add the following to the NavigationLoop:
NavigationLoop.cpp:
NavigationLoop::NavigationLoop(MapWidget * map) : QObject(), QRunnable()
{
    ...
    mDoAutoZoom = false;
}

...

void NavigationLoop::run()
{
    ...
    if (navigationActive())
    {
        SDK_ERROR rc = SDK_GetGuidanceInformation(&gps, &navInfo, 0, progressCallback);
        if (rc == SDK_ERROR_Ok)
        {
            ...
            SDK_BOOL isTunnel = false;
            SDK_CheckIfTunnel(&navInfo, &gps, &isTunnel);
            if (!isTunnel)
            {
                mMap->setGreyMode(false);
                mMap->setCenter(navInfo.PosOnRoute);
                mMap->setMapMarker(navInfo.PosOnRoute, navInfo.CourseOnRoute, false, SDK_mm_Directed);
            }
            else
            {
                mMap->setGreyMode(true);
                mMap->setCenter(gps.extraPolatedPos);
                mMap->setMapMarker(gps.extraPolatedPos, gps.extraPolatedCourse, false, SDK_mm_Directed);
            }
            ...
        }
    }
    else
    {
        mMap->setGreyMode(false);
        ...
    }
    ...

}
We check for a tunnel right after calling SDK_GetGuidanceInformation. If we are not in a tunnel, we set the center of the map and the map marker to the real GPS position and course, otherwise we use the extrapolated position and course (we also render the map in grey mode if we are in a tunnel to give the user the feedback that the position is extrapolated and not real GPS).
Tracking Mode
Now we can navigate, but how to stop and reset the navigation? For this, the SDK offers the function SDK_TrackingMode(). It will reset the navigation and remove the route trace from the map.
We switch to tracking mode by triggering the menu action actionTrackingMode.
Add the following to the MainWindow class:
MainWindow.h:
    ...
protected slots:
    void actionTrackingModeTriggered(bool triggered);
    ...
Mainwindow.cpp
MainWindow::MainWindow(QMainWindow * parent) : QMainWindow(parent)
{
    ...
    connect(ui.actionTrackingMode, SIGNAL(triggered(bool)), this, SLOT(actionTrackingModeTriggered(bool)));
}

void MainWindow::actionTrackingModeTriggered(bool triggered)
{
    SDK_TrackingMode(SDK_TRUE, 0, 0);
    ui.map->removeAllPins();
    mNavigationLoop->stopNavigation();
    ui.nextManeuverWidget->setVisible(false);
    ui.infoControlWidget->setVisible(false);
}