06 Navigating a route
Overview
In this tutorial you will learn how to implement route navigation and how to interpret the maneuvers given by the NavigationSDK. We also show you an easy way to simulate a navigation along the current route for testing.
Base
Use Tutorial05 as a starting point for this project.
getGuidanceInformation
To get maneuvers for our current guidance, we have to call [NSDK_Navigation getGuidanceInformation:error:]
in our NavigationLoop. But we only have to call it when we are navigating a route. So we add an isNavigation flag to our NavigationLoop and corresponding accessor methods to determine the status of our app. We can do this in our NavigationLoop.m file.
@implementation NavigationLoop

...

-(void) startNavigation {
  _isNavigation = YES;
}

-(void) stopNavigation {
  _isNavigation = NO;
}

-(BOOL) isNavigation {
  return _isNavigation;
}

...
startNavigation, stopNavigation and isNavigation methods in the corresponding header file.
Then we can call [NavigationLoop startNavigation] if calculateTour returns no errors in our ViewController.
@implementation ViewController
...
- (void) calcNavigation {

    ...

    [NSDK_Navigation calculateTour: tour observer:self error:&err];
    if (err) {
      NSLog(@"calculateTour NSError returns:%@", err);
    } else {
      [_navigationLoop startNavigation];
    }
  }];
}
Now we can get the guidance information in the navigation loop. Because getGuidanceInformation is a potentially long running operation, we would usually push it to the NSDK_JobQueue. But since we are already in our _run method - which is called in the NSDK_JobQueue - there is no need for this. If we have no route, it makes no sense to get guidance information. So we check and return early from the loop. Finally we also have a look at the getDestinationReached flag of the returned NSDK_NavigationInformation result to check if we have to stop the navigation.
@implementation NavigationLoop

...

- (void) _run {

    ...

    if (!_isNavigation) {
        return;
    }

    NSError * error;
    NSDK_NavigationInformation * nsdk_NavigationInformation = [NSDK_Navigation getGuidanceInformation:nsdk_gpsdata error:&error];

    if (error) {
        NSLog(@"getGuidanceInformation returns error:%@", error);
    }

    if (nsdk_NavigationInformation != nil) {
        if ([nsdk_NavigationInformation getDestinationReached]){
            [self stopNavigation];
        }
    }
}
Rerouting
So whats happening if we deviate from the given route? Do we have to check and calculate a new route? No we don't, getGuidanceInformation will take care of that. If we deviate only a few meters from our current route, the call to getGuidanceInformation will pull us back to our current route. If we deviate further, getGuidanceInformation will calculate a complete new route to our destination.
Notifying all navigationControls in the NavigationLoop
We update our NavigationControl protocol with three new methods.
@protocol NavigationControl <NSObject>

- (void) onGPS:(NSDK_GPSData*) gps;

// 3 new methods
/**
 * Callback to notify controls of the current state of the guidance
 */
- (void) onNavigation:(NSDK_NavigationInformation*) info gpsData:(NSDK_GPSData*) gps;

/**
 * Callback to notify controls the navigation has started
 */
- (void) onNavigationStarted:(NSDK_RouteInformation*) info;

/**
 * Callback to notify controls the navigation has stopped
 */
- (void) onNavigationStopped;
@end
We use these callbacks to notify all our controls with the current guidance information and when navigation started or stopped. In the call to 'onNavigationStarted' we also pass the current NSDK_RouteInformation of the current navigation.
In the NavigationLoop we iterate over the navigationControl Array and call the new methods like this:
@implementation NavigationLoop
...
- (void) _run {
...
    NSError * error;
    NSDK_NavigationInformation * nsdk_NavigationInformation = [NSDK_Navigation getGuidanceInformation:nsdk_gpsdata error:&error];

    if (nsdk_NavigationInformation != nil) {
        dispatch_async(dispatch_get_main_queue(), ^{
            for (id navigationControl in _navigationControls) {
                [navigationControl onNavigation:nsdk_NavigationInformation gpsData:nsdk_gpsdata];
                if ([nsdk_NavigationInformation getDestinationReached]){
                    NSLog(@"Destination reached stopNavigation");
                    [navigationControl stopNavigation];
                }
            }
        });
    }
}

-(void) startNavigation {
    _isNavigation = YES;

    NSError * error;
    int activeTrace = [NSDK_Navigation getAlternativeRouteActive:&error];
    for (id navigationControl in _navigationControls) {
        [navigationControl onNavigationStarted:[NSDK_Navigation getRouteInformationWithRouteIndex:0 alternative:activeTrace error:&error]];
    }
}


-(void) stopNavigation {
    _isNavigation = NO;
    NSError * error;
    for (id navigationControl in _navigationControls) {
        [navigationControl onNavigationStopped];
    }
}
Attention
Don't update the GUI directly from the NavigationLoop. Please do only update the user interface from the GUI thread (aka main thread). Therefore all GUI processing calls have to be wrapped like above (dispatch_async(dispatch_get_main_queue(), ...)
Building maneuvers
Here we will implement a small control which shows the distance, the street name and an icon representation of the next maneuver.
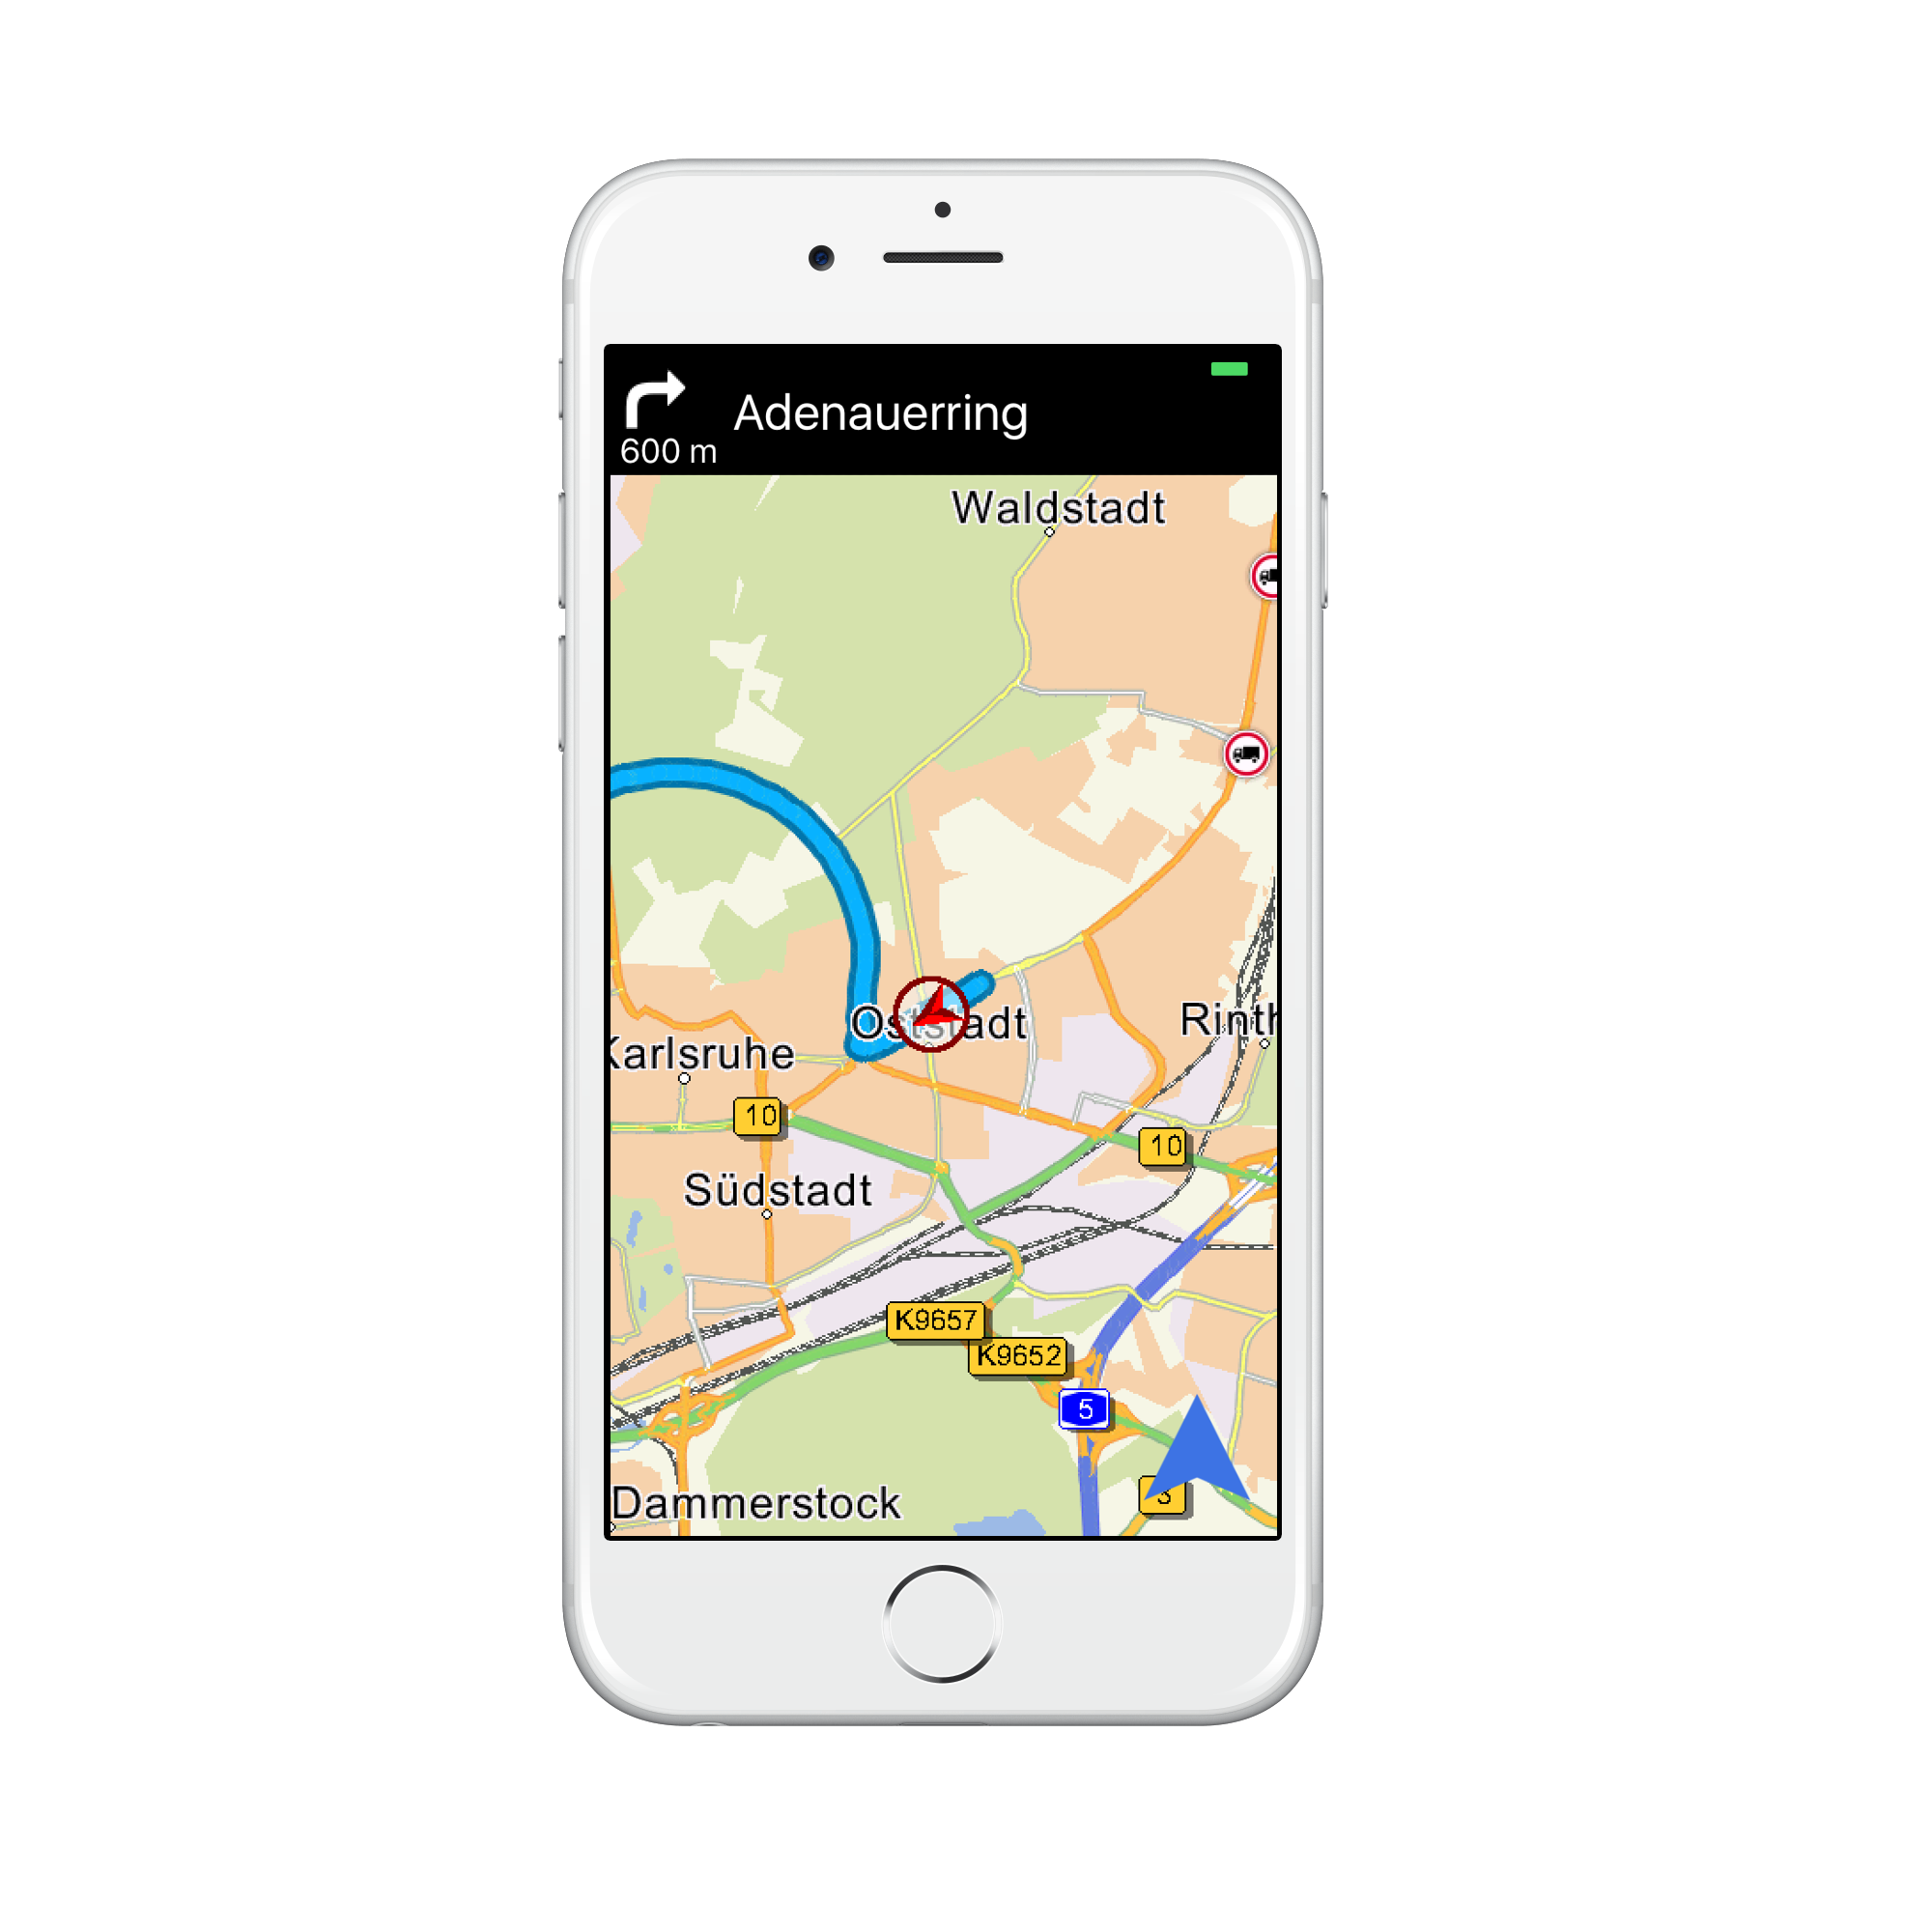
The View consists of three subviews: An UIImageView which shows an image representation of the next maneuver, a UITextField which shows the distance to the next maneuver and a UITextField with the street name of the next maneuver.
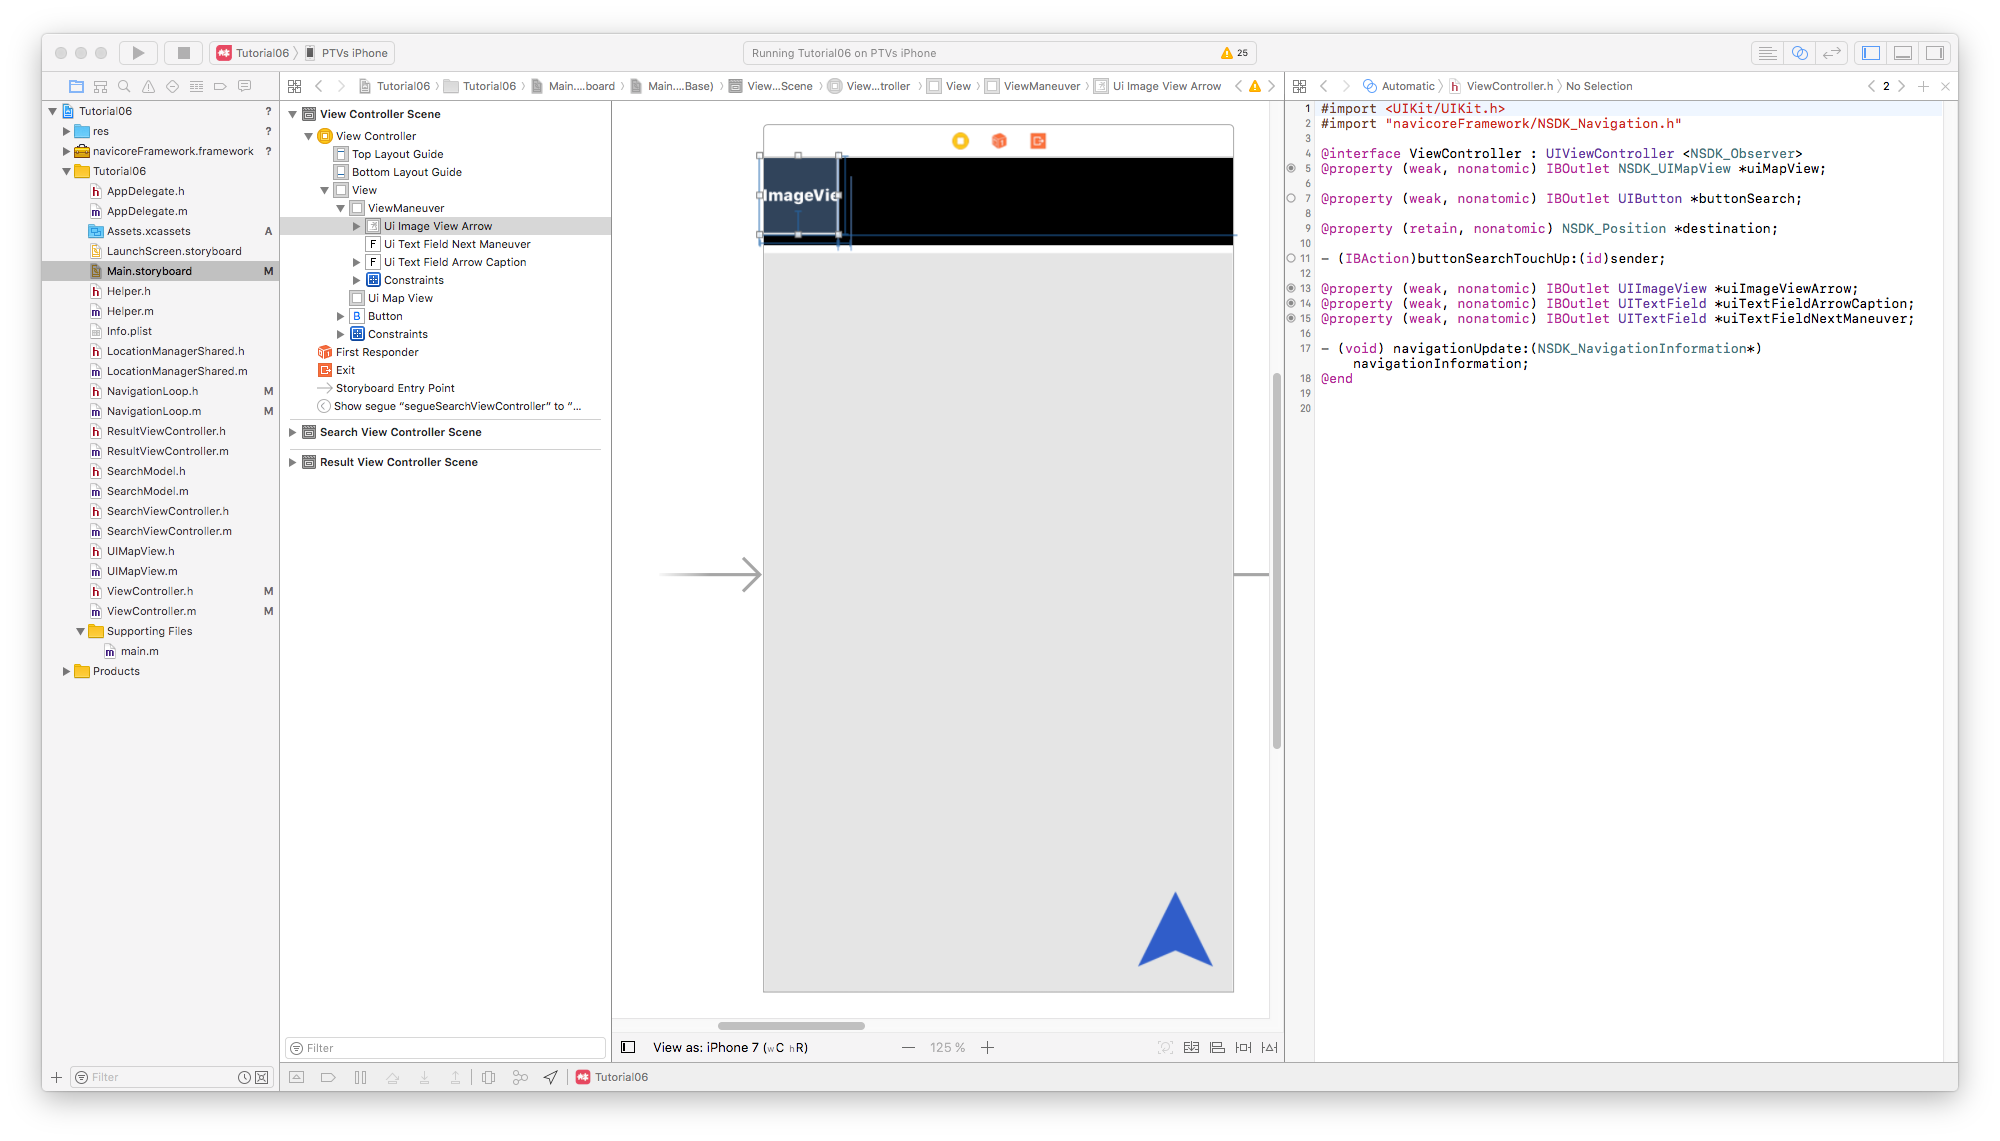
Ctrl-Drag the three UIViews as properties into the Header File:
@interface ViewController : UIViewController <NSDK_Observer>
...
@property (weak, nonatomic) IBOutlet UIImageView *uiImageViewArrow;
@property (weak, nonatomic) IBOutlet UITextField *uiTextFieldArrowCaption;
@property (weak, nonatomic) IBOutlet UITextField *uiTextFieldNextManeuver;
For managing the content and visibility of this Control we implement a class called NextManeuverControl which implements the NavigationControl protocol.
...
@interface NextManeuverControl : NSObject <NavigationControl>

- (instancetype) initWithTextFieldNextManeuver:(UITextField*) uiTextFieldNextManeuver
    imageViewArrow:(UIImageView*) uiImageViewArrow
    textFieldArrowCaption:(UITextField*) uiTextFieldArrowCaption;

@property (weak, nonatomic) UITextField *uiTextFieldNextManeuver;
@property (weak, nonatomic) UIImageView *uiImageViewArrow;
@property (weak, nonatomic) UITextField *uiTextFieldArrowCaption;
As you can see, the new class gets a reference to the UI properties passed in the initializer. In a first implementation of the class we just want to show the street name of the next maneuver. The implementation of the 'onNavigation' method looks like this.(The implementation of the initializer is not shown for the sake of brevity.)
@implementation NextManeuverControl
...
- (void)onNavigation:(NSDK_NavigationInformation *)navigationInformation gpsData:(NSDK_GPSData *)gps {

    NSDK_ManeuverDescription * maneuver = [navigationInformation getNextManeuver];
    [_uiTextFieldNextManeuver setText: [maneuver getStreetName]];
}
To use the NextManeuverControl we create a member in the ViewController
@interface ViewController : UIViewController <NSDK_Observer, NavigationControl>
...
@property (retain, nonatomic) NextManeuverControl *nextManeuverControl;
And initialize it in the viewDidLoad implementation
@implementation ViewController
...
- (void)viewDidLoad {
    ...
    _nextManeuverControl = [[NextManeuverControl alloc] initWithTextFieldNextManeuver:_uiTextFieldNextManeuver imageViewArrow:_uiImageViewArrow textFieldArrowCaption:_uiTextFieldArrowCaption];
    ...
    [_navigationLoop addControl:_nextManeuverControl];
}
When you run the app at this stage of the tutorial and start a navigation, you should see the street name in the top of the screen.
To update the UIImageView with a maneuver arrow, we have to interpret the NSDK_ManeuverDescription given by [NSDK_NavigationInformation getNextManeuver] and the NSDK_CrossingView given by [NSDK_NavigationInformation getNextManeuverCrossingView].
Maneuvers are described by three properties, implemented as enums. First, NSDK_ManeuverType describes the kind of maneuver we are dealing with (simple turn, entering a motorway or a roundabout for example). Second, the NSDK_ManeuverDirection describes which direction the maneuver has. Third, you get a rough estimation of the angle of a maneuver from the NSDK_ManeuverWeight. For extended information on the next crossing/junction you need to access the NSDK_CrossingView information with [NSDK_NavigationInformation getNextManeuverCrossingView].
We implement an example how to map these informations into a maneuver arrow in a new method [NextManeuverControl getImageNameFromManeuver:] by using the SDK method [NSDK_Navigation getManeuverArrow: crossing: error:]. The returned NSString contains the image name of the arrow. You will find all example arrows in the res folder of Tutorial06. In addition we set the distance to the maneuver as the text of the second UITextField. To get a human readable string of [NSDK_NavigationInformation getDistToNextManeuver], we pass it to [NSDK_Navigation getLocalizedDistanceString:].
Note
The getLocalizedDistanceStringfunction returns a formatted String including the appropriate unit ("km" or "m" for example).
@implementation NextManeuverControl
...
- (void)onNavigation:(NSDK_NavigationInformation *)navigationInformation gpsData:(NSDK_GPSData *)gps {

    NSDK_ManeuverDescription * maneuver = [navigationInformation getNextManeuver];

    NSError * error;
    NSString * localizedDistanceString = [NSDK_Navigation getLocalizedDistanceString:[navigationInformation getDistToNextManeuver] quantify:YES allowNow:YES now:@"now" error:&error];

    NSString * imageName = [self getImageNameFromManeuver:maneuver crossingView:[navigationInformation getNextManeuverCrossingView]];

    [_uiTextFieldNextManeuver setText: [maneuver getStreetName]];
    [_uiImageViewArrow setImage:[UIImage imageNamed:imageName]];
    [_uiTextFieldArrowCaption setText:localizedDistanceString];
}

-(NSString*) getImageNameFromManeuver:(NSDK_ManeuverDescription*) description crossingView:(NSDK_CrossingView*) crossingView {

    NSError * error;
    NSDK_ManeuverArrow arrow = [NSDK_Navigation getManeuverArrow:description crossing:crossingView error:&error];
    if (error) {
        NSLog(@"NSDK_Navigation getManeuverArrow returns error:%@", error);
    }

    switch (arrow) {
        case None:
            return @"arw_fwd.png";
        case Left:
            return @"arw_left.png";
        case Right:
            return @"arw_right.png";
        case FowardLeft:
            return @"arw_fwd_left.png";
        case FowardRight:
            return @"arw_fwd_right.png";
        case UTurnLeft:
            return @"arw_uturn_left.png";
        case UTurnRight:
            return @"arw_uturn_right.png";
        case WeakLeft:
            return @"arw_fwd_left_weak.png";
        case WeakRight:
            return @"arw_fwd_right_weak.png";
        case RoundaboutRight045:
            return @"arw_rb_right1.png";
        case RoundaboutRight090:
            return @"arw_rb_right2.png";
        case RoundaboutRight135:
            return @"arw_rb_right3.png";
        case RoundaboutRight180:
            return @"arw_rb_right4.png";
        case RoundaboutRight225:
            return @"arw_rb_right5.png";
        case RoundaboutRight270:
            return @"arw_rb_right6.png";
        case RoundaboutRight315:
            return @"arw_rb_right7.png";
        case RoundaboutLeft045:
            return @"arw_rb_left7.png";
        case RoundaboutLeft090:
            return @"arw_rb_left6.png";
        case RoundaboutLeft135:
            return @"arw_rb_left5.png";
        case RoundaboutLeft180:
            return @"arw_rb_left4.png";
        case RoundaboutLeft225:
            return @"arw_rb_left3.png";
        case RoundaboutLeft270:
            return @"arw_rb_left2.png";
        case RoundaboutLeft315:
            return @"arw_rb_left1.png";
        case Foward:
            return @"arw_fwd.png";
        case LeaveMotorWayLeft:
            return @"arw_mw_left.png";
        case LeaveMotorWayRight:
            return @"arw_mw_right.png";
        case Destination:
            return @"arw_destination.png";
        default:
            return @"arw_fwd.png";
    }
}
Route metrics
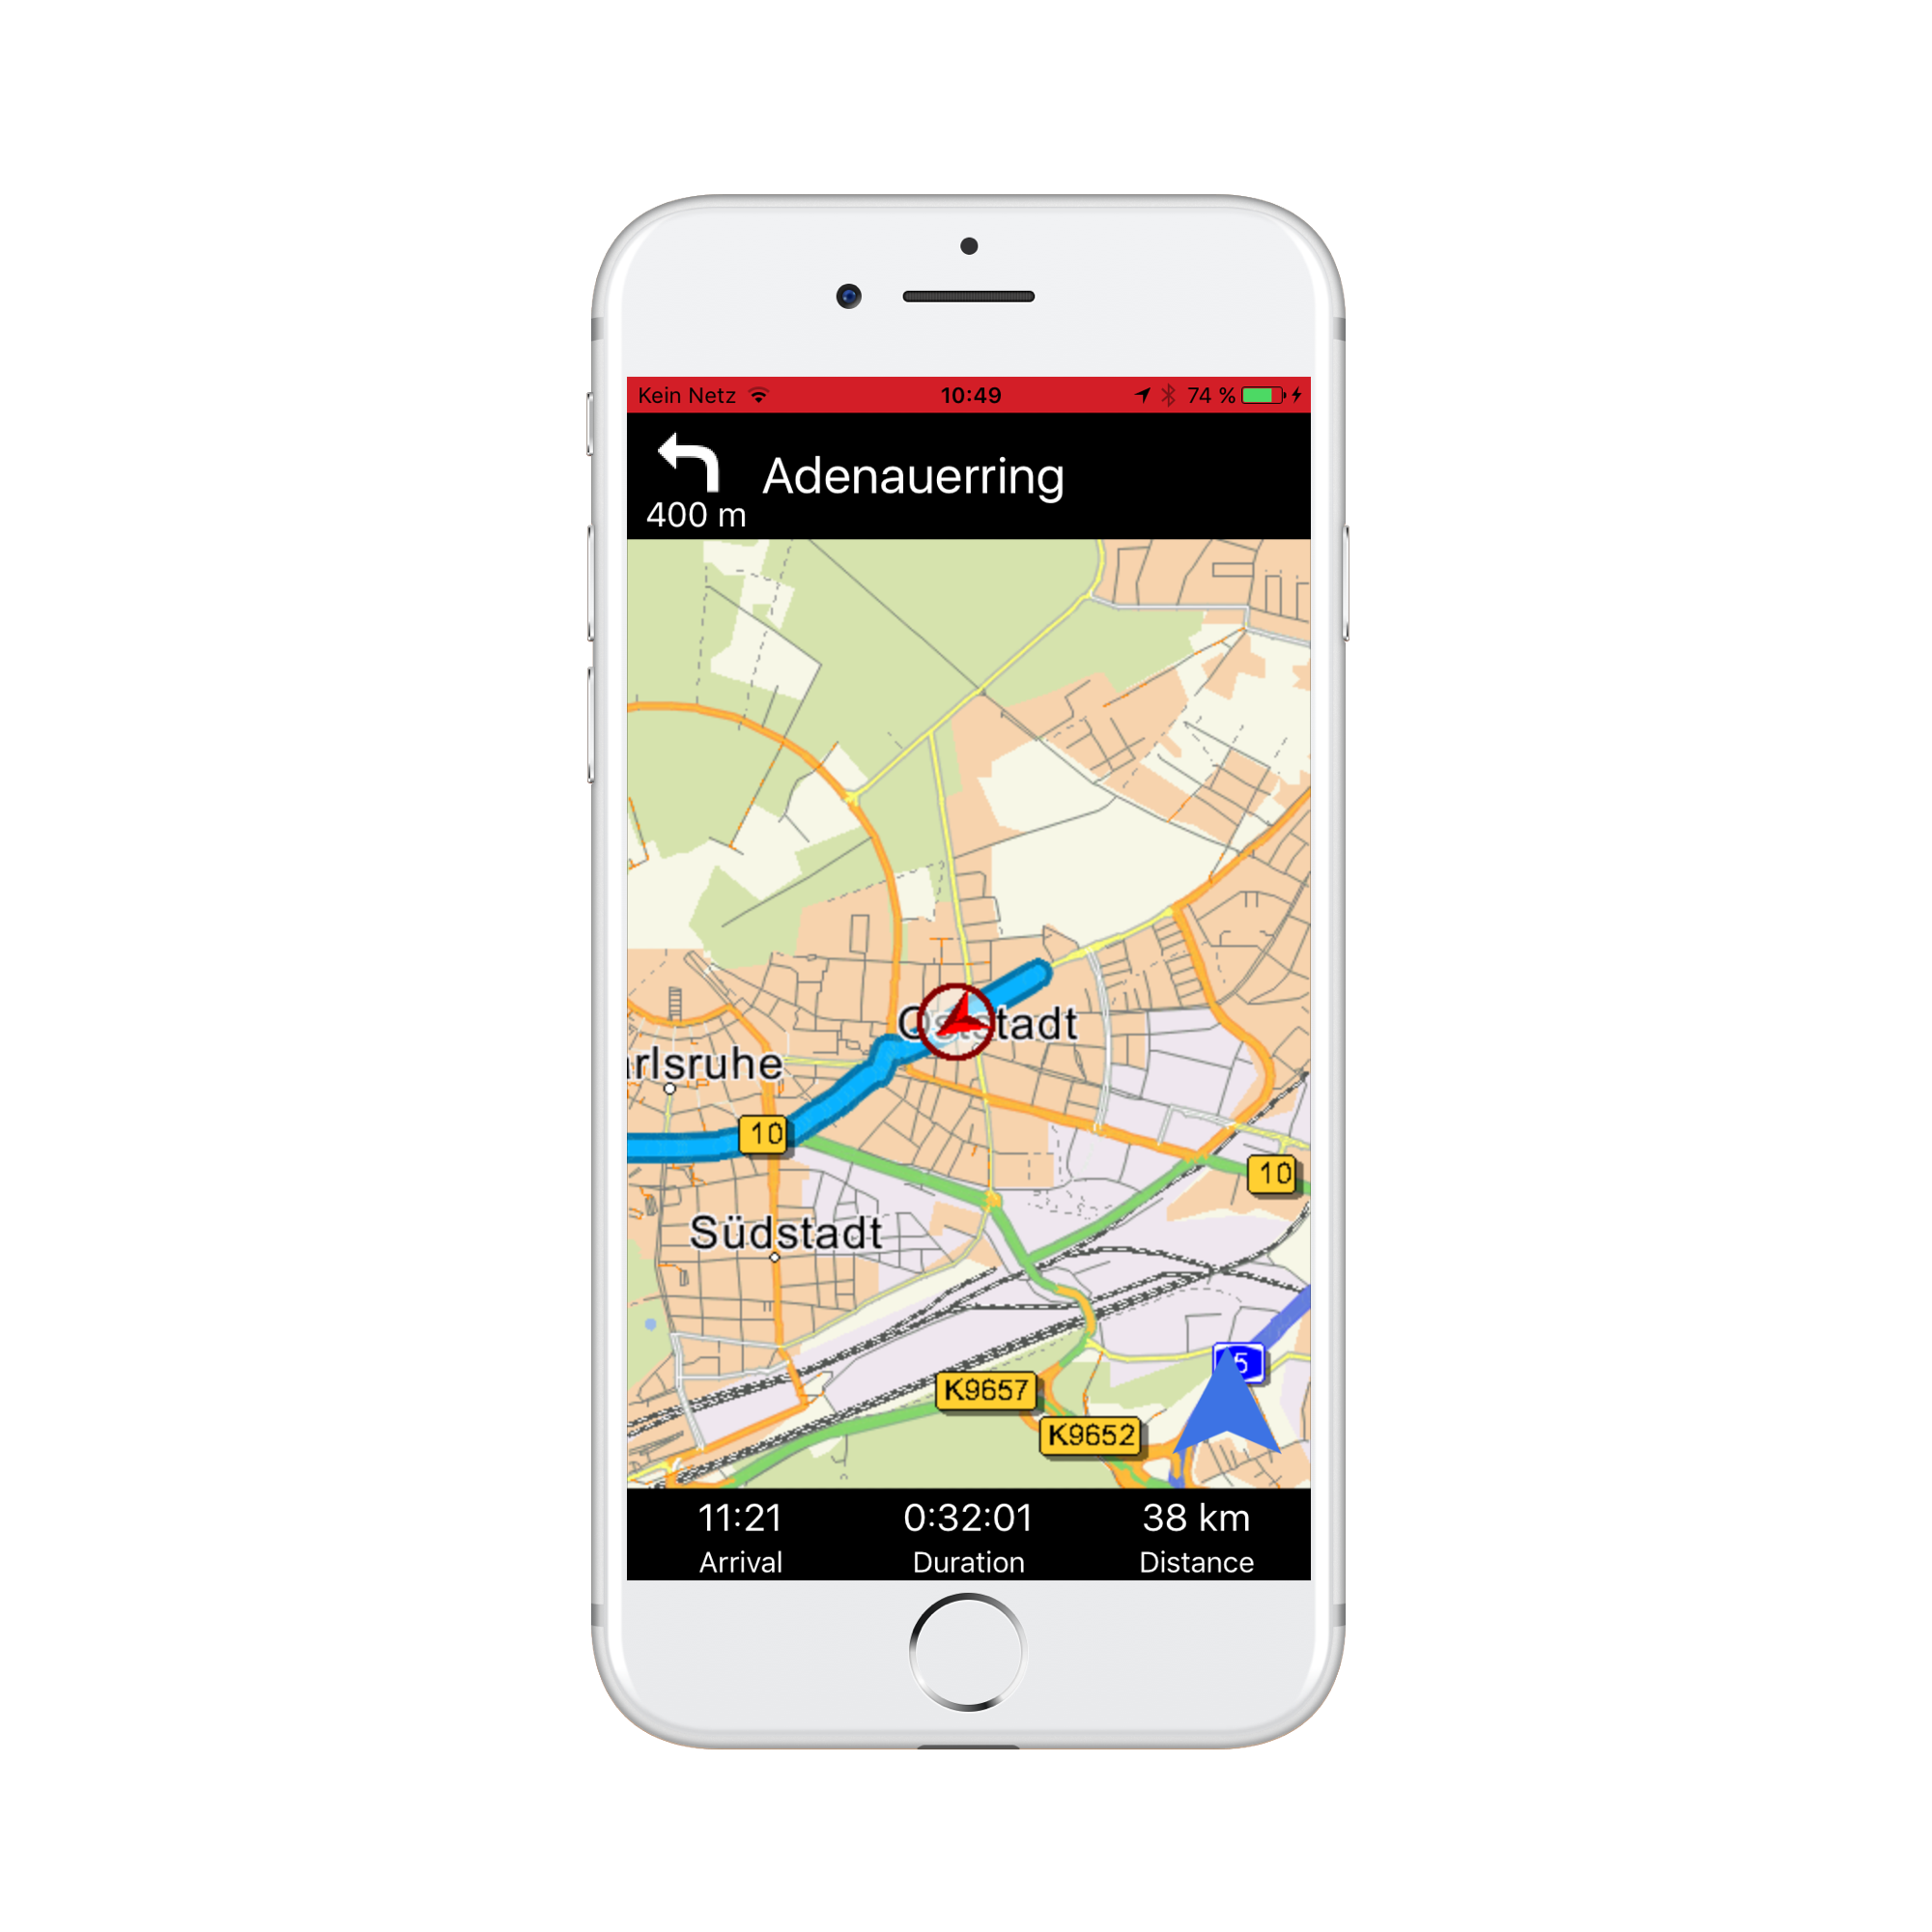
To inform the user about the arrival, we add the following information at the bottom of the screen:
- Estimated time of arrival
- Estimated duration until arrival
- Distance to the destination
We open our storyboard File and put three labels at the bottom of the ViewController. We connect the labels with the following new members in ViewController.h
@property (weak, nonatomic) IBOutlet UILabel *uiLabelEta;
@property (weak, nonatomic) IBOutlet UILabel *uiLabelDuration;
@property (weak, nonatomic) IBOutlet UILabel *uiLabelDistance;
We set the values of these labels in a new class 'NavigationInformationControl' which again implements the NavigationControl protocol:
@interface NavigationInformationControl : NSObject <NavigationControl>
- (instancetype) initWithLabel:(UILabel *) uiLabel;
@property (weak, nonatomic) UILabel *uiLabel;
@end
The implementation for the NavigationControl methods is shown as an example for the NavigationInformationControlDistance class:
@implementation NavigationInformationControlDistance

- (void)onNavigationStarted:(NSDK_RouteInformation *)info {
    NSString * distanceString = [NSDK_Navigation getLocalizedDistanceString:[info getLength] quantify:YES error:nil];
    self.uiLabel.text = distanceString;
}

- (void)onNavigation:(NSDK_NavigationInformation *)navigationInformation gpsData:(NSDK_GPSData *)gps {
    NSString * distanceString = [NSDK_Navigation getLocalizedDistanceString:[navigationInformation getDistToDestination] quantify:YES error:nil];
    self.uiLabel.text = distanceString;
}
@end
Don't forget to initialize your new objects in the ViewController and to register them in the navigationLoop
@implementation ViewController
...
- (void)viewDidLoad {
    ...
    _navigationInformationControlDistance = [[NavigationInformationControlDistance alloc] initWithLabel:_uiLabelDistance];
    ...
    [_navigationLoop addControl:_navigationInformationControlDistance];
    ...
}
Simulate driving
For easy testing, the NavigationSDK brings its own simulation mechanism. To use it, we simply generate a simulation file by calling [NSDK_Navigation createGPSSimulationWithPath:] after a route calculation. We then close our current GPSDevice by calling [[NSDK_GPSManager sharedInstance] closeGPSDevice:] and reopen a simulated GPSDevice with [[NSDK_GPSManager sharedInstance] openSimulatedGPSDevice:(BOOL) simFile:(NSString*) error:(NSError**)]].
@implementation LocationManagerShared

...

- (void) startGPSSimulation {
    _gpsSimulationIsActive = YES;

    NSError * error;
    NSString * tmpSimFileWithPath = [Helper getWritablePathWithFilename:@"sim.tmp"];
    [NSDK_Navigation createGPSSimulationWithPath:tmpSimFileWithPath error:&error];
    [[NSDK_GPSManager sharedInstance] closeGPSDevice:&error];
    [[NSDK_GPSManager sharedInstance] openSimulatedGPSDevice:false simFile:tmpSimFileWithPath error:&error];
}


- (void) stopGPSSimulation {
    NSError * error;
    [[NSDK_GPSManager sharedInstance] closeGPSDevice:&error];
    [[NSDK_GPSManager sharedInstance] openGPSDevice:NO error:&error];
    _gpsSimulationIsActive = NO;
}
Don't forget to put the appropriate function declarations into the header file!
Attention
Don't push locations to the SDK by calling [[NSDK_GPSManager sharedInstance] pushLocation:] while simulating! Please only retrieve the current position with [[NSDK_GPSManager sharedInstance] getCurrentPosition:]. The simulation will step to the next position with every call to getCurrentPosition.
Therefore we introduced a property gpsSimulationIsActive in the code above. We use this property to check if we're allowed to push a new location into the SDK:
@interface LocationManagerShared : NSObject <CLLocationManagerDelegate>

...

@property BOOL gpsSimulationIsActive;
@implementation LocationManagerShared

...

- (void) pushLocationInSDK:(CLLocation*) location {
    if (!_gpsSimulationIsActive) {
        NSDK_JobQueue * jobQueue = [NSDK_JobQueue sharedInstance];
        [jobQueue pushWithBlock:^{
            [[NSDK_GPSManager sharedInstance] pushLocation:location error:nil];
        }];
    }
}
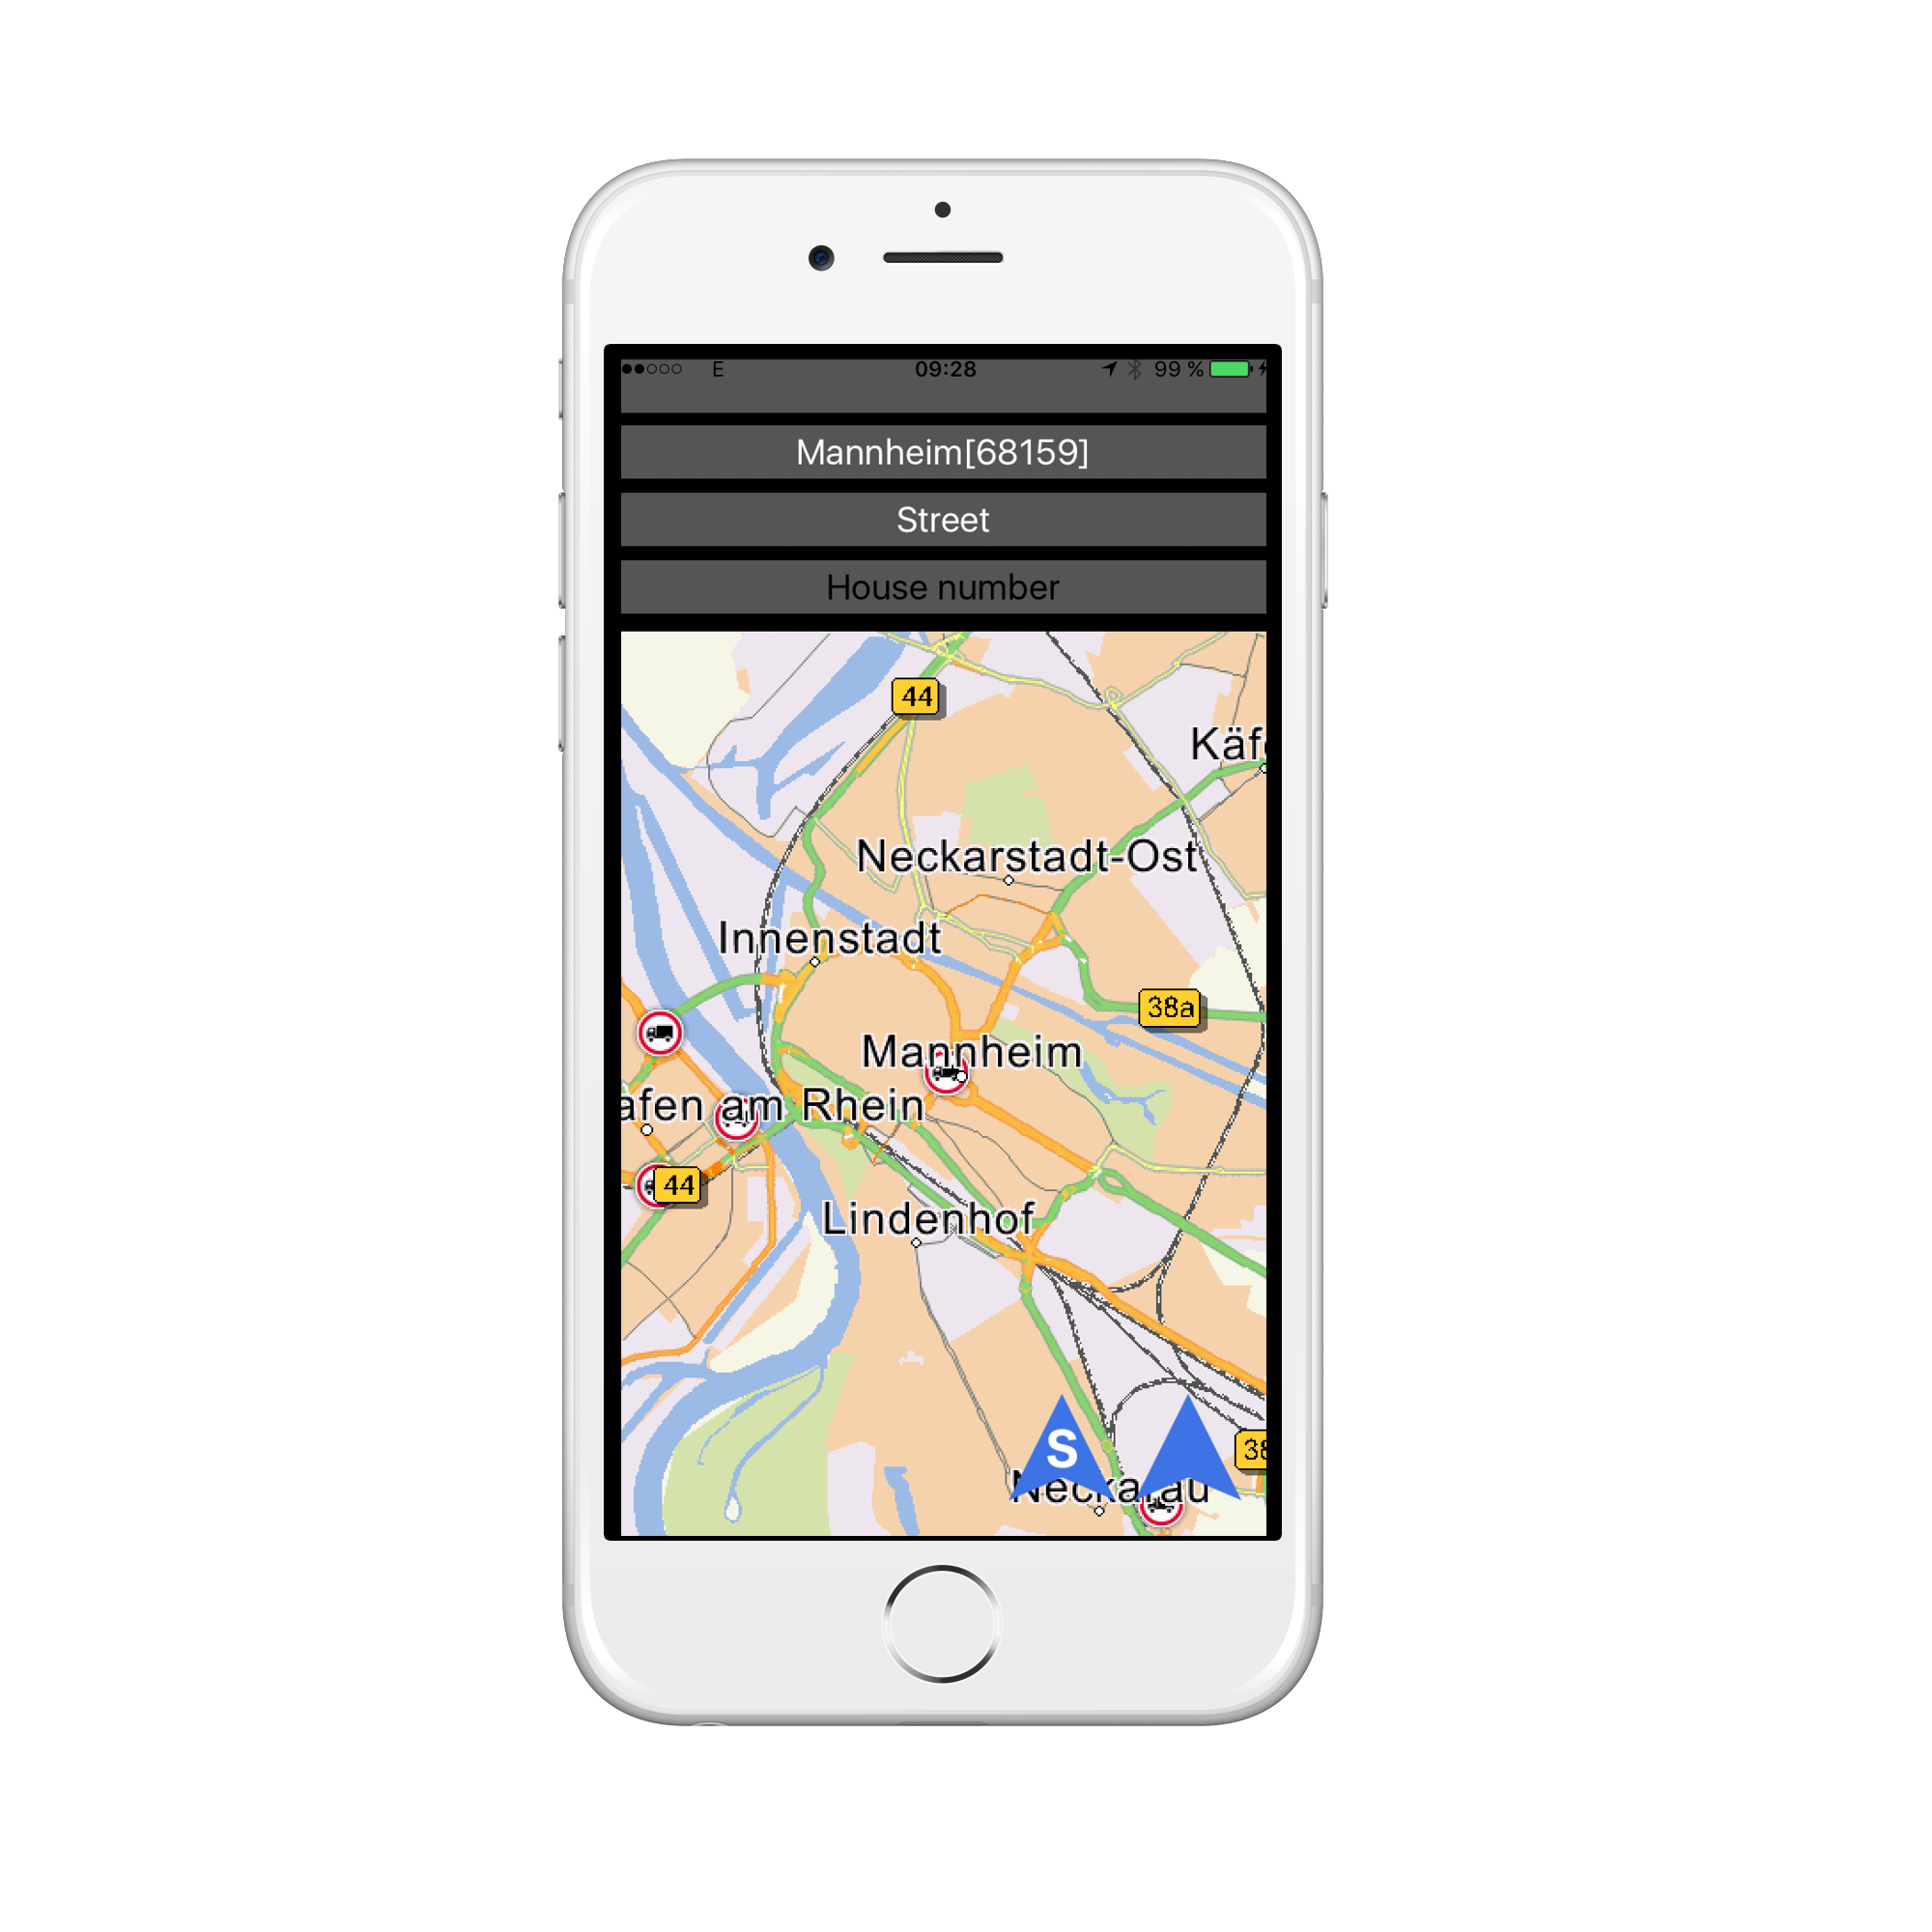
To start a simulation, we will introduce a UIButton in our SearchViewController (The "S" in the button means "Simulation" ).
We make an IBAction method, which will be later connected with the UIButton. We also have to adapt the existing unwindToMainViewController: method to stop an ongoing GPS Simulation.
@interface ViewController ()
...
@property BOOL gpsSimulationIsActive;
@end
@implementation ViewController

...

- (IBAction)unwindToMainViewControllerSimulation:(UIStoryboardSegue*)sender {
    _gpsSimulationIsActive = YES;

    if (_destination != nil ) {
        [self initProgressView];
        [self calcNavigation];

        [[NSDK_JobQueue sharedInstance] pushWithBlock:^{
            [[LocationManagerShared sharedManager] startGPSSimulation];
        }];
    }
}

- (IBAction)unwindToMainViewController:(UIStoryboardSegue*)sender {

    if (_gpsSimulationIsActive) {
        [[LocationManagerShared sharedManager]  stopGPSSimulation];
    }
    _gpsSimulationIsActive = NO;

    if (_destination != nil ) {
        [self initProgressView];
        [self calcNavigation];
    }
}
Open Main.storyboard and Ctrl-Drag the new UIButton to the Exit Icon and choose the unwindToMainViewControllerSimulation: method in the popup menu.
Start the app and have fun watching the CCP following the calculated route!
Autozoom
Manual zoom levels hide many informations while driving. We need suitable zoom levels according to the current speed and navigation situation. We provide optimized zoom levels while driving if you add a doAutoZoom call to your UIMapView.
@implementation UIMapView
...

- (void)onNavigation:(NSDK_NavigationInformation *)nsdk_navigationInformation gpsData:(NSDK_GPSData *)nsdk_gpsdata {
    NSError * error;
    [self doAutoZoom:nsdk_navigationInformation gpsData:nsdk_gpsdata doSmoothZoom:YES error:&error];
    [self setOrientation:270 + [nsdk_gpsdata getCourse]];
    [self refresh];
}

- (void)onNavigationStarted:(NSDK_RouteInformation *)info {
    [self setFixPoint: [[NSDK_Position alloc] initWithX:0 y:-39]];
    [self refresh];
}
Please have a look at the following NavigationSDK methods to configure the Autozoom:
| Config method | Description |
|---|---|
| [setAutoZoomSpeedScales] | Set the auto zoom scales for the given speeds for tracking and navigation mode |
| [setAutoZoomScaleMargins] | Set the auto zoom scale margins in 2d and 3d |
| [setAutoZoomSteppingValues] | Set the auto zoom linear approximation stepping values |
As you can see in the code above, we also added calls to [NSDK_UIMapView setOrientation:] and [NSDK_UIMapView setFixPoint:] for setting the map orientation in driving direction and display the current car position not in the middle of the map, but in the lower third.
Tunnel extrapolation
When driving through a tunnel, we normally have no valid GPS position. Our navigation software therefore stops at the tunnel entry and will go on when leaving the tunnel. Most of the time, this behaviour is not wanted, we want to drive through the tunnel as in normal navigation and we also want updated navigation information in the tunnel.
To circumvent this situation, the SDK offers the method [NSDK_Navigation checkIfTunnel:]. It has to be called right after getting navigation information and checks if we entered or leaved a tunnel. We set a member flag in our UIMapView class accordingly. Now, we know if we are in a tunnel or not, but we still haven't a valid GPS signal and the navigation will not continue in the tunnel.
[NSDK_Navigation checkIfTunnel:] also has a solution for this problem. It not only checks if we enter a tunnel, it also starts a position extrapolator, which emulates a GPS signal in the tunnel. We can get the extrapolated data by calling [NSDK_GPSData getExtraPolatedPos:], [NSDK_GPSData getExtraPolatedCourse:] and [NSDK_GPSData getExtraPolatedVelocity:].
To enable the extrapolating, we have to revise the 'onGPS' and 'onNavigation' methods in the UIMapView class:
@interface UIMapView ()
@property UIImageView * customCCPImageView;
@property BOOL isTunnel;
@end

@implementation UIMapView
...
- (void)onGPS:(NSDK_GPSData *)nsdk_gpsdata {
    if (!_isTunnel){
        [self setMapMarkerWithCenter:[nsdk_gpsdata getGPSPositionMerc] orientation:[nsdk_gpsdata getCourse] northernAdjust:NO style:MapMarkerStyleDirected];
        [self setCenterWithPosition:[nsdk_gpsdata getGPSPositionMerc]];
        [self refresh];
    }
}


- (void)onNavigation:(NSDK_NavigationInformation *)nsdk_navigationInformation gpsData:(NSDK_GPSData *)nsdk_gpsdata {
    NSError * error;
    [self doAutoZoom:nsdk_navigationInformation gpsData:nsdk_gpsdata doSmoothZoom:YES error:&error];

    _isTunnel = [NSDK_Navigation checkIfTunnel:(NSDK_NavigationInformation*) nsdk_navigationInformation gpsData: nsdk_gpsdata error:&error];
    if (_isTunnel) {
        [self setMapMarkerWithCenter:[nsdk_gpsdata getExtraPolatedPos] orientation:[nsdk_gpsdata getExtraPolatedCourse] northernAdjust:NO style:MapMarkerStyleDirected];
        [self setCenterWithPosition:[nsdk_gpsdata getExtraPolatedPos]];
        [self setOrientation:270 + [nsdk_gpsdata getExtraPolatedCourse]];
        [self setGrayMode:YES error:&error];
    } else {
        [self setGrayMode:NO error:&error];
        [self setOrientation:270 + [nsdk_gpsdata getCourse]];
    }

    [self refresh];
}
Tracking Mode
Now we can navigate, but how to stop and reset the navigation? For this, the SDK offers the function [NSDK_Navigation trackingMode:] It w ill reset the navigation and remove the route trace from the map. We switch to tracking mode by revising our stopNavigation method in the NavigationLoop and add a call to [NSDK_Navigation trackingMode:]:
@implementation NavigationLoop
...
-(void) stopNavigation {
    _isNavigation = NO;
    NSError * error;
    [NSDK_Navigation trackingMode:YES error:&error];
    for (id navigationControl in _navigationControls) {
        [navigationControl onNavigationStopped];
    }
}